
User's Manual

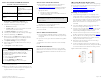
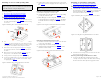


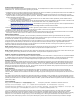


Table Of Contents
- Before You Begin
- Package Contents
- Step 1: Collect Tools and Setup Requirements
- Step 2: Connect the AP to Your Computer
- Step 3: Prepare Your Computer for AP Setup
- Step 4: Log Into the AP
- Step 5: Customize the Wireless Settings
- Step 6: Place the AP in Your Site
- Step 7: Verify the Installation
- For More Information
- (Optional) Mounting Instructions

Copyright © 2014 Ruckus Wireless, Inc. Page 3 of 4
Published July 2014, Part Number 800-70564-001 Rev A
Mounting on a Recessed Drop-Ceiling T-Bar
The enclosed T-bar bracket supports mounting to recessed
drop ceiling T-bars.
• Mounting an AP using the External Bracket
• Removing an External Bracket from a T-Bar
• Removing an External Bracket from an AP
Mounting an AP using the External Bracket
1 Insert the unit removal pin (A in Figure 4
) into the hole on
the side of the R500 (B in Figure 4
) to release the locking
mechanism.
Figure 4. Attaching the external bracket to the AP
2 Position the studs on the bottom of the T-bar bracket (C
in Figure 4
) in the mounting holes on the R500 enclosure,
and then slide the T-bar bracket until the studs are in the
narrow parts of the R500 mounting keyholes (arrow).
3 Remove the unit removal pin (A in Figure 4
) to engage
the locking mechanism and secure the T-bar bracket to
the R500.
4 Make sure that the locking tab (D in Figure 4
) is in the
first position on the T-bar bracket (C in Figure 4
).
5 Gently push the ceiling tiles up and out of the way.
6 Position the T-bar bracket so its two clasps grip one edge
of the T-bar (A in Figure 5
). Make sure that both clasps
are gripping the T-bar.
Figure 5. Attaching the external bracket to the T-bar
7 Hold the R500 in place and gently push the locking tab
(B in Figure 5
) until its clasp grips the other edge of the T-
bar.
Removing an External Bracket from a T-Bar
1
Move the ceiling tiles out of the way.
2 Gently lift up the locking tab (A in Figure 6) by sliding
your fingers under the tab.
3 While lifting up on the locking tab, rotate the R500-
and-T-bar bracket assembly (B in
Figure 6). The R500-
and-T-bar bracket assembly comes away from the T-
bar.
Figure 6. Removing the external bracket from the T-bar
Removing an External Bracket from an AP
1
Insert the unit removal pin (A in Figure 7) into the hole
on the side of the R500.
2 Gently lift up the retainer tab (B in Figure 7).
3 Gently push the T-bar bracket (C in Figure 7) until it
detaches from the R500.
Figure 7. Removing the external bracket from an AP
Mounting on a Flush Drop-Ceiling T-Bar
• Mounting an AP using the Integrated Bracket
• Removing an AP Integrated Bracket from a T-Bar
Mounting an AP using the Integrated Bracket
1
Orient the AP so that the T-bar is positioned between
the T-bar clips as shown in Figure 8, then rotate the AP
until the third T-bar clip catches the T-bar and the
latch locks the T-bar in place (
Figure 9).
Figure 8. Attaching the integrated bracket to the T-bar
Figure 9. Locking the integrated bracket to the T-bar
2 Insert the Torx security screw into the hole near the
latch to lock the AP in place.
Removing an AP Integrated Bracket from a T-Bar
1
To remove the AP from a T-bar, first remove the
security screw, then depress the latch while rotating
the AP so that the T-bar clips disengage the T-bar.
Note: This mounting bracket can also be used on a flush
drop-ceiling T-bar, so the four rubber feet on the bottom
of the AP minimize ceiling tile displacement.
A
B
C
D
A
B
CAUTION: Make sure that all three clasps are gripping the T-
bar!
A
B
C
B
A