
User guide


Table Of Contents
- Contents
- About This Guide
- Introducing the ZoneFlex Access Point
- Overview of the ZoneFlex Access Point
- Unpacking the ZoneFlex Access Point
- Getting to Know the Access Point Features
- Installing the Access Point
- Before You Begin
- Step 1: Preconfigure the Access Point
- Configuring for Management by ZoneDirector
- Configuring for Standalone Operation or for Management by FlexMaster
- What You Will Need
- 1. Prepare the Administrative Computer
- 2. Connect the Access Point to the Administrative Computer
- 3. Log Into the Access Point’s Web Interface
- 4. Configure the Wireless Settings
- 5. Disconnect the Access Point from the Administrative Computer
- 6. Restore the Administrative Computer’s Network Settings
- Step 2: Verify Access Point Operation
- Step 3: Deploy the Access Point
- Troubleshooting Installation
- Navigating the Web Interface
- Configuring the Access Point
- Managing the Access Point
- Viewing Current Device Settings
- Viewing Current Internet Connection Settings
- Viewing Current Local Subnet Settings
- Viewing Current Wireless Settings
- Viewing Associated Wireless Clients
- Changing the Administrative Login Settings
- Enabling Other Management Access Options
- Working with Event Logs and Syslog Servers
- Upgrading the Firmware
- Rebooting the Access Point
- Resetting the Access Point to Factory Defaults
- Running Diagnostics
- Where to Find More Information
- Numerics
- A
- B
- C
- D
- E
- F
- G
- H
- I
- K
- L
- M
- N
- O
- P
- R
- S
- T
- U
- V
- W
- Z
- Index
37
Installing the Access Point
Step 1: Preconfigure the Access Point
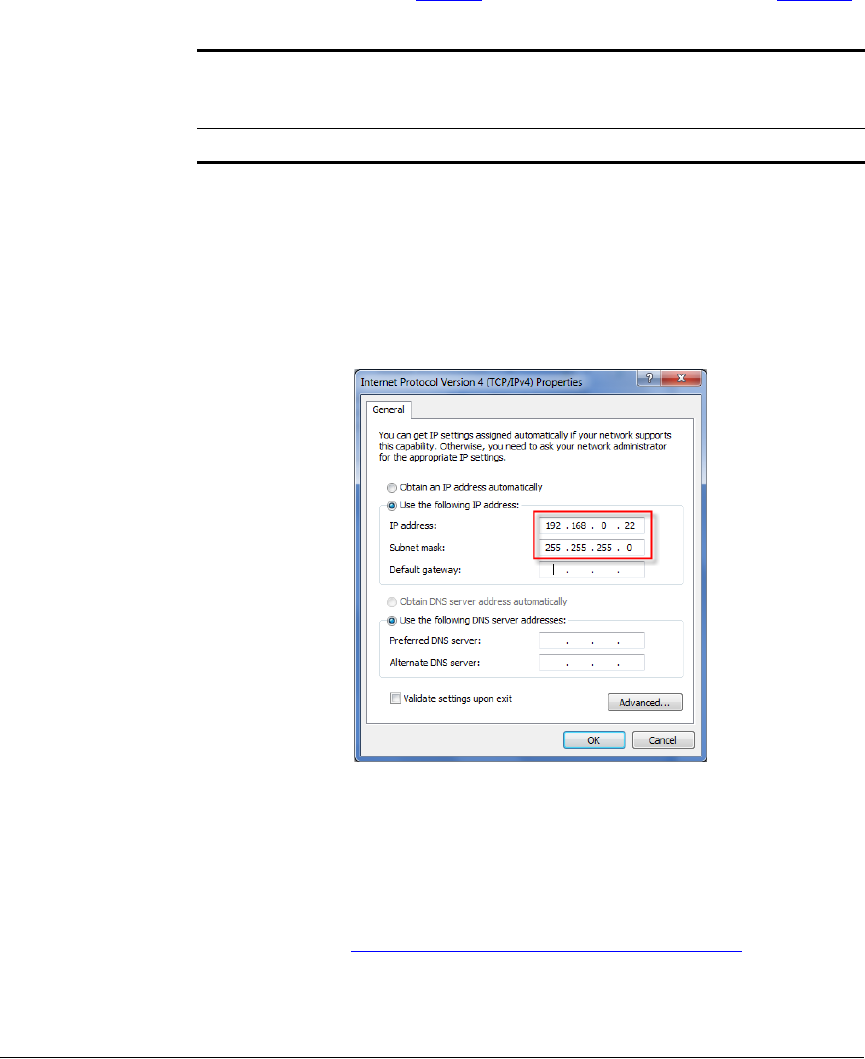
5. Click Use the following IP address, and then configure the IP address settings
with the values listed in Table 18
. For a sample configuration, refer to Figure 21.
You can leave the Default Gateway and DNS server fields blank.
6. Click OK to save your changes and close the TCP/IP Properties dialog box.
7. Click OK again to close the Local Area Connection Properties dialog box.
Windows saves the IP address settings that you have configured.
Figure 21. Sample configuration in the Internet Protocol (TCP/IP) Properties
dialog box
2. Connect the Access Point to the Administrative
Computer
1. Connect one end of an Ethernet cable to an Ethernet port on the Access Point,
and then connect the other end to the administrative computer’s Ethernet port.
2. Provide power to the AP using either an AC adapter or a PoE injector or switch,
as described in “
1. Connect the Access Point to a Power Source” above.
Table 18. Configure your computer’s IP address settings
IP address 192.168.0.22 (or any address in the 192.168.0.x
network—with the exception of 192.168.0.1, which
is the default IP address assigned to the Access Point)
Subnet mask 255.255.255.0