S BLUED & STAINLESS STEEL INSTRUCTION MANUAL FOR CALIBERS .204 Ruger, .223, .22-250, .243, .257 Roberts, .25-06, .270 Win., .280 Rem., 7mm-08, 7mm Rem. Mag., .308, .30-06, .300 Win. Mag., .338 Federal, .338 Win. Mag., .358 Winchester, .375 Ruger RUGER ® M77® HAWKEYE® BOLT ACTION RIFLES M77 Hawkeye READ THE INSTRUCTIONS AND WARNINGS IN THIS MANUAL CAREFULLY BEFORE USING THIS FIREARM For Product Service on This Model Please Call: (603) 865-2442 (See p. 28) STURM, RUGER & Company, Inc.
State-By-State Warnings Certain states require by law that their own specified warning notices in larger-than-normal type be conspicuously included by the manufacturer, distributor, or retail dealer with firearms sold in that state. Sturm, Ruger sells its products in compliance with applicable laws and regulations. Because our products may be sold in these states, we include the following: California: WARNING ADVERTENCIA “A los niños los atraen las armas de fuego y las pueden hacer funcionar.
Maine: “ENDANGERING THE WELFARE OF A CHILD IS A CRIME. IF YOU LEAVE A FIREARM AND AMMUNITION WITHIN EASY ACCESS OF A CHILD, YOU MAY BE SUBJECT TO FINE, IMPRISONMENT OR BOTH. KEEP FIREARMS AND AMMUNITION SEPARATE. KEEP FIREARMS AND AMMUNITION LOCKED UP. USE TRIGGER LOCKS.” Maryland: “WARNING: Children can operate firearms which may cause death or serious injury.
New Jersey: “IT IS A CRIMINAL OFFENSE TO LEAVE A LOADED FIREARM WITHIN EASY ACCESS OF A MINOR.” New York City: “THE USE OF A LOCKING DEVICE OR SAFETY LOCK IS ONLY ONE ASPECT OF RESPONSIBLE FIREARMS STORAGE. FOR INCREASED SAFETY, FIREARMS SHOULD BE STORED UNLOADED AND LOCKED IN A LOCATION THAT IS BOTH SEPARATE FROM THEIR AMMUNITION AND INACCESSIBLE TO CHILDREN AND OTHER UNAUTHORIZED PERSONS.
LOCKING DEVICE INSTALLATION INSTRUCTIONS WARNING — USE OF LOCKING DEVICES • Always keep your firearm pointed in a safe direction, including when you are installing or removing your locking device. • Always verify that your firearm is completely unloaded before installing your locking device. • Do not install locking devices in the trigger guard; always keep your fingers, clamp and locking device outside the trigger guard during device installation and removal.
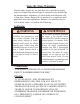
4. Release the floorplate latch and allow the floorplate to hang open. 5. Apply the lock directly to your M77 Hawkeye rifle as shown below. 6. Close the lock by pressing the shackle into the body of the lock (the part that receives the key) as tightly together as possible. The lock has bumpers and the shackle is coated with a non-marring material that will not harm the metal finish of your firearm; be careful not to dent or scratch the wooden stock. 7. Once the lock is securely closed, remove the key.
FIREARMS SAFETY-YOUR RESPONSIBILITY SAFETY MUST BE THE FIRST AND CONSTANT CONSIDERATION OF EVERY PERSON WHO HANDLES FIREARMS AND AMMUNITION. This Instruction Manual is designed to assist you in learning how to use and care for your RUGER® M77® Hawkeye® rifle properly. Only when you are certain you fully understand the Manual and can properly carry out its instructions should you practice loading, etc. with live ammunition.
WARNINGS OF GREAT IMPORTANCE ARE FOUND ON THE FOLLOWING PAGES: Locking Devices Alterations Manual Safety Lead Exposure Ammunition Loading Handling Firing 6 9 12 12 13 13 14 15 Unloading Malfunctions Disassembly Lubrication Storage Scope Mounting Shipping Parts Purchasers 16 17 18 23 24 27 28 29 OTHER CAUTIONS AND WARNINGS APPEAR THROUGHOUT THE MANUAL. FIREARMS ARE DANGEROUS WEAPONS — READ THE INSTRUCTIONS AND WARNINGS IN THIS MANUAL THOROUGHLY AND CAREFULLY BEFORE USING.
All mechanical components are made of heat-treated chrome-molybdenum or stainless steel with music wire coil springs throughout the mechanism (except the magazine spring). The rifle is available in short and standard action. The RUGER® M77® Hawkeye® “African” Model is chambered in the new .375 Ruger cartridge and features a blue matte finish, American black walnut stock, and red recoil pad. The RUGER® M77® Hawkeye® “Alaskan” Model is designed to handle the harshest conditions. Chambered for the new .
The safety selector can be moved from the “Fire” position to its two other positions (“Load-Unload” and “Safe”) only when the firing pin is cocked. Fully raising the bolt handle cocks the firing pin. The bolt handle can be raised and lowered only when the safety selector is in either the “Fire” or the “Load-Unload” position.
WARNING —MANUAL SAFETY 3 FIRE 2 LOADUNLOAD Keep the safety on unless actually firing. Always move the safety fully to its intended position and check it. The safety has three positions –“SAFE,” “LOAD-UNLOAD,” and “FIRE.” Never depend on a safety mechanism or any other mechanical device to justify careless handling or permitting the rifle to point in an unsafe direction. The only “safe” rifle is one in which the bolt is open and the chamber and magazine are empty.
WARNING —AMMUNITION Death, serious injury, and damage can result from the use of wrong ammunition, bore obstructions, powder overloads, or incorrect cartridge components. Even the strongest gun can be blown up by excess pressure. Only use correct ammunition loaded to U.S. Industry Standards. Always wear shooting glasses and hearing protectors.
Loading the magazine: (Safety should be in “Load-Unload” position.) With the bolt open, and the floorplate in its closed and latched position, load cartridges of the correct caliber directly into the magazine from the top by pressing one cartridge at a time into the magazine. Loading the chamber: (Safety should be in “Load-Unload” position.) Do not chamber a cartridge until you are ready to shoot immediately. After loading the magazine, push the bolt handle forward.
To fire the rifle: When a cartridge is chambered and the rifle is pointed in a safe direction, put the safety in the “Fire” position. Pulling (squeezing) the trigger will discharge the cartridge. Always be certain that you know where the bullet will strike when you fire the rifle. Never allow the thumb to touch the cocking piece when firing as it can be pinched when the cocking piece moves forward to fire the rifle.
CORRECT UNLOADING SEQUENCE SAFETY IN "LOAD-UNLOAD" POSITION 2 1 3 4 WARNING — UNLOADING Removing cartridges from the magazine does not prevent the rifle from being fired! When there is a cartridge in the chamber and the safety selector is in the “Fire” position, the cartridge will discharge if the trigger is pulled. It is absolutely essential for the user to know how to completely unload it. “Completely” means emptying the magazine and removing a chambered cartridge.
–When attempting to extract a cartridge that is “stuck” in the chamber do not use any type of tool that is likely to act as a “firing pin” and discharge the cartridge should the tool impact on the primer. –After clearing a jam, inspect the gun mechanism to determine if dirt might be the cause of the problem. Excess lubricant or grease can cause cartridges to feed sluggishly or fail to extract.
TO MINIMIZE MALFUNCTIONS ( JAMS ) Firearms of all makes and types are susceptible to occasional malfunctioning due to a cartridge not feeding from the magazine to the chamber, or due to a cartridge or fired case not being extracted and ejected. To minimize the possibility of such occurrences the gun user should: –Use ammunition of the correct caliber and type which is loaded to U.S. Industry Specifications. Do not use cartridges that are deformed or cartridges that have been reloaded.
Before attempting to disassemble the rifle for the first time, study the parts drawing and parts list so as to be familiar with the relative position, appearance and name of each part. Carry out the disassembly slowly and carefully note the position of the part in the gun before starting to remove it. If a part is under spring tension (such as, the Safety Selector, Bolt Stop, Trigger) remove it cautiously and anticipate the direction the spring and plunger are most likely to “jump.
7. To remove the sear: a. Press out the sear pivot pin. b. Turn receiver upside down and slide sear forward. Sear will drop out of the top slot in the receiver. 8. To remove safety assembly: a. Rotate the safety selector so that the upper section is positioned fully over the center of the receiver tang. b. While holding the safety selector in place with thumb and forefinger, slide the retainer up out of receiver.
5. To reassemble firing pin assembly into bolt: Screw the assembly fully into the bolt. The assembly is properly positioned in the bolt when the flat on the bottom right side of the bolt sleeve (front of bolt facing you) is aligned with the flat on the bottom end of the bolt handle. Note: There is a shallow notch on the rear end of the bolt body – at the end of the cam cut – into which the nose of the cocking piece ‘fits.
CARE AND CLEANING WARNING: BEFORE CLEANING, BE CERTAIN THE RIFLE AND ITS MAGAZINE CONTAIN NO CARTRIDGES. A firearm must be free of rust, dirt, grease and firing residues to function safely and reliably. Periodic maintenance, which includes inspection of components to determine if they are in proper working order, is absolutely essential. Firing deposits particles of bullet lubricant and powder in the bore, chamber, bolt, receiver, magazine and other parts of the rifle.
6. If the rifle is to be stored for an extended period, clean the rifle thoroughly. Disassemble to the extent described elsewhere in this manual, taking care to put pins and similar easily mislaid and “rolling” components in a tray. Rewipe all surfaces with preservative oil. Reassemble and store properly. WARNING —LUBRICATION IL O Firing a rifle with oil, grease, or any other material even partially obstructing the bore may result in damage to the rifle and serious injury to the shooter and those nearby.
While the rifle is less likely to be used by unauthorized persons when disassembled in the above manner, it is always safest to store a firearm with the supplied locking device correctly installed, or to store the firearm in a gun safe or other secure location, away from children and unauthorized adults. Guns should always be stored securely, unloaded and separate from their ammunition. WARNING —STORAGE Never place or store any firearm in such a manner that it may be dislodged.
MAINTENANCE OF STAINLESS STEEL RIFLES Firearms and components made of stainless steel are relatively more resistant to corrosion than those of blued steel. However, in the interest of proper operation and long life of a stainless steel firearm, inspect it frequently and clean, lubricate and apply an appropriate rust preventative. Sometimes discoloration occurs from perspiration or from contact with some types of gun cases.
SIGHT PICTURE AND ADJUSTMENT FOR ALASKAN AND AFRICAN MODELS ONLY Both the Ruger “Alaskan” and “African” bolt action rifles are equipped with a fixed elevation rear sight set for approximately 50 yards. Lateral (windage) adjustment is made by loosening the rear sight blade lock screw (located in front of the rear sight blade) and carefully moving the blade in the direction you wish to move the bullet's point of impact. Tighten the screw securely before shooting the rifle.
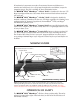
SPECIAL INSTRUCTIONS AND WARNING FOR THE M77¤ HAWKEYE¤ FRONTIER RIFLE ATTACHING WEAVER SCOPE BASE ADAPTER (for non-Ruger rings) 1. Remove the two barrel screws (Key Nos. 4 & 5) as shown in Figure 5a. (Do not remove the two remaining screws.) Figure 5a 2. Attach the sight base (Key No. 7) using the two screws removed in step 1, and the two screws (Key Nos. 7a & 7b) provided with the base as shown in Figure 5b. Be careful to locate the screws in the correct holes as shown in Figure 5b.
SERVICE AND PARTS POLICY If you have any question with regard to the performance of your RUGER® M77® Hawkeye® rifle please write or call (603-865-2442) our Product Service Department in Newport, New Hampshire 03773, fully describing all circumstances and conditions involved.
Work performed will bear a net minimum labor charge of $20.00 plus a $30.00 shipping and handling charge. The charge for rebluing the RUGER® M77® Hawkeye® rifle is $50.00 plus a $30.00 shipping and handling charge. Custom gunsmithing service for nonstandard alterations are NOT AVAILABLE from Ruger Product Service Departments. WARNING —PARTS PURCHASERS It is the purchaser’s responsibility to be absolutely certain that any parts ordered from the factory are correctly fitted and installed.
RUGER® M77® HAWKEYE® RIFLE PARTS LIST Design, prices and specifications subject to change without notice. SPECIFY MODEL AND CALIBER WHEN ORDERING (See Exploded Views on Pages 36 & 37) NOTE: Component parts for the “Alaskan” and “African” Models are NOT ILLUSTRATED.
* 31 Part Name Cocking Piece, Not Illustrated - Blued Cocking Piece, Not Illustrated - Stainless Cocking Piece, Not Illustrated Ejector Ejector Spring Extractor Extractor Band Extractor Band Firing Pin Assembly Firing Pin Cross Pin Firing Pin Spring Floor Plate Assembly - Satin Finish, Long Action Floor Plate Assembly Floor Plate Hinge - Blued Models Floor Plate Hinge - Stainless Models Floor Plate Hinge Floor Plate Latch - Blued Models Floor Plate Latch - Stainless Models Floor Plate Latch Floor Plate Pi
32 Part Name Part No.
33 * * * * Part Name Rear Mounting Screw Rear Sight Base Rear Sight Base Rear Sight Base Screw Rear Sight Base Screw Rear Sight Blade Rear Sight Clamp Screw Rear Sight Clamp Screw Rear Sight Williams Gib Lock Clamp Rear Sight Williams Gib Lock Clamp Rear Sling Swivel Stud Recoil Pad Recoil Pad (Not Illustrated) Recoil Pad Screw, 2 Req’d Recoil Pad Screw, 2 Req’d Safety Selector - Blued Models Safety Selector - Stainless Models Safety Selector Safety Selector Detent Safety Selector Detent Spring Safety Sele
* * * 34 * Part Name Safety Selector Retainer - Stainless Models Safety Selector Retainer Scope Base Clamp Scope Base Clamp Scope Base Nut Scope Base Nut Scope Base Torx® Head Screw, 8 Req’d Scope Base Torx® Head Screw, 8 Req’d Scope Rings, Medium rings, Accomodates 42mm Lens Scope Rings, Medium rings, Accomodates 42mm Lens Sear Sear Pivot Pin Stock Torx® Key Wrench, Not Illustrated (for scope base Torx® Head Screw) Trigger Trigger Guard Assembly Trigger Guard Assembly Part No.
Part Name Trigger Guard Assembly Trigger Pivot Pin Trigger/Sear Spring * PARTS SO MARKED MUST BE FITTED Part No.
RUGER® M77® HAWKEYE® RIFLE EXPLODED VIEW 36
RUGER® M77® HAWKEYE® FRONTIER RIFLE COMPONENT PARTS LIST (See Exploded View on Page 36 for Other Parts) Key No. 1 2 3 4 5 6 7 7a 7b Part Name Barrel Rib Dowel, Front Barrel Rib Dowel, Rear Barrel Rib Barrel Rib Screws, 2 Req’d Barrel Rib Center Screws, 2 Req’d Scope Rings, Low, Sold as Pair Scope Base Adapter (Includes Key Nos. 7a & 7b) Scope Base Screw, Front Scope Base Screw, Rear 37 Part No.
THE BASIC RULES OF SAFE FIREARMS HANDLING We believe that Americans have a right to purchase and use firearms for lawful purposes. The private ownership of firearms in America is traditional, but that ownership imposes the responsibility on the gun owner to use his firearms in a way which will ensure his own safety and that of others. When firearms are used in a safe and responsible manner, they are a great source of pleasure and satisfaction, and represent a fundamental part of our personal liberty.
A safe direction must take into account the fact that a bullet may penetrate a wall, ceiling, floor, window, etc., and strike a person or damage property. Make it a habit to know exactly where the muzzle of your gun is pointing whenever you handle it, and be sure that you are always in control of the direction in which the muzzle is pointing, even if you fall or stumble. Keep your finger off the trigger until you are ready to shoot. 3. FIREARMS SHOULD BE UNLOADED WHEN NOT IN USE.
5. BE SURE OF YOUR TARGET BEFORE YOU SHOOT. Don’t shoot unless you know exactly where your bullet is going to strike. Be sure of the bullet stop behind your target, even when dry-firing with an unloaded gun. If you are in the field hunting, do not fire at a movement or noise. Take the time to be absolutely certain of your target before you pull the trigger. 6. WEAR SHOOTING GLASSES AND HEARING PROTECTORS WHEN YOU SHOOT.
8. DON T SHOOT AT A HARD SURFACE, OR AT WATER. Bullets can glance off many surfaces like rocks or the surface of water and travel in unpredictable directions with considerable velocity. 9. NEVER TRANSPORT A LOADED FIREARM. Firearms should always be unloaded before being placed in a vehicle. A suitable carrying case or scabbard should be used to carry an unloaded firearm to and from the shooting area. 10. AVOID ALCOHOLIC BEVERAGES WHEN SHOOTING. Don’t drink until the day’s shooting is over.
A BRIEF ACCOUNT OF AN EXTRAORDINARY ACHIEVEMENT: RUGER FIREARMS Sturm, Ruger & Company, Inc., had its beginning in a small machine shop occupying a rented frame building in Southport, Connecticut. In January, 1949, with an initial investment of only $50,000 and an idea, William B. Ruger and Alexander M.
WHY NO WARRANTY CARD HAS BEEN PACKED WITH THIS NEW RUGER FIREARM The Magnuson-Moss Act (Public Law 93-637) does not require any seller or manufacturer of a consumer product to give a written warranty. It does provide that if a written warranty is given, it must be designated as “limited” or as “full” and sets minimum standards for a “full” warranty. Sturm, Ruger & Company, Inc.