Drop Proof Dust Proof Sunlight Readable Water Proof Rugged Tablet PC SR820 Manual AN ISO / TS 16949/ 9001/ 13485 / 14001 / OHSAS 18001 CERTIFIED GROUP Since 1975 Ba ttery LED Backlight Copyright 2010. SAMWELL GROUP. Portable IP65 MIL 6 hours + 8.9 - WSV GA Ver 1.
Index Copyright Notice……………………………………………………………………iv Declaration of Conformity…………………………………………………………iv Important Safety Instructions………………………………………………………v Disposing of Your Old Product…………………………………………………….vi Chapter 1 Introduction Getting Started............................................................................................................2 Safety and Maintenance…………………………………………………………….3 Check Lists..................................................................................................
Chapter 2 Getting Start Hardware and Software...........................................................................................16 Hot Keys....................................................................................................................22 Storage......................................................................................................................23 The SD Card Slot……………………………………………………………….….24 SIM Card Slot……………………………………………………………………...
Appendix Statements.................................................................................................................53 Safety Caution ..........................................................................................................54 Important Safety Instructions……………………………………………………..54 Canadian Department of Communications............................................................55 Caution For Adatper................................................................................
Copyright Notice All Rights Reserved. The information in this document is subject to change without prior notice in order to improve the reliability, design and function. It does not represent a commitment on the part of the manufacturer. Under no circumstances will the manufacturer be liable for any direct, indirect, special, incidental, or consequential damages arising from the use or inability to use the product or documentation, even if advised of the possibility of such damages.
Important Safety Instructions Read these safety instructions carefully 1. Place this equipment on a reliable surface when installing. Dropping it or letting it fall may cause damage 2. For pluggable equipment, the socket outlet should be near the equipment and should be easily accessible. 3. Keep this equipment away from humidity. 4. Disconnect this equipment from the A/C outlet before cleaning it. Use a dry cloth. Do not use liquid or sprayed detergent for cleaning. 5.
THE OPERATING TEMPERATURE IS BETWEEN 0° C TO 60° C. AND THE STORAGE TEMPERATURE IS BELOW -20° C OR ABOVE 85° C. THIS MAY DAMAGE THE EQUIPMENT. Disposing of Your Old Product Within the European Union EU-wide legislation, as implemented in each Member State, requires that waste electrical and electronic products carrying the mark (left) must be disposed of separately from normal household waste. This includes monitors and electrical accessories, such as signal cables or power cords.
Chapter 1 Introduction
Chapter1 - Introduction Getting Started Congratulations on your purchase of this Tablet PC. The Tablet PC is a fully functional Tablet PC with built-in LAN, and wireless connectivity. Therefore its’ capable to organize and access important business and personal information with excellent efficiency. In addition, you will be able to send and receive e-mail and access the Internet at anytime and anywhere. This Manual contains the information you need to set up and use your Tablet PC.
Safety and Maintenance You can use your Tablet PC under a wide range of environmental conditions. However, to ensure long use and continued high performance, consider the following factors when setting up your Tablet PC: • Follow all warnings and instructions noted in this documentation and in the Windows Help program.
Chapter1 - Introduction Check Lists After opening the package, carefully inspect the contents. If any of the items is missing or appear damaged, contact your dealer. The shipping carton should contain the following: • • SR820 x 1 Accessory BOX x 1, included: a. Battery x 1 b. Adapter x 1 c. Stylus Pen x 1 d. Service DVD x 1 e. Strap x 1 f. Screws x 2 (For strap use only) g. Power Cord x 1 h.
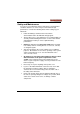
Features Software Support Windows® 7 Professional Edition • Microsoft® Internet Explorer • Microsoft® Outlook Express • Microsoft® Windows Media Player High Performance Processors ® Intel Atom Z530P 1.6GHz Processor, 512KB L2 Cache Overview SR820 is a versatile Tablet PC equipped with 8.9” TFT LCD, and adopts ® ® the latest Intel ATOM Z530P industrial grade processor with Intel US15WP SCH chipset.
Chapter1 - Introduction WWAN Function (Optional) You can use your own SIM card and also purchase our 3.5G module to setup your high-performance WWAN network. Please connect our sales for this optional function. GPS Function(Optional) You can purchase our GPS module to set your GPS function up. You can also purchase third-party GPS navigation program to arrange in a group to use. Please connect our sales for this optional function.
Where to Look for Information About Your Tablet PC This User’s Manual describes the key elements of your Tablet PC. New users can find a simple step-by-step orientation in the Quick Start section of this chapter. About Windows Help and Support are available at the Windows XP Tablet Edition Start menu, offers extensive Windows assistance. Welcome Center offers an online orientation for new Windows users.
Chapter1 - Introduction Quick Start Install and change battery at your Tablet PC ______________________________________ 1. Remove the screws on the battery cover at bottom side of your Tablet PC and open the battery cover. 2. Remove the water-proof rubber on top of battery pack.
3. Insert the battery pack into the Tablet PC and check the connector location is correct 4. Put the water-proof rubber back to the cannelure after Insert the battery pack. Attention: Please check the fool-proof check point like picture. 5. Put the battery cover back and lock the screws to the battery cover. Turn on the Tablet PC for the first time 1. Connect the AC adapter to SR820 2. Connect the AC adapter power cord to the AC adapter. 3. Connect the AC adapter power cord to an AC outlet. 4.
Chapter1 - Introduction Load Windows (Bundle OS model only) The following section is for installing the Windows operating system only. If you are installing a different operating system, please check with your vendor for installation details. Keying Product ID At the first time you starting the tablet PC, you may choose your Language options by selecting the dropdowns 'Language to install', 'Time and Currency format' and 'Keyboard here.
Product Key Set up After running and loading Windows 7, please set up your Windows 7 by introducing your Windows product key. To verify your product key, look for the product key sticker on your computer or inside the Windows package Your Tablet PC will begin loading Windows once you turn on the power. Wait a few seconds for Windows setup to load. The Windows setup will prompt you for the product key number, shown to the right: Note: The product key is on a sticker attached to the bottom of the Tablet PC.
Chapter1 - Introduction 1. Type your name, and, if applicable, the name of your company. 2. Read the End User's License Agreement. Click Next to accept it. 3. Enter the product key number. You can find this on the Certificate of Authenticity on a sticker attached to the Tablet PC. Click Finish. 4. The Start Wizard will prompt you to set the date, and your local time. After the Start Wizard updates your system settings, the Welcome to Windows screen will appear.
Adjusting the Brightness Use the Hot keys on front panel to adjust the LCD panel brightness: • : increases the brightness • : decreases the brightness Disconnecting from the desktop Follow these steps to disconnect your computer from external accessories: 1. Save any open files. 2. Remove any media, floppy disks or compact disks from the drive(s). 3. Shut down the computer. 4. Close the display cover. 5. Disconnect the cord from the AC adapter. 6.
Chapter1 - Introduction Turn off Your Tablet PC Turning off the Tablet PC properly is important to maintaining your Tablet PC. 1. Click the Windows start button. 2. Choose Shut down option and turnoff the Tablet PC by click on ‘Switch user’. Warning: Shutting off the Tablet PC improperly may result in data loss.
Chapter 2 Getting Started
Chapter 2 —Getting Started Hardware and Software This chapter introduces the different components and controls of your Tablet PC, including the hardware components, the software, and the audio and video systems. Getting Started Before you begin using your Tablet PC, read this chapter to familiarize yourself with the main components installed in the system.
1. DC Power Jack Connect the Adapter connector to DC Power Jack. 2. RJ-45 LAN port With the built-in Ethernet LAN combo, you can make LAN connections without installing PC cards. Connection speed is 10/100/1000 Mbps. When using the LAN function, wrap your LAN cable around the EMI ferrite suppression box to inhibit electromagnetic interference. 3. Microphone Jack There can connect your own microphone to record your voice or using an IM program which support voice transfer. 4.
Chapter 2 —Getting Started ※ Please see the Hotkey Table section at Page 22 18
15. RS232 Port The RS232 port can transmit data using the DB9 cable, and send and receive faxes at 14.4 Kbps. In some countries, local regulations may not permit the use of the fax/modem designed for this system. 15. Barcode Scanner (Optional) There is a Barcode Scanner function for your second choice, the detail information please see Chapter 5 16. USB port Please see Item #5 17. VGA Port VGA output can connect to another monitor, display, or projector…etc.
Chapter 2 —Getting Started 18. Battery Bay Install Battery into the Battery Bay 19. Camera Please see the camera item at Chapter 5 page 49 20. Stylus Bay Put your stylus at Stylus Bay. 21. Heat Flow Hole There has a heat sink inside 22. WWAN You can install a WWAN module to setup WWAN network with your SIM card. 23. Speaker Hole There has a speaker inside.
LED Status Indicators The LED Status Indicators show which power source the system is using. They also show battery status and low battery power alerts.
Chapter 2 —Getting Started Hot Keys The hot keys are unique features of your Tablet PC.
Stylus You can use the stylus to replace a mouse when using SR820. Store the stylus in the stylus bay when it not in use. Storage a. Solid State Disk(SSD) The SSD disk provides high performances even after violent shake, high temperatures. Windows and most programs are stored here. It may be your other choice b. Hard Disk Drive(HDD) The hard disk provides 1.8” ultra slim storage and fast access. Windows and most programs are stored here.
Chapter 2 —Getting Started The SD Card Slot Your Tablet PC includes card slot which supports SD Card. Before you find out the SD card slot, you need remove battery pack first. Then you will see the SD card slot like below picture: Note: Please read the instructions included with individual PC cards.
SIM Card Slot This system has a SIM card slot supported. User can also purchase 3.75G WWAN module to setup your own WWAN network. Before you insert your SIM card into the SIM card slot, please remove battery pack first.
Chapter 3 Power Management
Power Management With Windows 7, the power consumption may be reduced through ‘Power plans’. This tool controls the interaction between hardware and system settings that manage how the computer uses energy, therefore the battery life and system performance can be balanced as well as enhanced. Checking the Battery Level You can check the remaining battery power in the Windows® battery status indicator located at the lower right-hand corner of the task tray.
Chapter 3 - Power Management Adjust the power plan As shown, power plan has been specified as Balanced, Power saver and performance, each has parameters those may be customized to fit individ circumstances as requirements of users. 1. Click the Battery Icon>More power options>Control Panel>System and Security>Power Options>Change Plan Settings. (System route may differ from your machine) 2. Adjusted the parameters to meet your requirement. 3. Press the ‘Save changes’ button to execute the adjustment.
Sleep power state Sleep is a new power state in Windows 7. This mode allows the computer to retain its workload in a minimum usage of energy as standby. While when user returns, the work can be easily resumed no matter where it stopped. Advantages of sleep state: - All the works, with information of programs those are currently in use will automatically be saved to the hard-disk.
Chapter 3 - Power Management Battery Charging When you use the AC adapter to connect your Tablet PC to a power outlet, the internal battery will automatically begin to recharge. While the battery is charging, the Battery Charge icon on the Indicator panel will be active. When the battery is fully charged, the Battery Charge icon will turn off. If your Tablet PC is turned off, a fully discharged battery will take about 2.5 hours recharge to 80%.
When to Replace the Battery Over time, the battery's capacity gradually decreases. We recommend to replace your battery when you notice that it begins to store significantly less charge. Changing the Battery Change the main battery pack as follows: 1.Unlock the screws on battery cover and remove the battery cover, and remove the water-proof rubber under battery pack 2.Slide battery latch to lift the cover, then insert battery into the compartment as illustrated.
Chapter 3 - Power Management Thermal Considerations The Tablet PC processor has been specially designed to consume few power and generates less heat. However, working in a hot environment, or working for long periods may raise the temperature. If the temperature continues to rise, processor activity will be reduced. You may notice a slight loss of performance when it happens.
Chapter 4 System Software
Chapter 4 - System Software System Software Software List Operating System Your hard drive already contains all the software that you need to operate the Tablet PC. Drivers These utility programs and drivers contain the PC Card drive, the sound system, and the graphics sub-system. System Recovery Before you start • If you reinstall your operating system, all of the data originally on the hard disk will be overwritten. Before reinstalling the operating system, carefully backup any important data.
1. Connect an external USB DVD-ROM to your SR820 machine. 2. Put the service DVD into the USB DVD-ROM and turn-off system. 3. Press power button to turn on the system, then press “Del” key to enter BIOS setup menu. 4. Move to Advanced BIOS Features setup menu and set USB DVDROM to priority 1st, HDD to priority 2nd, then put recovery DVD into DVD-ROM. Then save and exit BIOS setup menu to reboot system.
Chapter 4 - System Software 5. When system reboot via USB DVD-ROM and see the message like below picture, you can: a. If you do not want to recover your OS, please take off the service DVD first, and then type “N” and press “Enter” key to reboot system. System will be rebooting. b. If you want to execute recovery OS, please type “Y” and press “enter” key, but data on the current partition will be deleted.
6.
Chapter 4 - System Software 7. 8. If you choose “1” to run recovery system, please wait for program running. After seeing below message “Press any key to reboot system”, you can remove service DVD from DVD-ROM/RW and press any key to reboot system If you choose “2” to run recovery system, your system will be re-partition as below picture.
9. When recover process successfully, the system will show below picture. After seeing below message “Press any key to reboot system”, you can remove the service DVD from DVD-ROM and press any key to reboot system.
Chapter 5 Utilities and Communication Devices
Utilities Utility List Your hard drive already contains all the third-party communication devices’ utility you can use on the Tablet PC. Bluetooth WLAN GPS Barcode Scanner Camera WWAN Caution: All of the utilities on SR820 Tablet PC have authorization to use, but only for your test, SAMWELL will not preside over any other third-party programs or software.
Chapter 5 - Utilities and Communication devices Bluetooth Your SR820 Tablet PC is equipped with a Bluetooth device. By using the Bluetooth function you can eliminates the need for cables to connect with other Bluetooth device. Features n Fully qualified Bluetooth v2.1 system n Enhanced Data Rate(EDR) compliant for both 2Mbps and 3Mbps supported n Fully speed operation with Piconet and Scatternet support n Implement 802.
Using Bluetooth After you turn on the Bluetooth function via press the Bluetooth button on front panel: 1. From Desktop: By double click “My Bluetooth Places” icon on the desktop. 2. From Taskbar: By double click “My Bluetooth Places” icon on the taskbar. 3. From Start Menu: By click “My Bluetooth Places” icon on “Start\ Programs\ My Bluetooth Places”. Functions 1. Add a Bluetooth Device 2. View My Bluetooth services 3. View devices in range 4.
Chapter 5 - Utilities and Communication devices WLAN SR820 Tablet PC is equipped with a WLAN module. By using the WLAN function you can eliminates the need for cables to connect to the network. Features n Compliant with the IEEE 802.11n standard and compatible with the IEEE 802.
WLAN Utility Microsoft provides a utility “Wireless Network Connection” that you can search for the available wireless networks and set up wireless network configuration. Using WLAN After turn on the WLAN function via Hotkey on the front panel: 1. From Taskbar: By double click “Wireless Network Connection” icon on the taskbar.
Chapter 5 - Utilities and Communication devices 2. From Start Menu: By double click “Wireless Network Connection” icon on “Start\ Settings\ Network Connections\ Wireless Network Connection”. Functions 1. Search for the available wireless networks 2. Connect with a wireless network 3. Set up a wireless network for a home or small office 4. Change the order of preferred networks 5.
GPS SR820 Tablet PC is equipped with a GPS module. You can install GPS navigation software to start navigating.
Chapter 5 - Utilities and Communication devices 1. TomTom n Web site :http://www.tomtom.com/ 2. Destinator n Web site :http://www.intrinsyc.
Barcode Scanner SR820 Tablet PC is equipped with a barcode scanner module. Features n Large working range n Small and light scan engine n 100 scans per second n Scanning speed delivers aggressive performance and accurate capture of all bar codes — even damaged and poorquality. n Low power consumption n Bright scan line and "Aim" mode n Programmable scan angle: Provides flexibility to costeffectively customize products for specific applications.
Chapter 5 - Utilities and Communication devices n Bookland EAN (Disable) n Code 128 (Enable) n Code 39 (Enable) n Code 93 (Disable) n Code 11 (Disable) n Interleaved 2 of 5 (Enable) n Discrete 2 of 5 (Disable) n Chinese 2 of 5 (Disable) n Codebar (Disable) n MSI (Disable) n RSS (Disable) Utility You can use “Scan Engine Demo” to scan barcode. Using barcode scanner 1. Executes “ScanEngineDemo.exe” on Windows XP Embedded desktop. 2.
Camera Module Your SR820 Tablet PC is equipped with a camera module. You can go to the webcamxp web site ‘ http://www.webcamxp.com/download.aspx" to download the camera utility to take picture and review. Of course you also can try to use another provider camera utility. Beside you can use the camera module as a web camera so you can use instance message software to talk and watch whom you are connecting to.
Appendix Statements
Statements Federal Communication Commission Interference Statement This equipment has been tested and found to comply with the limits for a Class B digital device, pursuant to Part 15 of the FCC Rules. These limits are designed to provide reasonable protection against harmful interference in a residential installation.
Appendix Statements interference received, including interference that may cause undesired operation. This device and its antenna(s) must not be co-located or operating in conjunction with any other antenna or transmitter. Federal Communication Commission (FCC) Radiation Exposure Statement This EUT is compliance with SAR for general population/uncontrolled exposure limits in ANSI/IEEE C95.
Canadian Department of Communications This class B digital apparatus meets all requirements of the Canadian Interference-causing Equipment Regulations. CAUTION FOR ADAPTER This tablet pc is for use with model adp-36ch BATTERY CAUTION Danger of explosion if battery is incorrectly replaced. Replace only with the same or equivalent type recommended by the manufacturer. Dispose of used batteries according to the manufacturer's instructions.
Appendix Statements WLAN “To prevent radio interference to the licensed service, this device is intended to be operated indoors and away from windows to provide maximum shielding. Equipment (or its transmit antenna) that is installed outdoors is subject to licensing.” For LPD “Operation is subject to the following two conditions: (1) this device may not cause interference, and (2) this device must accept any interference, including interference that may cause undesired operation of the device.
testing and approvals. The engines contain a full suite of host independent fault protection mechanisms and have been proven to stay Within classification during operation and single fault conditions as required by EN/IEC 60950.
Appendix Statements 60950-1 report to your laser/product safety test laboratory upon receipt of a standard NDA agreement signed by both the Lab and Symbol. Note that some specialty markets such as medical, military, or other specialty markets may have more specialized regulatory controls, and may require additional tests to be performed. * The Class 2 SE950 has one usage restriction: In order to maintain classification, the AIM mode input from the host cannot be active for more than 5 seconds at a time.