
Installation Guide


7 8
65
CONSTRUCTION INSTALLATION
CONSTRUCTION INSTALLATION
CONSTRUCTION INSTALLATION
WARRANTY
This product is warranted for 5 years from the date of purchase. If this
product does not perform to the specifications supplied on this package,
send an email to support@runbisonlighting.com for product return and
replacement. This replacement is the sole remedy available. Liability for
incidental or consequential damage is expressly excluded.
Fig.3
Make sure the POWER IS TURNED OFF when you are installing the product.
Fig.1
Fig.4
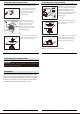
3000K
4000K
5000K
SELECTABLE
HIGH
MED
LOW
CCT
LUNEN
ADJUSTABLE
Fig.5
Fig.6
The junction box is fixed on the ceiling bracket.
For wet location installation, after fixture is installed on ceiling , put silicone glue to
seal the gap between fixture and ceiling.
1. Locate a suitable position to place
the super thin LED fixture and open a
hole in accordance to the cut-hole
dimensions(use the Hole Size
Template provided)
3. Fix the ceiling or other fixed parts of the
junction box and hook the safety cord to the
junction box or other place (Fig.3).
4. Use the color temperature toggle switch
to select your desired lamp color tempera-
ture-Warm white(3000K), Cool white
(4000K) or Daylight (5000K). Use the
lumen and wattage adjustable toggle switch
to adjust low(50%),medium(75%) or
high(100%) (Fig 4)
5. Squeeze the two housing clips so they
are in an upright position and insert lamp
into housing (Fig.5).
6. Once lamp is inside the housing, release
the housing clips and continue pushing
lamp into housing lamp into housing until
securely fixed and with ceiling (Fig.6).
2. Connect incoming AC mains
power to fixture input leads. Putthe
downlight conduit into the J-box
and wire to the power source.
(black to hot, white to neutral, violet
to 0-10V dimming positive, pinkto
0-10V dimming negative).