
Specifications
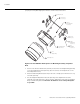


Installation
Runco RS-1100 Series Owner’s Operating Manual 41
PRE
L
IMINAR
Y
4. Attach the Anamorphic Lens (item #9) to the Lens Adapter Ring by threading it
clockwise.
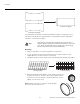
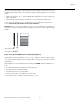
Adjusting the Lens Height (Y):
1. Project a white field on the screen.
2. Ensure that the Height/Y-Adjustment T-Screws and Pitch Adjustment T-Screws are
loose enough to allow vertical movement of the lens assembly.
3. Slowly move the anamorphic lens into place so that there are no shadows on the top
or bottom of the screen:
4. When the height is properly set, tighten the Height Adjustment T-Screws to secure
the lens in place.
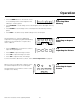
Adjusting the Pitch (Angle): Next, angle the lens to even out any top-to-bottom
pincushion distortion. To do this, loosen the Pitch Adjustment T-Screws on either side of
the lens to allow it to pivot freely. Then, adjust the anamorphic lens angle so that the
projected image is rectangular:
Too High
Too Low
Correct position