O W N E R ’S O P E R A T I N G M A N U A L CL-810 DLP™ Projector
Table of Contents Limited Warranty ............................................................................ 5 Safety Precautions ......................................................................... 8 Overview ......................................................................................... 9 Features .............................................................................................................. 9 Front/Top View .................................................................
Table of Contents (continued) Setup .................................................................................................................. 39 ISF Calibration ..................................................................................................... 44 Lamp Replacement ......................................................................... 47 Troubleshooting .............................................................................. 49 RS-232 Setup ...............................
TWO YEAR LIMITED WARRANTY For Projectors, Video Processors and Controllers Congratulations on your purchase of a Runco video product and welcome to the Runco family! We believe Runco produces “The World’s Finest Home Theater Products”. With proper installation, setup and care, you should enjoy many years of unparalleled video performance. This is a LIMITED WARRANTY as defined in the Magnuson-Moss Warranty Act. Please read it carefully and retain it with your other important documents.
RIGHTS, LIMITS AND EXCLUSIONS: Runco limits its obligations under any implied warranties under state laws to a period not to exceed the warranty period. There are no express warranties. Runco also excludes any obligation on its part for incidental or consequential damages related to the failure of this product to function properly. Some states do not allow limitations on how long an implied warranty lasts, and some states do not allow the exclusion or limitation of incidental or consequential damages.
ADDITIONAL INFORMATION: To locate the name and address of the nearest Runco Authorized Service Center, or for additional information about this Limited Warranty, please call or write: RUNCO INTERNATIONAL, INC.
Safety Precautions Thank you for your purchase of this quality Runco video projector! It has been designed to provide you with the quality of video that is expected in a home theater. For the best performance, please read this manual carefully as it is your guide through the menus and operation. CAUTION RISK OF ELECTRIC SHOCK DO NOT OPEN CAUTION: TO REDUCE THE RISK OF ELECTRIC SHOCK DO NOT REMOVE COVER (OR BACK) NO USER SERVICEABLE PARTS INSIDE. REFER SERVICING TO QUALIFIED SERVICE PERSONNEL.
Overview • Native 16:9 Aspect Ratio, SuperOnyxTM DMD 1280 x 720p • High Contrast and Picture Quality 12-degree mirrors with dark metal process. • High Dynamic Range and Rich Gray-scale 6-segment, 5x color wheel with wide color space. • TIR (Total Internal Reflection) Prism High-performance light engine with Cat’s Eye optics. • Motorized Lens Controls Vertical lens shift, zoom, focus and electronic iris control via the projector remote control.
Overview Front/Top View 1. Runco Logo Can be rotated to match floor or ceiling installation. See “Runco Logo” on page 14. 4. Intake Vent 2. Projection Lens 6. Exhaust Vent 3. Top IR Sensor 7. Front IR Sensor 10 5. Status LEDs See “Control Panel” on page 13.
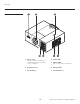
Overview 1 4 6 5 8 Rear / Bottom View 3 2 9 1. Connector Panel See “Connector Panel” on page 14. 7 8 6. Cable Access Door Open to access connectors. See “Connector Panel” on page 14. 2. AC Power IN Socket 3. AC Power Switch 4. Runco Logo Can be rotated to match floor or ceiling installation. See “Runco Logo” on page 14. 5. Cable Opening Pass cables through this opening. Runco CL-810 Owner’s Operating Manual 7. Lamp Module Cover Remove this cover when replacing the lamp.
Overview This page is intentionally left blank.
Controls and Functions Control Panel 1. LAMP LED Indicates the status of the lamp - Red when the lamp has exceeded its usage life or developed a problem. Please contact your Runco Dealer for assistance. - Flashing Red when the fans are not working or the lamp cover is open. Please contact your Runco Dealer for assistance. 3. TEMP LED Indicates the status of the fans and internal temperature - Red when the internal temperature is too high. Please contact your Runco Dealer for assistance.
Controls and Functions To access the connector panel, pull firmly on the cable access cover to open it. S-VID / S-VID Connector Panel 1. HDMI (High-Definition Multimedia Interface) Input Digital video signal input 2. Component (RCA Jacks) 480i Component (Y/CB/CR) video signal input 3. Video (RCA Jack) Composite video signal input 4. S-Video (mini DIN 4-pin) Y/C (S-video) signal input 5. RS-232C (RJ-11 Jack) RS-232C control signal input (refer to page 49 for details) 6.
Controls and Functions LIGHT Press to turn on the remote control back light. ON Press to turn on the projector. OFF Press to turn off the projector. LIGHT VID ON VID (Video) Composite video signal input. OFF S-VID COMP1 RGBHD HDMI INFO COMP2 S-VID (S-Video) S-Video signal input. COMP1 (Component 1) Component Y/CB/CR input. RVR COMP2 (Component 2) DTV Y/PB/PR signal input. ENTER INFO Displays active source and aspect ratio information.
Controls and Functions CINEMA Image in Letterbox mode is enlarged to a 16x9 image and the upper and lower portions are compressed. Remote Control (continued) ANA (Anamorphic) For 16:9 DVDs. LIGHT VID ON OFF S-VID COMP1 RGBHD HDMI INFO COMP2 RVR ENTER EXIT MEM1, ISF NIGHT, ISF DAY, FACT Recall video memory sequentially. See “Selecting Video Memory” on page 28. 0-9 Press to type in menu passcodes.
Installation Push the battery cover and slide it off. Install the two AAA batteries with the correct polarity and then replace the cover. Notes on Batteries • Make sure that the battery polarities are correct when installing the batteries. • Do not mix an old battery with a new one or different types of batteries. • If you will not use the remote control for a long time, remove the batteries to avoid damage from battery leakage.
Installation Installation Considerations Installation Type ➤ Proper installation of your projector will ensure the quality of your display. Whether you are installing a projector temporarily or permanently, you should take the following into account to ensure your projector performs optimally. Choose the installation type that best suits your needs: front or rear screen, floor mount or inverted mount.
Installation Rear screen installations There are two basic types of rear screens: diffused and optical. A diffusion screen has a surface that spreads the light striking it. Purely diffused screens have a gain of less than 1. The main advantage of the diffused screen is its wide viewing angle, similar to that of a flat screen for front screen projection. This type of screen is suitable when a wide viewing angle is required but there is low ambient room lighting.
Installation Ambient Light ➤ Other Considerations ➤ Throw Distance ➤ In general, minimize or eliminate light sources directed at the screen. Contrast ratio in your images will be noticeably reduced if light directly strikes the screen, such as when a shaft of light from a window or floodlight falls on the image. Images may then appear washed out and less vibrant. Other considerations and tips that can help improve your installation: • Keep the ambient temperature constant and below 35°C (95°F).
Installation ➤ Vertical and Horizontal Position ➤ Proper placement of the projector relative to the screen will yield a rectangular, perfectlycentered image that completely fills the screen. Adjusting the Projection Angle Ideally, the projector should be positioned perpendicular to the screen and in such a way that the lens center is aligned with either the top or bottom edge of the screen area, and centered horizontally.
Installation Mounting ➤ There are several methods for mounting the projector. Depending on your chosen installation, one method may be more suitable than another. In typical front and rear screen installations the projector can be mounted to a secure and level surface, such as a table or cart. Carts are useful when moving a projector during a presentation or from site to site. If possible, lock the wheels when it’s in position to prevent it from being moved during a presentation.
Connections When connecting your equipment: Connecting Video Inputs 1. Turn off all equipment before making any connections. 2. Use the correct signal cables for each source. 3. Ensure the cables are firmly connected.
Connections The RGB BNC input (labeled COMP 2 / RGB) supports two kinds of HDTV formats: Progressive component (DTV Y/PB/PR) and DTV RGB. The projector will automatically detect the resolution.
Connections This unit is compatible with the following computer resolutions: 1024x768, 800x600 and 640x480. S-VID S-VID / Connecting a Computer (GBRHV) Green Blue Red Horiz Vert PC or Notebook (PC, RGB, Analog, HD Component, Progressive DVD) Use an HDMI (High-Definition Multimedia Interface) cable to connect the projector to an HDMI device.
Connections Connecting to AC Power The CL-810 ships with various types of AC power cords. Choose the one that is appropriate to your locale. Plug the female end of the power cord into the AC receptacle on the rear of the projector (AC 100V ~ 240V). Then, connect the other end to your AC power source.
Basic Operation • Turn on the main power switch. The POWER LED will light orange. • Press the ON button on the remote control to turn on the projector. The POWER LED flashes orange during the warm up period, then lights solid green. • “Searching….” appears on the screen before the projector identifies the input signal, and remains there until a valid signal is detected.
Basic Operation Selecting Video Memory MEM1 ISF NIGHT ISF DAY FACT • Press MEM1 to recall custom memory settings. • Press ISF NIGHT to recall ISF Night settings. • Press ISF DAY to recall ISF Day settings. NOTE: ISF settings must be calibrated and stored by a certified ISF calibrator. For more information, please go to www.imagingscience.com.
Basic Operation • Press INFO to view information about the active signal source and aspect ratio. • Press MENU to open or close the on-screen menu. • Use the arrow buttons (▲,◄,▼,►) to select menu items or make adjustments. • Press ENTER or ► to enter the setting of items in the menu, or press EXIT to leave and save the setting of items in the menu. • When you turn on the projector, it searches for the input source you selected last time.
Basic Operation Turning off the Power • Press the OFF button to turn off the projector. • The POWER LED will blink green and the fans will speed up for a quick cool-down. The projector will not respond to any command for 90 seconds. • The POWER LED will light solid orange once the cooling down cycle has completed. • The fans will run for three minutes to cool. • You can turn the projector back on after approximately two minutes.
On-Screen Display Menus INFO This unit is equipped with an on-screen display (OSD) menu for making adjustments and changing settings. There are five menu languages; see the Language setting under “Installation” on page 35. RVR ENTER EXIT Using the Menu MENU Press the Menu button to turn on/off the OSD menu. • NOTE: If the Main Menu is displayed, you can also press Exit to turn it off. • Use the arrow buttons (▲,◄,▼,►) to select items in the menu or to make various adjustments.
On-Screen Display Menus When you press the Menu button, the Main Menu (shown on the previous page) appears on the screen. Use the ▲ or ▼ button to move to an item, then press Enter to select it. The active source is indicated by an arrow (>) to the left of the source; in the example above, Video is the active source. To select a different source, use the ▲ or ▼ button to highlight it and press Enter or ►.
On-Screen Display Menus The CL-810 has six memory settings for Color Temperature. Four of these settings are factory set to default as follows: 0 1 2 3 4 5 ------- Original lamp color temperature 5400 kelvins 6500 kelvins 8500 kelvins Custom Custom Color Temperature ICC Selection Store Image Settings ➤ With a 480p or higher-resolution signal, the sharpness control is applied only to the output signal and only when you set the Sharpness filter to “on” (1).
On-Screen Display Menus Runco CL-810 Aspect Ratio > Video S-Video Component1 Component2 RGB-HD HDMI -----------------------Aspect Ratio Installation Option Setup ISF Calibration Aspect Ratio Anamorphic (16:9) Standard (4:3) Letterbox Virtual Wide Cinema Virtual Cinema To access the Aspect Ratio adjustments, press Menu, then press the ▲ or ▼ arrows to highlight Aspect Ratio and press Enter. The Aspect Ratio sub-menu then appears (see above).
On-Screen Display Menus Aspect Ratio (continued) • CINEMA The image in the Letterbox mode is enlarged to a 16x9 image and the upper and lower portions are compressed. • VIRTUAL CINEMA A 2.35 image is stretched vertically in both directions to fill a 16:9 image.
On-Screen Display Menus Language ➤ Picture Orientation ➤ Keystone Adjust ➤ Press the ▲ or ▼ arrows to select from the available Languages: English, French, Spanish, German and Italian. Press the ▲ or ▼ arrows to select the projector’s Picture Orientation. The projector can be installed on a ceiling or in a rear-screen configuration with one or more mirrors. There are four settings: Floor Front, Ceiling Front, Floor Rear and Ceiling Rear.
On-Screen Display Menus Runco CL-810 Option > Video S-Video Component1 Component2 RGB-HD HDMI -----------------------Aspect Ratio Installation Option Setup ISF Calibration Option Reset Image Settings Sleep Timer Lamp Hours OSD Timer OSD Position PC & HD Adjust PIP/PBP Set Up DNR To access the Option adjustments, press Menu, then press the ▲ or ▼ arrows to highlight Option and press Enter. The Installation sub-menu will then appear (see above).
On-Screen Display Menus PC & HD Adjust ➤ Press Enter to display the PC & HD Adjust menu. Use these settings to fine-tune 480p and higher-resolution signals for optimum picture quality. Auto: Adjusts the phase, frequency and position automatically. • • Freq.: Adjusts the frequency of the signal. • Phase: Adjusts the phase of the input signal (similar to tracking on a VCR). • H. Pos.: Adjusts the horizontal position of the image. • V. Pos.: Adjusts the vertical position of the image.
On-Screen Display Menus To access advanced picture quality adjustments, use the up- or down-arrow keys to highlight Set Up and press Enter. Use the number buttons on the remote to enter the Set Up menu passcode when prompted and press Enter again. Then, press MENU on the remote control.
On-Screen Display Menus Gamma Selection ➤ SD Enhance ➤ The normal gamma setting of 2.2 is correct for almost all signals and conditions. If excess ambient light washes out the image and it becomes difficult or impossible to see details in dark areas, lower the gamma setting to compensate. This will improve contrast while maintaining good details for blacks. Conversely, if the image is washed out and unnatural, with excessive detail in black areas, increase the setting.
On-Screen Display Menus ➤ Image Shift ➤ Amplitude Adjust ➤ Video Black Level ➤ The Image Shift menu allows you to precisely center the image on the screen. (These controls are available only with a 480i source signal.) Horizontal Vertical Lamp Power Horizontal: This control moves the image right or left within the area of available pixels. - + 0 Vertical: This option moves the image up or down within the area of available pixels. NOTES: 1.
On-Screen Display Menus Remote Control ➤ The Remote Control menu shows you the primary and secondary infrared (IR) codes assigned to the CL-810. The Primary IR code is permanently set to +20. The secondary IR code is also +20. Primary Secondary +20 +20 You can change the secondary IR code if either: • Another device in the theater (a DVD player, for example) is responding to commands from the CL-810 remote control in ways that are unpredictable or undesirable.
On-Screen Display Menus Fan Control > Auto Normal Auto Hi. Altitude Manual Fan Speed +2 Set Up White Balance Gamma Selection SD Enhance RVR Adjust Image Over Scan Image Shift Amplitude Adjust Video Black Level Lamp Power Remote Control Reset Lamp Timer Fan Control Return to User OSD Fan Control ➤ Mode Fan Speed Select Fan Control from the Set Up Menu to control the operation of the projector’s cooling fan.
On-Screen Display Menus ISF Calibration The CL-810 has been designed to incorporate setup and calibration standards established by the Imaging Science Foundation (ISF). The ISF has developed carefully crafted, industry-recognized standards for optimal video performance and has implemented a training program for technicians and installers to use these standards to obtain optimal picture quality from Runco video display devices.
Y C M Intensity +100 Sat. +100 Hue M C 0 Store Setting Store Settings Splash Screen Timer ➤ B ➤ NTSC R G ICC Adjust ➤ Color Use the ICC Adjust controls to customize the stored NTSC, HDTV and/or PAL color space characteristics. To do this, select the color space to modify. Then, select a component color (Red, Green, Blue, Yellow, Cyan or Magenta).
Return to User OSD ➤ To exit the ISF Calibration menu, use the up- or down-arrow keys to highlight Return to User OSD and press Enter. To return to the ISF Calibration menu, select it from the Main Menu, press Enter twice, then press MENU on the remote control. (You do not need to re-enter the passcode.
Lamp Replacement The lamp should be replaced when it reaches the end of its life (typically 2000 hours), or sooner if a noticeable degradation in brightness occurs. Contact your Runco dealer to obtain a replacement lamp. 1. Turn off the projector and unplug the power cord. Allow the projector to cool down for approximately 45 minutes prior to removing the lamp assembly for replacement. 2. Loosen the two captive screws from the lamp cover. 3. Remove the lamp cover. 4.
Lamp Replacement This page is intentionally left blank.
Troubleshooting PROBLEM The projector does not turn on No picture POSSIBLE CAUSE REMEDY There is no power from the power cable. Plug the power cord into the AC power socket on the rear of the projector and an electrical outlet. The power switch is not turned on. Turn on the power switch. The projector was turned on again within the cool down time. Wait until projector completes the cool down time. Lamp cover is not attached well. Correctly attach the lamp cover.
Troubleshooting This page is intentionally left blank.
RS-232 Setup 1. Connect a D-Sub 9-pin female-to-RJ-11 adapter (not included) to a COM port on your PC. The adapter must be wired as follows: RS-232 Pin Assignments D-Sub 9-pin female 4-pin RJ-11 Function 2 2 Transmit Data 3 3 Receive Data 5 1, 4 Ground 1, 4, 6, 7, 8, 9 -- Not Connected 2. Connect the COM port to the RS-232 port on the projector. Use a standard, 4-wire RJ-11 telephone cable, wired straight-through.
RS-232 Setup RS-232C Control Codes NOTES: 1. All codes are in the ASCII format. 2. A carriage return is required after each command. 3. The projector will not accept RS-232 commands for 20 seconds after it is turned on or off.
RS-232 Setup Code Function x131x Switch to Composite input x132x Switch to S-Video input x133x Switch to RGB-HD input x134x Switch to DVI input (HDMI) x135x Switch to Component 1 input x136x Switch to Component 2 input x156x Background Color = Blue x157x Background Color = White x181x Toggle Blue Image on/off x281x Vertical Lens Shift = Up x282x Vertical Lens Shift = Down x283x Zoom In x284x Zoom Out x285x Focus (rotate lens to right) x286x Focus (rotate lens to left) x287x
RS-232 Setup This page is intentionally left blank.
Specifications Projector Type: Digital Light Processing™ (DLP™), Single-Chip SuperOnyx™ DMD™ Native Resolution: 1280 x 720 (16:9) Aspect Ratios: 4:3, Letterbox, 16:9 Anamorphic, VirtualWide™, Cinema, Virtual Cinema™ Video Standards: NTSC, PAL, SECAM DTV Compatibility: 480p, 576p, 720p, 1080i Scan Frequency: Horizontal: 15-80 kHz Vertical: 50-100 Hz Picture Size (16:9 screens): Recommended Width: 72 in. (1.83 m) to 96 in. (2.44 m) Capable of screen widths between 48 in. (1.22 m) and 240 in. (6.
Specifications Brightness and Contrast: Cinema Standards Measurement System (CSMS) Specifications - Brightness: 14.5 to 21.6 foot-Lamberts (fL) - Contrast Ratio: 200:1 to 220:1 These measurements are taken from the projector in a controlled, home theater environment. All measurements are made to ANSI/ NAPM IT7.228-1997 specifications using the Photo Research PR-650 SpectraColorimeter and Minolta LS-100 Luminance Meter, Video Essentials test DVD and a 1.3 gain, 72-inch wide screen.
Dimensions 9.84 in. (250.00 mm) 19.69 in. (500.00 mm) 17.32 in. (440.00 mm) 8.86 in. (225.00 mm) 2.17 in. (55.00 mm) 1.38 in. (35.00 mm) 9.25 in (235.00 mm) 12.99 in. (330.00 mm) 17.72 in. (450.00 mm) 18.21 in. (462.50 mm) 7.28 in. (185.00 mm) 4.43 in. (112.50 mm) Runco CL-810 Owner’s Operating Manual 8.16 in. (207.27 mm) 57 8.85 in. (224.
SERIAL NUMBE R RUMA-011135 rev 09-12-05 Runco International • 2900 Faber Street • Union City, CA 94587 • Ph (510) 324-7777 / (800) 23RUNCO / Fax (510) 324-9300 www.runco.