
International Projector User Manual


Installation
42 Runco LS-HB Installation/Operation Manual
PRE
L
IMINAR
Y
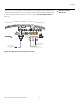
4. Then, adjust the anamorphic lens angle so that the projected image is rectangular:
The anamorphic lens will almost always be angled with respect to the projector; this is
normal.
5. When the height and angle are properly set, tighten the Height/Pitch Adjustment
Screws to secure the lens in place.
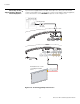
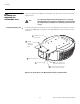
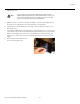
Movable Anamorphic Lens Attach the movable anamorphic lens to the bracket using the plastic knobs supplied with
the lens. See Figure 3-17.
Figure 3-17. Attaching the Anamorphic Lens to the Lens Mount
Adjusting the Lens Position:
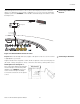
1. Adjust the vertical position and tilt of the lens so that the projector beam is passing
through the center of the lens and any residual pincushion distortion is about the
same at the top and bottom of the image. This typically results in the anamorphic lens
being below the center of the primary lens and tilted slightly downward.
There may be some pincushion distortion even after the lens is
properly adjusted, especially at shorter throw distances. If this is the
case, Runco recommends that you slightly over-scan the image into
the screen frame area to mask the distortion.
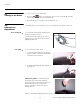
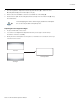
Correct Lens Angle
Incorrect Lens Angle
Note
➤