OWNER ’ S O PERATING M ANUAL CL-510 / CL-510LT
Limited Warranty Congratulations on your purchase of a Runco video product and welcome to the Runco family! We believe Runco produces “The World’s Finest Home Theater Products”. With proper installation, setup and care, you should enjoy many years of unparalleled video performance. Please read this consumerprotection plan carefully and retain it with your other important documents. This is a LIMITED WARRANTY as defined by the U.S. Consumer Product Warranty and Federal Trade Commission Improvement Act.
IMPORTANT: WARRANTY REGISTRATION: Please fill out and mail your warranty registration card. It is imperative that Runco knows how to reach you promptly if we should discover a safety problem or product update for which you must be notified.
Runco CL-510/ CL-510LT User’s Manual Runco CL-510/ CL-510LT Video Projector User’s Manual Thank you for your purchase of this quality Runco video projector! It has been designed to provide you with the quality of video that is expected in a home theater. For the best performance, please read this manual carefully as it is your guide through the menus and operation. WARNING CAUTION RISK OF ELECTRIC SHOCK DO NOT OPEN CAUTION: TO REDUCE THE RISK OF ELECTRIC SHOCK.
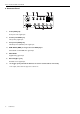
Runco CL-510/ CL-510LT User’s Manual Table of Contents WARNING . . . . . . . . . . . . . . . . . . . . . . . . . . . . . . . . . . . . . . . . . . . . 1 1.Overview. . . . . . . . . . . . . . . . . . . . . . . . . . . . . . . . . . . . . . . . . . . . . 3 Features . . . . . . . . . . . . . . . . . . . . . . . . . . . . . . . . . . . . . . . . . . . . . . . . . . . 3 Projector Exterior View . . . . . . . . . . . . . . . . . . . . . . . . . . . . . . . . . . . . . . 4 Front / Upper Side . . . . . . . . . . .
Runco CL-510/ CL-510LT User’s Manual 1. Overview Features ■ Runco Engineered, Gen 3 Technology. ■ Native 16x9 Aspect Ratio DMDTM 12 degree mirrors with dark metal process ■ High Contrast and Picture Quality 9 point white balancing system ■ Dynamic Performance and Rich Gray-scale 6-segment 5x color wheel and precision gray scale tracking ■ TIR (Total Internal Reflection) Prism Light engine with custom optics featuring an elliptical aperture for highest performance.
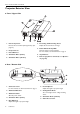
Runco CL-510/ CL-510LT User’s Manual Projector Exterior View ❚ Front / Upper Side 1. Front Lamp Cover Remove this cover when replacing the lamp. (See page 27.) 2. Projection Lens 3. Front IR Sensor 4. Ventilation Holes (intake) 5. Ventilation Holes (exhaust) ❚ 7. Power LED and Lamp LED Show the status of power and lamp. For more details, see "Control Panel" on page 5. 8. Top IR Sensor 9. Runco Logo (Can be turned off, see "Options" on page 24.) Rear / Bottom Side 1.
Runco CL-510/ CL-510LT User’s Manual Controls and Functions ❚ Control Panel 1. POWER LED Indicate power status Orange when the AC power cord is plugged into the wall outlet (standby mode). Once in the standby mode, you can turn on the projector by pressing the ON key on the remote control for ONE second. ■ Green when the power is turned on (operational mode). ■ Flashing Orange for the first 45 seconds after power-up indicating that the lamp is warming up.
Runco CL-510/ CL-510LT User’s Manual ❚ Connector Panel 1. Video (RCA Jack) Composite video signal input. 2. S-Video (mini DIN 4-pin) Y/C (S-video) signal input 3. Component (RCA Jacks) 480i Component (Y/CB/CR) video signal input 4. RGB/ HDTV (BNC) or Progressive Scan DVD players DTV Y/PB/PR or DTV RGB video signal input. 5. DVI/ HDCP Digital/ Analog signal input. 6. RS-232C (RJ-11 Jack) RS-232C control signal input. 7. 12v Trigger (mini jack with the diameter of 5.5 mm outside and 2.
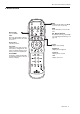
Runco CL-510/ CL-510LT User’s Manual ❚ Remote Control ON Hold down this button for ONE second to turn on the unit. Anamorphic For 16: 9 DVDs. 4X3 The input signal will be scaled to fit 4: 3 display mode in the center of screen. LPos+, LPosLetterbox position Letterbox Letterbox mode. Image in letterbox format is enlarged to fit 16:9 full screen display and the upper/ lower portion are “blanked off”. VirtualWide 4:3 image is enlarged nonlinearly in horizontal direction to fit 16: 9 full screen display.
Runco CL-510/ CL-510LT User’s Manual Arrow (c,e,d,f) Use to select the menu or to make various adjustments. Enter Enter the setting of items in the menu. Picture Access the Picture Setting menu (see "Picture Quality Adjustments" on page 23) Info Access the projector information Exit Exit and save the setting(s) of items in the menu. Menu Turns on/off the on-screen display menu. Video Composite video signal input S-Video S-Video signal input PBP (Picture by Picture) Enable the PIP function.
Runco CL-510/ CL-510LT User’s Manual 2. Installation Remote Control Push forward on the tap and lift to open the cover. Install the two AAA batteries with the correct polarity, then close the cover. Notes on Batteries Make sure that the battery polarities are correct when installing the batteries. Do not mix an old battery with a new one or different types of batteries. ■ If you will not use the remote control for a long time, remove the batteries to avoid damage from battery leakage.
Runco CL-510/ CL-510LT User’s Manual ❚ Adjust the Lens Zoom/Focus ring Adjust the projected image size you need with the zoom ring on the lens. To focus the image, rotate the focus ring on the lens. Focus Zoom out ❚ Adjust the height There are 4 screw adjusters on the bottom of this unit. You can adjust the height or projection angle of this unit by using these adjusters. 10 2.
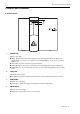
Runco CL-510/ CL-510LT User’s Manual Installation For CL-510 (With 1.75 - 2.00 Lens) Ceiling Screen __________ (H) x __________ (W) B) THROW DISTANCE: CL-510 16 x 9 Screens: Minimum: (screen width x 1.75) = __________ inches Maximum: (screen width x 2.00) = __________ inches C) VERTICAL OFFSET: Screen width x 0.12 = _________ inches from the center of the lens. Floor 2.
Runco CL-510/ CL-510LT User’s Manual Throw Distance Chart For CL-510 (With 1.75 - 2.00 Lens) CL-510 @ 1024 x 576 12 Screen Height Screen Width Min Throw Distance Max Throw Distance Vertical Offset Position 40.5 43 45 47 49 50 51.5 52 54 56 58 58.5 60 61 63 65 67.5 72 80 82 90 72 77 80 84 87 89 92 93 96 100 103 104 107 109 112 116 120 128 142 146 160 126.00 134.75 140.00 146.41 152.25 155.75 161.00 162.75 168.00 175.00 180.25 182.00 187.25 190.75 196.00 203.00 210.00 224.00 248.50 255.50 280.
Runco CL-510/ CL-510LT User’s Manual Installation For CL-510LT (With 2.30 - 3.00 Lens) Ceiling Screen __________ (H) x __________ (W) B) THROW DISTANCE: CL-510LT 16 x 9 Screens: Minimum: (screen width x 2.30) = __________ inches Maximum: (screen width x 3.00) = __________ inches C) VERTICAL OFFSET: Screen width x 0.10 = _________ inches from the center of the lens. Floor 2.
Runco CL-510/ CL-510LT User’s Manual Throw Distance Chart For CL-510LT (With 2.30 - 3.00 Lens) CL-510LT @ 1280 x 720 14 Screen Height Screen Width Min Throw Distance Max Throw Distance Vertical Offset Position 40.5 43 45 47 49 50 51.5 52 54 56 58 58.5 60 61 63 65 67.5 72 80 82 90 72 77 80 84 87 89 92 93 96 100 103 104 107 109 112 116 120 128 142 146 160 165.60 177.10 184.00 192.24 200.10 204.70 211.60 213.90 220.80 230.00 236.90 239.20 246.10 250.70 257.60 266.80 276.00 294.40 326.60 335.80 368.
Runco CL-510/ CL-510LT User’s Manual 3. Connecting When connecting, make sure to: 1. Turn off all equipment before making any connections. 2. Use the correct signal cables for each source. 3. Ensure the cables are firmly connected. 4. Connect all audio signals to external speakers. This projector is not equipped with speakers. Connecting Video Inputs ❚ Video / S-Video / Component (Interlaced Video) DVD Player 3.
Runco CL-510/ CL-510LT User’s Manual ❚ Progressive Component (DTV Y/PB/PR) DTV Source ❚ RGBHV (DTV RGB) DTV Source The RGB BNC input supports two kinds of HDTV formats: Progressive component (DTV Y/PB/PR) and DTV RGB. The unit will detect the resolution automatically. 16 3.
Runco CL-510/ CL-510LT User’s Manual Connecting a Computer (DVI/ HDCP) PC or Notebook This unit is compatible with the following computer resoultions: 1280x720, 1024x768, 800x600, 640x480. 3.
Runco CL-510/ CL-510LT User’s Manual 4. Basic Operation Turning on the Power The Power LED lights orange when power is applied and the power switch is turned on. ■ Press and hold the ON key on the remote control for ONE second to turn on the unit. The POWER LED will blink orange during warm up period, then light solid green. ■ " Searching…." will be displayed on the screen before the projector identifies the input signal. This message will remain on the screen until a valid signal is detected.
Runco CL-510/ CL-510LT User’s Manual Selecting "ASPECT RATIO" Select the proper aspect ratio according to the content being used. There are four aspect ratios: ■ Anamorphic: 4:3 image is stretched horizontally to fit a 16: 9 screen. This is for 16:9 DVDs. ■ 4 X 3: The input signal will be scaled to fit 4 : 3 display mode in the center screen. ■ Letterbox: Image in letterbox format is enlarged to fit 16:9 full screen display and the upper/lower portion are cropped.
Runco CL-510/ CL-510LT User’s Manual Selecting Input Source When this unit is turned on, it will search for the input source you last selected. ■ You may select the input source directly on the remote control. ■ PIP/ PBP function ■ ■ ■ ■ ■ ■ ■ ■ ■ 20 Press the PIP button to enable the PIP function For PIP purposes, there are two groups of inputs separated by their display modes: Video Group: Video, S-Video and Component Y/CB/ CR inputs Graphic Group: HDTV input and Computer input.
Runco CL-510/ CL-510LT User’s Manual Turning off the Power ■ ■ ■ ■ ■ Press the OFF key on the remote control to turn off the unit. The POWER LED will blink green and the fans will speed up for a quick cool down. The projector will not respond to any command for 90 seconds. The POWER LED will light solid orange once the cooling down cycle has completed. Fans will run for three minutes to cool. You may turn the projector back on after the first 90 seconds. 4.
Runco CL-510/ CL-510LT User’s Manual 5. Menu Using the Menu This unit is equipped with an on-screen display (OSD) menu for making various adjustments and settings. There are four different menu languages; see page 24 Language setting for more details. Press the Menu button to turn on /off the on-screen display menu. Use the ARROW buttons (c,e,d,f) to select the menu or to make various adjustments.
Runco CL-510/ CL-510LT User’s Manual Picture Quality Adjustments Runco CL-510 > Video S-Video Component Component HD RGB HD DVI-I ----------------------Aspect Ratio Options Set Up Adjustment Brightness Contrast Color Tint Sharpness Filter Temperature Store Recall To access the picture quality adjustments, press Menu, highlight the active source (indicated by the arrow) and press Enter or f. The picture quality sub-menu will then appear (see above).
Runco CL-510/ CL-510LT User’s Manual ■ 4 x 3: The input signal will be scaled to fit in the center of the 16:9 screen. Active Image Area ■ LETTERBOX: The image in the Letterbox mode will be stretched vertically, and the top and bottom portion 'blanked off'. This ratio is best suited for LaserDisc movies or non-anamorphic DVD's. Active Image Area ■ VIRTUAL WIDE: A 4:3 image is transformed into a 16x9 image.
Runco CL-510/ CL-510LT User’s Manual Lamp Hours: To check for total time of lamp usage. OSD Position: To adjust horizontal and vertical positions of OSD. PC & HD Adj.: The following settings are only available with a PC or DTV RGB signal. There is no position adjustment when using DVI-D signal. ■ AUTO: Adjusts the phase, frequency and position automatically. ■ FREQ.: Adjusts the frequency of the signal. ■ PHASE: Adjusts the phase of the input signal. ■ H. POS.
Runco CL-510/ CL-510LT User’s Manual White Balance: To adjust grey scale. White Balance Red Gamma Green Gamma Blue Gamma Red Gain Green Gain Blue Gain Red Offset Green Offset Blue Offset Store Adjust the Gamma Curve Adjust High End Adjust Low End Reset Lamp Timer: Use this function to reset lamp usage counter. Reset only if you replace the lamp. Background Color: To adjust background color to blue or white. 26 5.
Runco CL-510/ CL-510LT User’s Manual 6. Additional Information Warning Message It is normal for lamp to be darker when this unit has been used for a period of time. ■ " Lamp life is expired ! Please install new lamp. And reset the lamp timer" message will be displayed for 30 seconds on the screen if the lamp has operated for 950 hours.
Runco CL-510/ CL-510LT User’s Manual 7. Put on the front lamp cover. 8. Tighten the screw of front lamp cover. 9. Turn on the power and go into the Set Up menu to reset the "Lamp Timer" item. Troubleshooting Problem Possible Cause Remedy This unit does not turn on. There is no power from power cable. Plug the power cord into the AC inlet on the rear of this unit, and plug the power cord into to the power inlet. The power switch is not turned on. Turn on the power switch.
Runco CL-510/ CL-510LT User’s Manual Specifications CL-510/ CL-510LT Specifications Projector Type: Digital Light Processing™ (DLP™), Single Matterhorn DMD™ Chip Native Resolution: 1024 x 576, (16:9) Aspect Ratios: 4:3, Letterbox, 16:9, Anamorphic, Virtual Wide Video Standards: NTSC, PAL DTV Compatibility: 480p, 720p, 1080i Scan Frequency: Horizontal: 15-80 kHz Vertical: 50-100 Hz Recommended Width: 72-96 in. Maximum Width: 200 in.
Runco CL-510/ CL-510LT User’s Manual *ANSI Lumen specification: This is the typical projector luminosity (brightness) specification found in most sales literature. This measurement is included in RUNCO literature to allow for direct comparison with other manufacturer's projectors. These measurements can be taken at 9,000 to 13,000 degree Kelvin to get expected performance data when the projector is used in professional, commercial, and industrial displays.
Runco CL-510/ CL-510LT User’s Manual Dimensions Unit: in. (mm) 6.
Runco CL-510/ CL-510LT User’s Manual RS-232 Setup PC Out Adapter Baud Rate: 115200 or 9600 1. Connect D-Sub 9-pin female to RJ-11 adapter (not included) to Com port on PC. Parity: None 2. Connect RJ-11 to Projector.
RUMA-010300 rev 7-03 Runco International . 2900 Faber Street . Union City, CA 94587 . ph (510) 324-7777 . fax (510) 324-9300 . www.runco.