
Specifications


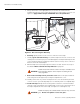

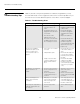
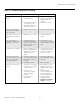

Table Of Contents
- TWO YEAR LIMITED WARRANTY
- Safety Precautions
- 1. Introduction
- 2. Controls and Functions
- 3. Installation
- 3.1 Remote Control
- 3.2 Quick Setup
- 3.3 Installation Considerations
- 3.4 Installing the Projection Lens, Lamp and Cooling
- 3.5 Installing the Optional CineWide Lens Mount
- 3.6 Mounting the SC-1
- 3.7 Connections to the SC-1 and DHD Controller
- Input Panel Access
- Connecting the DHD Controller to the SC-1
- Connecting Source Components to the DHD Controller
- RS-232 Controller Connection
- Connecting 12-volt Trigger Outputs to External Equipment
- Connecting an External IR Receiver to the DHD Controller
- Connecting an External Power Supply/Ballast to the Projection Head
- Connecting to AC Power
- 3.8 Turning on the Power
- 3.9 Maximizing Light Output
- 3.10 Adjusting the Picture Orientation
- 3.11 Primary Lens Adjustments
- 3.12 Installing and Adjusting the CineWide Anamorphic Lens
- 3.13 Calibrating Projector Input 2 (DVI)
- 3.14 Working With the Lamp
- 4. Operation
- 5. Maintenance and Troubleshooting
- 6. Serial Communications
- 7. Specifications

Maintenance and Troubleshooting
90 Runco SC-1 Owner’s Operating Manual
PRE
L
IMINAR
Y
Cleaning the Lens Removing Dust:
1. Brush most of the dust off with a camel-hair brush and/or blow dust away with
compressed air.
2. Fold a microfibre cloth smooth and gently wipe remaining dust particles off the lens.
Make sure to wipe evenly with the smooth portion of the cloth that has no folds or
creases. Do not apply pressure with your fingers — use the tension in the folded cloth
itself to collect the dust.
3. If significant dust is still bound to the surface, dampen a clean microfibre cloth with
lens cleaning solution (damp, not dripping). Wipe gently until clean.
Removing Fingerprints, Smudges, Oil and Other Substances:
1. Brush most of the dust off with a camel-hair brush and/or blow dust away with
compressed air.
2. Roll a lens tissue around a swab and soak in lens cleaning solution. The tissue should
be damp but not dripping.
3. Gently wipe the surface using a figure-8 motion. Repeat until blemish is removed.
Cleaning the Reflector Removing Dust:
1. Brush most of the dust off with a camel-hair brush and/or blow dust away with
compressed air.
2. If some dust remains, just leave as is — air circulating at the lamp is unfiltered, so
some dust is inevitable. Avoid unnecessary cleaning.
Removing Fingerprints, Smudges, Oil and Other Substances:
1. Brush dust off with a camel-hair brush and/or blow dust away with compressed air.
2. Fold a clean microfibre cloth and dampen with methanol. Make sure to wipe evenly
with the smooth portion of the cloth that has no folds or creases. Do not apply
pressure with your fingers; use the solution in the cloth to collect the dirt.
Cleaning Other
Components
In a normal operating environment check, clean and treat the following components every
six months or so to help ensure proper lamp and projector function:
Lamp Fan: A clogged lamp fan impeller or motor can reduce air flow, leading to possible
overheating and failure of the lamp. Clean and treat the impeller as follows:
1. Vacuum loose dirt from the lamp fan impeller.
2. If necessary, use a brush with hot water and suitable detergent.
Igniter: Clean the high voltage terminal and insulator to remove accumulated dust or dirt.
➤
➤
➤
Do not bend the impeller blades or loosen the balancing weights.
WARNING