
Specifications


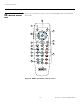
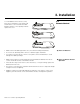

Table Of Contents
- TWO YEAR LIMITED WARRANTY
- Safety Precautions
- 1. Introduction
- 2. Controls and Functions
- 3. Installation
- 3.1 Remote Control
- 3.2 Quick Setup
- 3.3 Installation Considerations
- 3.4 Installing the Projection Lens, Lamp and Cooling
- 3.5 Installing the Optional CineWide Lens Mount
- 3.6 Mounting the SC-1
- 3.7 Connections to the SC-1 and DHD Controller
- Input Panel Access
- Connecting the DHD Controller to the SC-1
- Connecting Source Components to the DHD Controller
- RS-232 Controller Connection
- Connecting 12-volt Trigger Outputs to External Equipment
- Connecting an External IR Receiver to the DHD Controller
- Connecting an External Power Supply/Ballast to the Projection Head
- Connecting to AC Power
- 3.8 Turning on the Power
- 3.9 Maximizing Light Output
- 3.10 Adjusting the Picture Orientation
- 3.11 Primary Lens Adjustments
- 3.12 Installing and Adjusting the CineWide Anamorphic Lens
- 3.13 Calibrating Projector Input 2 (DVI)
- 3.14 Working With the Lamp
- 4. Operation
- 5. Maintenance and Troubleshooting
- 6. Serial Communications
- 7. Specifications

Controls and Functions
Runco SC-1 Owner’s Operating Manual 15
PRE
L
IMINAR
Y
1. IR OUTPUT INDICATOR
Lights when a button is pressed to indicate that an IR signal is being transmitted.
2. ON / OFF
Press to turn the projector on or off.
3. ENTER
Press to select a highlighted menu item or confirm a changed setting.
4. Cursor Buttons ( , , , )
Use these buttons to select items or settings, adjust settings or switch display
patterns.
When no menu is present on-screen, the UP and DOWN buttons toggle through the
available aspect ratios, in this order:
UP Button = Anamorphic - Standard (4:3) - Letterbox - VirtualWide - Cinema -
Virtual
Cinema
DOWN Button = Virtual Cinema - Cinema - VirtualWide - Letterbox - Standard (4:3) -
Anamorphic
Likewise, the LEFT and RIGHT buttons toggle through the different source inputs, in
this order:
LEFT Button = HDMI 2 - HDMI 1 - HD/RGB2 - HD/RGB 1 - Component SD - S-Video
2 - S-Video 1 - Composite
RIGHT Button = Composite - S-Video 1 - S-Video 2 - Component SD - HD/RGB 1 -
HD/RGB 2 - HDMI 1 - HDMI 2
5. LIGHT
Press to illuminate the buttons.
6. MENU
Press this button to access the OSD controls, or to exit the current menu and return
to the previous one.
7. VIDEO (1)
Press to select Composite video input as the source or to enter the numeric
character
“1.”
8. COMP (Component) (2)
Press to select Component SD (480i/576i) video input as the source or to enter the
numeric character “2.”
Virtual Cinema is available only on the SC-1/CineWide. For more
information about aspect ratios, refer to
Table 4-1.
The UP, DOWN, LEFT, RIGHT, ENTER and MENU buttons are
functional only when an analog source (HD/RGB, SD Component,
Composite or S-Video) is selected.
Note
Note