
Manual
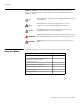
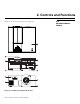
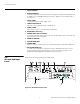
Table Of Contents
- TWO YEAR LIMITED WARRANTY
- Safety Precautions
- 1. Introduction
- 2. Controls and Functions
- 3. Installation
- 3.1 Remote Control
- 3.2 Quick Setup
- 3.3 Installation Considerations
- 3.4 Installing the Projection Lens
- 3.5 Installing the Optional CineWide Lens Mount
- 3.6 Mounting the VX-44d/-55d
- 3.7 Connections to the VX-44d/-55d and DHD Controller
- Connector Panel Access
- Connecting the DHD Controller to the VX-44d/-55d
- Connecting Source Components to the DHD Controller
- RS-232 Controller Connection
- Connecting 12-Volt Trigger Outputs to External Theater Equipment
- Connecting an External IR Receiver to the DHD Controller
- Connecting to AC Power
- 3.8 Turning on the Power
- 3.9 Adjusting the Picture Orientation
- 3.10 Primary Lens Adjustments
- 3.11 Installing and Adjusting the CineWide Anamorphic Lens
- 3.12 Calibrating Projector Input 2 (DVI)
- 3.13 Working With the Lamp
- 4. Operation
- 5. Maintenance and Troubleshooting
- 6. Serial Communications
- 7. Specifications
Runco VX-44d/-55d Owner’s Operating Manual 1
PRE
L
IMINAR
Y
1.1
About This Manual
This Owner’s Manual describes how to install, set up and operate the Runco Video
Extreme™ Series DLP Projector (Models VX-44d and VX-55d) and DHD Controller.
Throughout this manual, the Runco Video Extreme DLP Projector and DHD Controller are
referred to as the “VX-44d/-55d.” The information in this manual applies to both projectors
except where otherwise indicated.
Target AudienceRunco has prepared this manual to help home theater installers and end users get the
most out of the VX-44d/-55d.
Runco has made every effort to ensure that this manual is accurate as of the date it was
printed. However, because of ongoing product improvements and customer feedback, it
may require updating from time to time. You can always find the latest version of this and
other Runco product manuals on-line, at www.runco.com.
If You Have Comments
About This Manual...
Runco welcomes your comments about this manual. Send them to techpub@runco.com.
Textual and Graphic
Conventions
Text Conventions: The following conventions are used in this manual, in order to clarify
the information and instructions provided:
• Remote and built-in keypad button identifiers are set in upper-case bold type; for
example, “Press EXIT to return to the previous menu.”
• Computer input (commands you type) and output (responses that appear on-screen) is
shown in monospace (fixed-width) type; for example: “To change the aspect ratio to
Letterbox, type LETTERBOX <Enter>.”
• All keys with functional names are initial-capped, set in bold type and enclosed in angle
brackets. These keys are the following: <Enter>, <Spacebar>, <Control>,
<Esc> and <Tab>.
• <Enter> indicates that you may press either the RETURN or ENTER key on your
keyboard if it has both keys.
In addition to these conventions, underlining, boldface and/or italics are occasionally used
to highlight important information, as in this example:
1. Introduction
A carriage return must be used after each command or string.
Note