OWNER'S OPERATING MANUAL IRTUAL VHIGH DEFINITION TM RY A MIN LI E PR VHD-4402 ULTRA Virtual High Definition Processor With Aspect Ratio Control
OWNER'S OPERATING MANUAL IRTUAL VHIGH DEFINITION TM RY A MIN LI E PR VHD-4402 ULTRA Virtual High Definition Processor With Aspect Ratio Control
The software installed in the VHD-4402 ULTRA is protected by copyright laws and International copyright treaties, as well as other intellectual property laws and treaties. IMPORTANT - READ CAREFULLY: This Runco License Agreement is a legal agreement between you (either an individual or a single entity) and Runco International for the Runco software product installed within the VHD-4402 ULTRA. By using the VHD-4402 ULTRA, you agree to be bound by the terms of this License Agreement.
CONTENTS Warnings and Safety Precautions . . . . . . . . . . . . . . . 4 Introduction . . . . . . . . . . . . . . . . . . . . . . . . . . . . . . . . 6 General Description . . . . . . . . . . . . . . . . . . . . . . . . . 6 Features and Benefits . . . . . . . . . . . . . . . . . . . . . . . 6 Front and rear panel description . . . . . . . . . . . . . . . . 7 Front Panel Description . . . . . . . . . . . . . . . . . . . . . . 7 Rear Panel Description . . . . . . . . . . . . . . . . . . . . . .
Warnings and Safety Precautions CAUTION: To turn off main power, be sure to remove the plug from power outlet. The power outlet socket should be installed as near to the equipment as possible, and should be easily accessible. REMARQUE: Pour mettre l’appareil hors circut, s’assurer de retirer la fiche de la prise d’alimentation. La prise d’alimentation doit être installé aussi proche que possible de l’appareil et doit être facile d’ accès.
WARNINGS AND SAFETY PRECAUTIONS WARNING: This equipment has been tested and found to comply with the limits for a Class B digital device, pursuant to Part 15 of the FCC Rules. These limits are designed to provide reasonable protection against harmful interference when the equipment is operated in a commercial environment.
INTRODUCTION General Description Congratulations on your purchase of the VHD-4402 ULTRA! This processor is designed to work with either a CRT projector or a fixed-pixel device (DLP, Plasma, etc.), and will provide full aspect ratio control as well as greatly enhanced picture quality. For example, DLP projectors were not initially designed to be used on wide aspect-ratio screens (16:9 or 1.85:1).
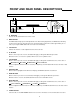
FRONT AND REAR PANEL DESCRIPTIONS Front Panel 1 2 Menu 4402 ULTRA RUNCO M U LT I F I L M 3 4 5 6 7 8 9 1. IR RECEIVER Receives the IR commands from the remote control. 2. MENU BUTTON The MENU button brings up the main adjustment menu. After making adjustments, the MENU button will bring you back to the sub-menu, then the main menu. The Menu will then either time-out after approximately 10 seconds, or pressing the MENU button will remove the menu immediately. 3.
FRONT AND REAR PANEL DESCRIPTIONS Rear Panel 1 RUNCO 12v Fuse RS-232 IN V H B G R Pass-through Y Pr Pb S-VIDEO COMPOSITE RS-232 OUT Mask Screen 2 3 4 5 6 7 8 9 1. 12v Fuse This fuse protects the 12v outputs from the MASK and SCREEN jacks.(Screen Fuse: 5mm x 25mm, AGC, 1A, 250v, Fast Blow) 2. Mask This is a 12V output that is used to trigger masking on screens that have that capability (For use on motorized screens only). 3.
FRONT AND REAR PANEL DESCRIPTIONS 10. Phone Jack The output of this jack must be connected to the PC Control input of the Projector. This communication will allow the controller and projector to be turned on simultaneously by turning on just the VHD-4402 ULTRA. 11. Power Input Plug in main power here. 12. 115 VAC Fuse This is the main AC input fuse. (Main Fuse: 5mm x 20 mm, 500mA, 250v, Slow Blow) 13. Main Power Switch Disconnects or applies main power to the processor.
FRONT AND REAR PANEL DESCRIPTIONS Remote Control Description A A. LED Lights when a button is pressed indicating IR output. B. POWER BUTTON Turns the unit on. The MAIN POWER switch on the rear of the unit must be on first for this button to be active. B PWR C G C. UP BUTTON When no menu is present on-screen, this button will toggle you through the different aspect ratios. When the menu is on-screen, the up button will move the cursor up within a menu. D.
Quick Set-up Guide Connection Examples RUNCO 12v Fuse RS-232 IN V H B G R Pass-through Y Pr Pb S-VIDEO COMPOSITE RS-232 OUT Mask Screen Projector RUNCO DVD Player Projector Phast or Crestron Computer or DTV decoder Sattelite receiver or SVHS player While there are many different ways to connect your source equipment to your VHD-4402 ULTRA, the examples shown above are the most common and are recommended by Runco.
QUICK SET-UP GUIDE Getting Started To get started using your VHD-4402 ULTRA and projector, follow these simple steps: 1. Ensure all sources that you are using are properly connected to the VHD-4402 ULTRA. This is something your Runco dealer has probably already done for you; if not, please refer to the ‘Connection Examples’ and the owners manuals of each appropriate source as necessary. 2. Turn on all sources.
QUICK SET-UP GUIDE Overall Functional Description The VHD-4402 ULTRA’s purpose is twofold. First, it provides aspect ratio control and can do so on either a WIDESCREEN or a standard 4:3 screen. Second, it provides a clean, progressive signal to the projector. The processing the VHD-4402 ULTRA uses is called SCALING. Scaling is simply a way of taking a signal, ‘digitizing’ it, then converting it to any of a number of resolutions.
MENU DESCRIPTION AND NAVIGATION Main Menu MAIN MENU ADJUST > COMPOSITE S-VIDEO COMPONENT PASS THROUGH ASPECT RATIO DISPLAY CONTROL Source selection and picture quality adjustments Aspect ratio selection Sets parameters for the projector (Not Used In This Version) The main menu (shown above) includes two sections: Source Selection/ Picture quality adjustments and Functional adjustments. Pressing MENU on the front panel or on the remote control will bring up the main menu.
MENU DESCRIPTION AND NAVIGATION Aspect Ratio allows selection of one of the three aspect ratios provided by the processor. You have two options for selecting an aspect ratio: First, highlight ASPECT RATIO on the main menu, then press ENTER. Then select the desired aspect ratio, and again press ENTER. The second option is to simply press the UP or DOWN arrows on the remote or front panel. Doing this will toggle you through the three choices- Anamorphic (16:9), Letterbox and Standard (4:3).
MENU DESCRIPTION AND NAVIGATION After pressing ENTER, the picture quality menu will appear (the menu to the right of the main menu above). To adjust a certain function, highlight it with the or DOWN buttons, and press ENTER. The following will then appear on-screen (we’ll use COLOR as an example): COMPOSITE COLOR: 0 AGC ENABLED To Change the value of the function (Color in this case), simply press the UP button to increase the value, and the DOWN button to decrease the value.
MENU DESCRIPTION AND NAVIGATION • SHARPNESS This controls the ‘high-frequency’ detail of the image. The more sharpness is increased, the more detail is added into the picture. However, if it is increased too much, it will also increase ‘noise’ in the picture as well as other types of artifacts. This may be set to personal preference; midrange is factory-preset. • LUMA ENHANCE This is similar to the sharpness control, but it does not boost the frequencies all over the picture.
ASPECT RATIOS First, the Basics An ‘aspect ratio’ is simply the ratio of the width vs. the height of the screen. For example, the current aspect ratio standard is 4:3 (or 1.33:1), where the image is 4 units wide and 3 units tall. 3 units tall 4 units wide All of our ‘regular’ televisions are this aspect ratio. You have probably noticed that occasionally you’ll watch a movie that does not fill the screen vertically.
ASPECT RATIOS Active image area (Actual screen area) Blanked (cut off) areas As you can see, our screen in this example is a 1.85:1 ratio. The dashed lines show the area that we ‘blanked’. If you recall, watching a letterbox movie on a 4:3 screen gave us black bars; therefore with letterbox movies, we’re not losing any information! The ‘other’ type of widescreen is called ‘ANAMORPHIC’.
DIMENSIONS Front Panel 17.45" Menu 3.5" 4402 ULTRA RUNCO M U LT I F I L M Rear Panel 17" RUNCO 3.5" 12v Fuse RS-232 IN V H B G R Pass-through Y Pr Pb S-VIDEO COMPOSITE RS-232 OUT Mask Screen Top 17" 16" 17.45" Side 3.
RS-232 PROTOCOL 9600 Baud 8 bits No parity 1 Stop bit ASCII RxD of the PC or TxD of the VHD is on pin2 TxD of the PC or RxD of the VHD is on pin3 Gnd is pin 5 RTS of the PC or CTS of the VHD is on pin7 (not used) CTS of the PC or RTS of the VHD in on pin8 (not used) Command format Inputs: 0 1 2 3 = = = = Composite S-Video Component Pass Through Aspect Ratios: A = Anamorphic L = LetterBox S = Standard (4:3) H = HDTV (for pass through) C = Computer (for pass through) Power: ON = Powe
SPECIFICATIONS Inputs: (1) Component, (1) S-video, (1) Composite, (1) Pass-through Input standards: NTSC (PAL, NTSC export version) Output formats: 540p, 600p (38 khz) Bandwidth: Video inputs: 5.5 Mhz Pass-through: 100 Mhz Power input: 120V (220V export model), 50/60 Hz Power consumption: 15W Control Options: RS-232, Infrared, Front panel Operating environment: 41-95° F (5-35° C) 0-90% humidity (non-condensing) Dimensions: Width: 17.45 in./443.23 mm Depth: 16 in./406.40 mm Height: 3.5 in./88.
RUMA-008900 rev 10-00 2463 Tripaldi Way Hayward, CA 94545 510-293-9154 Fax: 510-293-0201