
User Guide


VX-2ix Color Gamut Adjustment
A-2 Runco VX-2ix Owner’s Operating Manual
A.1
Required Hardware
and Software
To perform these adjustments, you need the following:
• Laptop or desktop PC with a DB-9 serial port.
• A straight-through (not null-modem) serial cable (DB-9 female to DB-9 male).
• A DB-9 female-to-3.5mm phono plug adapter.
• Terminal emulation software – HyperTerminal or equivalent.
• Color analyzer – Sencore ColorPro 5000 software and ColorPro III sensor, or
equivalent.
A.2
Serial Connections and
Equipment Setup
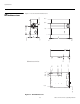
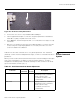
Connect your PC to the projector and color sensor as shown in Figure A-2.
Figure A-2. Equipment Setup for Color Gamut Adjustment
1. Connect a straight-through serial cable to the computer’s serial port.
2. Connect the other end of the serial cable to a 9-pin-to-3.5mm phono plug adapter.
3. Connect the 3.5-mm phono plug to the secondary RS-232 port on the rear of the
projector. This port is not labeled, but is to the right of and slightly below the primary
RS-232 port; see Figure A-3.
Most computer-based color analyzers – like the Sencore product used
here as an example – also require a serial connection for the color
sensor. In order to use them for this procedure, your PC must have either
two available RS-232 COM ports, or one COM port and one Universal
Serial Bus (USB) port.
If you are using a stand-alone color analyzer, this is not an issue.
Note
3.5-mm phono plug
to D-Sub 9-pin
(not included)
COM1
USB or COM2
Screen
Color Sensor
6 - 12 in.