
Installation guide


Configuration Scenarios
116 Runco WindowWall Installation Guide
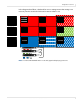
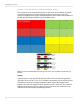
Note: Runco WindowWall with two 4 x 2 sub walls. One Big Picture is not available, but each
sub wall can have eight different sources.
Cabling
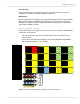
Cluster the displays into the groups where you want your sub walls, and cable each
sub wall to Quad Input Manager Module that are sequentially looped together. If you
want to be able to also spread an input across the whole wall (Scenario 2), you must
complete a single loop.
If you want to be able to spread more inputs across the sub wall than will fit on one
Quad Input Manager Module, you can split the wall into separate loops.
A1
A2
A3 A4
B1
B3
C1 C2 D1
B2
B3
D2
C3 C4 D3 D4
A
Loop Out
Dual Link In
Loop Out
Dual Link In
Loop Out
Dual Link In
Digital 1 Digital 2 Digital 3 Digital 4
B
Digital 1 Digital 2 Digital 3 Digital 4
Digital 1 Digital 2 Digital 3 Digital 4
Loop Out
Dual Link In
Digital 1 Digital 2 Digital 3 Digital 4
D
Switch 1 Loop
Switch 2 Loop
Switch 3 Loop
Switch 4 Loop
Internal Loop Digital 1
X External Loop Dual Link In
Use Loop External
Switch 1 Loop
Switch 2 Loop
Switch 3 Loop
Switch 4 Loop
Internal Loop Digital 1
X External Loop Digital 3
Use Loop External
Switch 1 Loop
Switch 2 Loop
Switch 3 Loop
Switch 4 Loop
Internal Loop Digital 3
External Loop Digital 3
Use Loop External
Quad Module Route C
Quad Module Route B
Quad Module Route A
Switch 1 Loop
Switch 2 Loop
Switch 3 Loop
Switch 4 Loop
Internal Loop Digital 1
X External Loop Digital 2
Use Loop External
Quad Module Route D
Wall Width 2
Wall Height 4
Unit Row 1
Unit Column 2
X Wall Mode
Wall Width 2
Wall Height 4
Unit Row 2
Unit Column 2
X Wall Mode
Wall Width 2
Wall Height 4
Unit Row 3
Unit Column 1
X Wall Mode
Wall Width 2
Wall Height 4
Unit Row 4
Unit Column 1
X Wall Mode
Wall Width 2
Wall Height 4
Unit Row 3
Unit Column 2
X Wall Mode
Wall Width 2
Wall Height 4
Unit Row 4
Unit Column 2
X Wall Mode
Wall Width 2
Wall Height 4
Unit Row 1
Unit Column 2
X Wall Mode
C
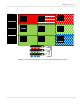
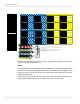
Source 1 Source 2 Source 3
Source 9
Source 4 Source 5 Source 6
Source 7 Source 8
Source 7 Source 8
Source 4
Source 6
Source 9
Source 8 Source 8
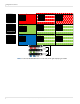
Note the cabling difference. A must loop out to C and C back to A. B must loop out
to D and D back to B
Any Source from A or C can be spread on the left half. Any source from B or Dcan
be spread on the right half
This configuration cannot be used for one input on the whole wall
Wall Width 2
Wall Height 4
Unit Row 1
Unit Column 1
X Wall Mode
Wall Width 2
Wall Height 4
Unit Row 4
Unit Column 2
X Wall Mode
Unit Row 1
Wall Width 2
Wall Height 4
Unit Column 2
X Wall Mode
Wall Width 2
Wall Height 4
Unit Row 2
Unit Column 2
X Wall Mode
Wall Width 2
Wall Height 4
Unit Row 3
Unit Column 2
X Wall Mode
Wall Width 2
Wall Height 4
Unit Row 3
Unit Column 1
X Wall Mode
Wall Width 2
Wall Height 4
Unit Row 2
Unit Column 1
X Wall Mode
Wall Width 2
Wall Height 4
Unit Row 2
Unit Column 1
X Wall Mode
Wall Width 2
Wall Height 4
Unit Row 4
Unit Column 1
X Wall Mode