
EB3 Baseboard Radiator Installation and Operation Manual
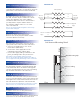

Left end
supply
Right end
supply
Wire nut,
remove for
right end
supply
Wire nut,
remove for
left end
supply
Factory wiring
L2
L1
L2
L1
L2
L1
L2
L1
Heating elements
High limit
$ETERMINEWHICHENDOFTHEBASEBOARDYOUWILLBE
connecting the supply wires to and remove the front
junction box cover on that end of the baseboard.
STEP 5 INSTALL MOUNTING CLIPS
,OCATEWALLSTUDSBEHINDTHERADIATORANDATTACH
the appropriate number of metal mounting clips
to the wall studs. Place the baseboard top grille
over the mounting clips. The top of the mounting
clip should be 9.75 inches off of the floor.
STEP 6 ATTACH TO THE WALL
,OCATETHESLOTSINTHEBACKOFTHEJUNCTIONBOXAND
secure a screw through the center of the slots into the
wall. Tighten the screws and then back them out one
turn. This allows for expansion of the baseboard.
Note: In most cases the wall will have a lower plate to screw to.
If this is not the case, a hollow wall anchor should be used.
STEP 7 ATTACH JUNCTION BOX COVER
STEP 8 CONNECT THE THERMOSTAT
Install the front cover on the junction box.
Connect a thermostat and/or relay to the baseboard
and connect to the circuit breaker load center.
$ETERMINETHEHEATERMOUNTINGLOCATIONON
the wall, and then lay the radiator face down
on the floor with the feet of the radiator
towards the wall. If the floor is a hard surface
you may want to lay the radiator down on
the foam the radiator came in or on some
other soft material.
Note: Do not lean the baseboard against a wall as it may
tip over and be damaged.
STEP 2 DETERMINE THE MOUNTING LOCATION
STEP 3 ATTACH THE CABLE CONNECTOR
Remove the back of the junction box.
Remove a knockout plug and attach a cable
connector (Romex connector).
STEP 1 DETERMINE THE SUPPLY SIDE
STEP 4 CONNECT THE SUPPLY LINES
$ISCONNECTTHEFACTORYWIRECONNECTORINTHE
open junction box. These are the heater wires.
a. Connect one supply wire to one of the
heater wires (white wire).
b. Connect the other supply wire to the
remaining heater wire (white wire).
c. Connect the supply cable ground wire to the
green grounding lead in the junction box.
Note: Always connect multiple radiators in parallel.
Note: Do not run wires through the radiator. The radiator is
not a UL approved raceway and damage to wires could result.
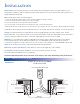
Side View and Mounting Detail
Floor
Wall
Metal Mounting Clip
Junction Box
Knockout Plug
Illustration 2
Illustration 3