
Trim Installation Guide

Trim Installation
Runtal North America, Inc.
187 Neck Road,
PO Box 8278
Ward Hill, MA 01835
T
oll Fr
ee:
1-800-526-2621
In Canada: 1-888-829-4901
www.runtalnorthamerica.com
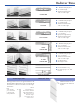
1) Simply hook the top edge of the cover (rounded curve) over
the top of the radiator.
2) Pull the bottom edge down, and snap trim onto the bottom
tube of the radiator.
Center Trims
Inside or Outside Corner Trims
End Trim and End Cap installation is most often a simple
“snap on” as noted for Center Trim. However, if there is less
than 3” of overlap with the radiator, or if extra rigidity is desired,
EC-4 Brackets should be used. See below for EC-4 installation.
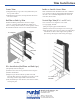
End Trim or End Cap Trim
EC-4 BRACKET
SCREWS
END TRIM
RADIATOR
PC-3
VER
TICAL
PIPE TRIM
1) Temporarily mount the trim piece.
2)
Mark the w
all to show the top and bottom of the trim piece
.
3) Remove the Trim Piece.
4)
Align the top of the EC-4 with the top mark on the w
all.
F
asten the EC-4 with screws
.
If required,
repeat with a second
EC-4, being careful to align with the bottom wall mark.
5)
F
irst,
mount
Trim piece onto the EC-4’s, then onto the radiator,
and snap into place.
EC-4 Installation (End Trims and End Caps)
PC-3’s and PC-10’s are designed to cover vertical
(“A” type) piping. To install:
1) Wrap the exposed pipes with the insulation.
2) Fold the trim tabs down, and slip the cover over the pipe.
3) Once in position, squeeze the cover back to its original shape
and fold the tabs back to their original vertical positions
(the tabs keep the trim piece from rotating on the pipe).
Inside and Outside Corner installations must have a minimum
of 2” of radiator overlap for proper rigidity. The installation is
the same as for a Center Trim; simply install one side of the
corner first, then the other.
Vertical Pipe Trim (PC-3’s and PC-10’s)