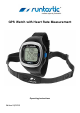
GPS Watch with Heart Rate Measurement Operating instructions Edition 04/2013
Table of Contents 1 Intro ................................................................................................................ 2 Plesed Read Safety and Watch Care Notes Before Use ... 2.1 Safety Instructions .......................................................................... 2.2 Repair ................................................................................................. 2.3 Water Resistance ........................................................................... 2.
7.2 Battery Level display .................................................................... 30 7.3 Setting a Count-down Timer ..................................................... 31 7.4 Alarm ..................................................................................................... 32 7.5 Dual Time – Display two time zones .................................... 33 8 GPS-Workoute mode ........................................................................... 34 8.1 Heart Rate Monitoring .......
12.2 Using Runtastic Connect .......................................................... 13 Technical Data...................................................................................... 14 Declaration of compliance ............................................................. 15 FAQ/Correction of errors ................................................................. 16 Warranty...................................................................................................
1 Intro The GPS Watch with Heart Rate Monitor works together with the heart rate chest strap to measure and record your heart rate. It has built-in GPS to track your route and speed during workouts. The watch is also equipped with a compass and can mark points along your route (“waypoints”) to help you find your way back to the beginning of your path or let you know how long it will take to reach a particular point on the path.
2 2.1 Please Read Safety and Watch Care Notes Before Use Safety Instructions Please read this chapter carefully and follow all the specified indications. This way you ensure the adequate functioning and a long period of operation for your GPS-watch. Keep the wrapping and operating instructions well, so that, in case of alienation, you can hand them on to the new owner. For safety reasons, do not operate the GPS-watch while driving a car. Stop or let a co-passenger carry on the settings.
This device is not intended for use by individuals (including children) with limited physical, sensorial or emotional capacities or limited experience and / or knowledge unless they are supervised by an individual responsible for their safety or receive instructions from the latter as to how the device should be used. Children should be supervised in order to ensure that they do not play with the device. Important: Always consult your doctor, before starting a regular training program.
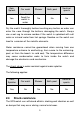
Rain, Splash Car wash Shower Bath, pool Nautical sports Yes, Yes, do not flood the watch in water No No No Dry the watch thoroughly before touching any button as water can enter the case through the buttons, damaging the watch. Always use a wet rag to remove residue if the watch is splashed with salt water or mineral water from hot springs. Residue on the watch can lead to corrosion of the metallic elements.
2.5 Avoid from Magnetic Fields Do not wear the watch near powerful magnetic fields (e.g. transformers) as they can alter the watch’s ability to accurately track time and location and lead to deterioration of the watch. 2.6 Operating Temperature Range The GPS-watch can be operated in a temperature range from 32 °F to 122 ° F, and stored at 14 °F up to 140 °C. Avoid high temperatures (e.g. in stopped vehicles or under direct sun influence) and sustained humidity.
Charge the battery of the GPS watch only with a USB cable delivered together with it. If the battery is charged otherwise, this can lead to overheating, explosion or fire. Do not charge the battery of the GPS watch near heat sources or in a car, under direct sunlight. Powerful temperature leads to the destruction of the battery and may lead to overheating, explosion or fire.
contacts of the battery and the contacts from the device. Keep operating instructions for consulting the information on batteries. Ignoring these instructions can lead to the deterioration of the battery and in extreme cases can cause the battery to explode. Information regarding the replacement of the battery of chest strap can also be found at point 9.2 "Replacement of the battery of chest strap.” 2.8 Disposal Please discard batteries appropriately. Batteries are special waste.
2.9 Maintenance The GPS watch and chest strap do not require maintenance. However, we recommend cleaning the sensor surfaces of the chest strap after each use. 2.10 Cleaning the Watch Exterior If problems occur when charging the GPS watch, check the contact pins on the back of the watch. If they have become soiled with sweat deposits and skin scales, clean them with a sharp metallic object (e.g.
3 How to Use This Manual The manual has been organized by first steps, then by features and modes. For further questions or support, email service@runtastic.com. 3.1 3.1.1 Getting to know your watch What’s in the box 1 GPS watch (Art.-Nr. RUNGPS1, Type: D02I280) including integrated lithium-polymer battery 1 chest strap (formed by sensors and elastic strap ) (Art.-Nr. RUNGPS1, Type: T00018D) incl. lithium battery (3V, CR2032) 1313 Sensor: Elastic strap: 1 USB cable 1 bike support incl.
3.1.2 Watch Buttons "St./Stp." Starts/Stops Workout Navigates UP in menus "LIGHT" button illuminates display "View" Toggles through views in watch mode, workout mode, and navigation mode.Long press turns on Heart Rate monitor or GPS.Selects item in Menu/Settings "MODE"-button— Switches watch modes, Long press opens Menu/Settings, While in Menu, press to return to previous menu "Lap/Reset" Press to manually mark a lap in workout or navigation mode. Navigates DOWN in Menu/Settings.
4 Before Using Your GPS Watch /First Steps Remove and dispose of the protective plastic on the watch screen. Caution! This protection film for the watch screen poses an asphyxiation danger and must be kept out of reach of babies and young children! The watch is delivered in off-line mode. To start the GPS watch, PRESS and HOLD the “LAP/RESET”-button for 5 seconds, or until the time and date is displayed. The first mode displayed is the Time Mode.
4.1 Getting to know your watch The GPS watch is equipped with a rechargeable lithium-polymer battery. Before the first use, charge the watch for 3 hours or until the battery is full. To charge the watch, attach the clamp-on USB charger to the watch. Be sure that the pins on the charger fit into the contacts on the back of the watch. Plug the USB into a USB wall adapter or your computer. To avoid corrosion, we recommend you to dry the contact points of the GPS watch well before starting a charging process.
correctly positioned and making contact. If the contacts become clogged with dirt or sweat, gently clean them with a cotton swab and dab of alcohol. When the charge is complete, a message will appear "Battery Full!" A full battery charge will yield up to 16 hours of watch time in GPS mode. 4.
Position the sensor under your pectoral (chest) muscles, adjusting the strap for a snug but not tight fit. Be sure the battery compartment is to your right when attaching the strap and the words are not upside down. . In order to make an optimum transfer of the cardiac frequency possible, wear the belt with the battery compartment on the right side (from the wearer’s point of view). The battery is already inserted in the chest strap, and is ready for use. 4.
requires a cold start. A cold start is one that may take a minute or longer to connect to the full GPS signal. On the other hand, a warm start that acquires the signal near the last GPS position, may only take 10 seconds to acquire the full GPS signal. In either case, when possible, it is recommended to start the GPS out in an open area with an unobstructed view of a clear sky. See SECTION 4.3 for instructions on how to start GPS 5 GPS Watch Modes The watch has four function modes.
6 Basic Settings Preparing your watch for use. 6.1 Navigating the Settings Menu To enter the Settings Menu, PRESS and HOLD the Mode button (bottom left) until the settings menu is displayed. Press the bottom right (Lap/Reset) button to scroll down to the menu item you want. Press the center right (View) button to select an item and display its sub-menu or to confirm (OK) a setting. Press the bottom left (Mode) button to return to the previous menu and again to exit settings return to watch mode. 6.1.
o Smart Lap By Dist LapWP points Alert Distance“ o View Scan o Track Log measurements o Delete Del Last Del All far • Navigation (Point 6.4) o Sel Path o Del Path o Nav Mode o WP Radius • GPS (Points 6.3 and 6.4) o On/Off reception o Timeout o A-GPS • HRM (Point 6.
Customize limits Alert Reset o Max.HR frequency o Pairing Modification of upper and lower Alarm activation for training area Reset of upper and lower limits to default settings Setting of maximum cardiac Junction of the chest belt with the GPS watch • Settings o Timer (Point 6.2) Timer adjustment o Alarm (Point 6.2) Alarm adjustment o Time Date (Point 6.
Dst/Spd of Position altitude Weight Adjustment speed and distance unit measure Adjustment of unit of measure for and longitude degree Adjustment of weight unit of body weight Compass (Point 6.5) Declinate Entry of declinations Calibrate Compass calibration Language Language adjustment Sys Reset Operation of system reset • Memory (Point 6.1.3) 6.2 6.2.1 Call of memory status.
lower number. Press the view button to accept the adjustment and move to the next setting. Press the Mode button when you have completed the birth date is set correctly. Weight Select SETTINGS the menu USER WEIGHT Then adjust weight 6.3 System settings Once you make the desired adjustments to a setting, press the Mode button to accept the changes and return to the previous menu. Turn on/off button sounds Turning on the button sounds (Key Tones) lets you know that you have pressed a button.
Adjusting the unit of measure (KM or Miles) for speed and distance The watch can be set to measure speed and distance both on land and on water. Select SETTINGS from the menu SYSTEM UNITS DST/SPD Select METRIC for Kilometers - km/h, IMPERIAL for miles-mph, or NAUTICAL for miles/ knots. Adjustment of the unit of measure for longitude and latitude degree Select SETTINGS from the menu SYSTEM UNITS POSITION Then select 0’00’00.00 N to display GPS location in DegreesMinutes-Seconds or 0.
6.4 Select "Off" in order not to reset the system and press the Mode button to return to the previous menu without resetting the watch. Check Memory Usage The watch has a limited memory and does not delete data automatically. You may want to track the memory usage to avoid losing any of your workout stats. To view how much memory has been used go MEMORY in the menu. The following display appears: Memory usage level The memory use level of the GPS watch will be indicated as a percentage %.
7 Time mode- Watch/Timer/Alarm/Battery Press the MODE button until the time mode is displayed. The main time mode is the watch with time and date. That appears as follows: Day of the week Time Month Date Cycle through the following time modes displays by pressing the VIEW button: 7.
SETTING THE TIME AND DATE The time and date can be set in the Menu by going to SETTINGS > TIME > HOME TIME and choosing how you want to set the time: GPS update Time Zone Manual setting Using GPS Update to set time: GPS Update is turned “ON” as a default setting and will automatically set the time when a GPS signal is acquired. Select SETTINGS from the menu TIME DATE HOME TIME GPS Upd To turn off the GPS Update feature select “Off.
Manual time adjustment If no GPS reception is possible, time format can also be manually adjusted: Select SETTINGS from the menu TIME DATE HOME DATE MANUAL Then adjust the seconds, minutes, hours, year, month and day. Use the ST/Stop and Lap/RESET buttons to change the time up or down. Press the VIEW button to switch between hour, minutes, seconds and date. Press MODE button when you have finished setting the time. 7.
7.3 Setting a Count-down Timer In Time-mode press the VIEW button until the following display appears : Timer Current time Set Timer Select SETTINGS from the menu TIMER Use the ST/STP or Lap/RESET button to adjust the hours, minutes and seconds for the timer. Press the VIEW button to move between hours, minutes and seconds. Press the MODE button to accept changes and return to the previous menu. To Use the Timer Press the VIEW button until the Timer display appears.
7.4 Alarm You can set up to 5 different alarms to go off at a particular time. Alarms can be set to repeat daily or on chosen days. To view the time of each set alarm, go to Time-mode and press the VIEW button until the following display appears: Alarm 1-5 Alarm time Alarm ON OFF Days repeated Press the ST/STP button, to view alarm 1-5. Press the LAP/RESET button to set the alarm "ON" (enabled) or turn it "OFF" (disabled).
Daily Daily Sun Sunday Mon Monday Tue Tuesday Wed Wednesday Thu Thursday Fri Friday Sat Saturday Mon-Fri Monday-Friday Press the MODE button to accept settings and return to the previous menu. Stopping the Alarm When the alarm rings, stop it by pressing any key. 7.5 Dual Time – Display two time zones Keep track of a different time zone by setting the Dual Time (e.g., always know what time it is in Paris when you are in New York).
8 Set the desired time difference from the current time (+12 hours to –12 hours in 30-minute increments). Press the MODE button to accept settings and return to the previous menu. GPS-Workout mode The GPS-Workout mode will display and record your stats once a current exercise session has been started. Stats can be saved and later uploaded to the Runtastic website using Runtastic Connect.
Setting of training data to zero If training stops, hold down the "LAP/RESET" button, until "Hold to Save" appears; all training data are set to 0 and you can start a new training. Still, the data of this training will be kept in the memory of the watch and will be able to be viewed later. 8.1 Heart Rate Monitoring The watch starts displaying current workout statistics when a workout session is started. Be sure you are wearing the heart rate monitor chest strap.
goals. The GPS watch has 3 training zone options (Health, Fat Burn, Aerobics), or you can customize the zones (User). The GPS watch automatically calculates your maximum heart rate based on your age and gender (this is why it you must set up this information in user settings see section ##). Heart rate zones are also set automatically based on your maximum heart rate.
Select SETTINGS from the menu HRM HR ZONE CUSTOMIZE Select the training zone you want to modify—Health, Fat Burn, Aerobics, or User. As you change the heart rate beats per minute (bpm) using the ST/STP or Lap/RESET buttons, the percentage of your maximum heart rate (indicated next to the heart rate bpm) will also change. Press the MODE button to accept the changes and return to the previous menu.
Press the MODE button to accept the changes and return to the previous menu. Activate/Deactivate Training Zone Alarms When you aren't looking at your watch, you can be alerted when you are above or below your set heart rate zone.
8.1.2 Sports Profiles and training data Choose a sports profile to show stats that pertain to a particular sport or the workout views can be customized to display the workout stats—heart rate, heart rate zones, distance, altitude, etc.-that you want to see on each screen. Each profile has 3 displays with 3 rows of stats.
When the “Scanning” function is activated, the GPS watch automatically switches between the 3 displays. To turn on automatic switching between views: Select SETTINGS from the menu WORKOUT VIEWSCAN ON Customize the Displayed Training Data Training data can be displayed on any row or screen in the workout. Choose the stats that you want to easily view based on your priorities.
To keep the current setting, press the VIEW button. Pressing the VIEW button again will display "View 2" and "View 3" Repeat the steps to customize each view. Press the MODE button when you are done to accept the changes and return to the previous menu.
Possible training data row 2 Distance HR LapDist LatLong PaceAvg SpeedAvg Speed TimeOfDay Wkout Time Distance Current cardiac frequency Lap distance Longitudinal and latitude degree Average pace (time/ mile) Average speed Current speed Time Training time Reset the Training Views to defaults In the setting mode select „Workout“ point from the menu „Profiles“ „Reset“. 8.1.
2. 3. Press and hold down the „VIEW“-button from GPSWorkout-mode. The GPS icon will blink indicating that it is searching for satellites. When the GPS signal is acquired (fixed), the icon will change as follows: Search for signal acquired Satellites GPS Option 2: 1. Press and hold the MODE button to enter the watch menu. 2. Select GPS from the menu ON/OFF 3. Press the VIEW button and the message "GPS On!" will be displayed. 8.1.
This symbol indicates that the GPS has acquired full 3-D positioning, including Altitude data. Accurate and uninterrupted reception of the satellite signal can only be guaranteed under calm weather conditions (clear sky) and an adequate reception area – open area with clear view to the sky. Satellite signals react sensitively to external influences. GPS reception may be weak or unavailable in bad weather (e.g.
2. Press and hold down the VIEW button until "GPS Off!" is displayed. Option 2: 1. Press and hold the MODE button to enter the watch menu. 2. Select GPS from the menu ON/OFF 3. Press the VIEW button and the message "GPS Off!" will be displayed. GPS Timeout setting When the GPS is turned on, it will search to reacquire a signal that has been lost. The default setting is for the watch to search for a GPS signal for 5 minutes. If it is not successful, the GPS will automatically turn off.
When You Can't Get a GPS Signal There are times when the GPS may not be able to obtain a signal (e.g., during bad weather, downtown among tall buildings). Yet, the watch can still track your workout and add the GPS information later using a feature called the "Assisted Global Positioning System" (AGPS). 8.1.5 A-GPS A-GPS fastens the search for a good GPS-reception and saves the data on a server for 7 days.
Automatic recording of lap times LAP BY DISTANCE The Smart Lap feature will automatically generate a lap at any set distance (e.g., every ½ mile, mile). Lap times will then automatically be recorded when the distance has been reached. To set up Smart Lap by distance: (1) Press and hold the MODE button to enter the watch's menu. (2) Select WORKOUT from the menu SmartLAP BY DIST (3) Use the ST/STOP or Lap/RESET buttons to set the desired lap distance. (4) Press the VIEW button to accept the setting.
8.2 After training-RECALLING WORKOUT History After a workout session has been completed and saved (see section###), you can review the data that was recorded during your workouts. To view your Workout history: Press and hold the MODE button to enter the watch's menu. Select WORKOUT from the menu WORKOUT HISTORY Press the VIEW button to recall your most recent workout stats. Use the ST/STOP or Lap/RESET buttons to scroll through the saved workouts.
To view the lap data: Press the VIEW button On the upper left is the Workout Number and on the upper right is the lap number. Press the ST/STOP or the LAP/RESET buttons, to switch between the individual laps. The history of the laps consists of 2 displays that automatically alternate: Display 1. Shows Average lap time, lap distance and lap pace (time per mile) 2nd Display Lap time, average heart rate for lap, and the speed of this lap.
lap in one mode, it begins a session and registers the lap in the other mode as well. Before you begin GPS Navigation, you need to choose a path. Previous paths can be followed, or a new path can be created. Press the MODE button repeatedly until the “GPS Navigation-mode is displayed: Current Speed Distance to the activated checkpoint Directional arrow Navigation Data 8.4 Waypoints- Creating a Path on the Watch, Finding Your Way A waypoint is a point along a route ("path").
navigation and pick the waypoint, or the forward navigation (see below for instructions). Another way to use marked waypoints is to return to a point along the path and find your way back to where you started, or simple choose your starting point and follow the way back. This is particularly helpful to be guided back to a point on a trail when hiking.
Press the MODE button to accept the changes and return to the previous menu. Delete path Press and hold the MODE button to enter the watch's menu. Select NAVIGATION from the menu DelPath Use the ST/STOP or Lap/RESET buttons to scroll through the saved paths. Creating a path Setting of measurement interval When you start the GPS Navigation, the watch will create a path (and save it to the path number you chose in the previous step.
Choose a path with "0" waypoints to create a new path. Choosing a previously recorded path will overwrite the previous path information. Press VIEW to choose the displayed path number. Press MODE to accept the settings and return to the previous menu. To create a waypoint, quickly press the LAP/RESET button to mark the location. 8.
Before you begin, choose the path, the navigation-mode and the waypoint-radius, as described below: 8.5.1 Navigation Mode There are three different types of navigation: Waypoint-navigation: Here you choose an individual waypoint on the active path that becomes the location to which you will be directed. Choose this navigation type when you want to go to a specific point along the recorded path. Each subsequent waypoint must be manually selected. Select the waypoint in the “go-to-display” (see below).
Waypoint-radius This setting determines the distance from the actual marked waypoint at which the watch determines that you have reached the waypoint. The default is 100 feet but it can be changed manually (from 50 to 650 feet). To set the waypoint radius: Press and hold the MODE button to enter the watch's menu. Select NAVIGATION from the menu WP Radius Use the ST/STOP or Lap/RESET buttons to increase or reduce the radius of the waypoint goal.
• Press the VIEW button and the message "GPS On!" will be displayed. The GPS Navigation will automatically load the last used path. To use another path, or to create a new path, follow the previous directions in this section on selecting or creating a path. If you are creating a new path, or have chosen a path with 0 waypoints, "no waypoint" will flash in the directional arrow box.
8.7 Navigating to a waypoint: Go-to-display While in the GPS-Navigation mode and press the “VIEW”-button until you see the following display: Waypoint number Path name Navigation data Choose a waypoint number from the currently selected path by pressing the “ST./STP.” or “LAP/RESET”-button.
Direction Indication of degrees N North 349° - 11° NNE North-Northeast 12° - 33° NE Northeast 34° - 56° ENE East-North East 57° - 78° E East 79° - 101° ESE East-South East 102° - 123° SE South East 124° - 146° SSE South-South East 147° - 168° S South 169° - 191° SSV South-South West 192° - 213° SV South West 214° - 236° VSV West-South west 237° - 258° V West 259° - 281° VNV West-North west 282° - 303° NV North west 304° - 326° NNV North-North west 327° - 348°
8.8.1 Compass calibration To ensure that the accuracy of the watch's compass it must be calibrated: The first time the compass is used on the watch Or When changing locations or situations from the last time the compass was calibrated. To calibrate the compass: Press and hold the MODE button to enter the watch's menu. Select SETTINGS from the menu SYSTEM COMPASS CALIBRATE.
Geographical North Pole Magnetic North Pole Magnetic declination Magnetic declination To correct this declination, the deviation degree can be introduced. This deviation degree is indicated on maps as plus (positive) Eastern deviation (E)(pointing to the right of North), and minus (negative) Western deviation(V) (Pointing to the left of North).
Select SETTINGS from the menu SYSTEM COMPASS DECLINATE. Use the ST/STOP or LAP/RESET to adjust the deviation number (plus or minus). Press the MODE button to accept the setting and return to the previous menu. 9 To Save Battery Life To preserve battery life, the watch display can be turned off. In Time mode, press and hold the LAP/RESET button for 5 seconds or until the display turns off. Settings and data will NOT be lost.
11 Charging the battery, replacement of batteries 11.1 Charging the battery of the GPS watch The GPS watch has a lithium-polymer battery. Battery Usage Display In Time-mode press the „VIEW“-button until the following display appears on the display: Remaining hours An estimation of the hours left for the use of the GPS function will be displayed. When the battery is almost empty, the following symbol will appear , and the GPS functioning and cardiac frequency measurement will be deactivated.
To charge the watch, attach the clamp-on USB charger to the watch. Be sure that the pins on the charger fit into the contacts on the back of the watch. Plug the USB into a USB wall adapter or your computer. When the USB charger/connection cable is securely attached to the watch this symbol will appear on the watch display. If the cable is connected, but the symbol does not appear, press the View button. If it still doesn’t display, check that the clamp is correctly positioned and making contact.
11.2 Replacement of the battery of chest strap Open the cover of the battery compartment with a coin, rotating counterclockwise. Take out the old battery and place a new 3V type CR2032. Make sure the plus pole (+) shows upwards. Put back the cover from the battery compartment and close it again, rotating clockwise. Make sure the closed tightly, so that moisture does not infiltrate the chest strap.
12.1.1 1. 2. 3. 4. How to install Runtastic Connect Do not yet connect the USB cable to your computer. Double click on the downloaded Runtastic Connect installation file to start installation . Follow the instructions in the installation program to install the program to your computer. This will also install the necessary driver for the USB port, so the watch can be recognized when connected and will automatically start the Runtastic Connect software.
Click to this arrow to open up the window completely: To sign up or create a Runtastic account, click on “Connect account". This will automatically take you to Runtastic.com where you can log in to an existing account or follow the instructions on the website to create a new account. Runtastic Connect has three windows: User, Customize, and System.
“User” In the customize window, you can make changes to the watch's profile displays as well as change the names of the profiles. The three screens can be customized by choosing the data type from the drop-down menu. When you have completed your changes, click on the "save" button.
From time-to-time, Runtastic will update the firmware that runs the GPS watch in order to improve its performance or update features. Regularly check for updates when connecting your watch by clicking on the System tab and pressing the "update" button. You will be notified if an update is available.
Accuracy of position determination Chest strap Power supply: 1 Lithium battery (3V, CR2032) Transmission frequency from the chest strap to the GPS watch: 2,4 GHz 14 Declaration of compliance R&TTE Directive 1999/5/EG: Shortened text of the declaration of compliance: By this, KripplWatches, declares that the GPS watch (Art.-No. RUNGPS1, Type: D02I280), as well as the chest strap (Art.-No. RUNGPS1, Type: T00018D) comply with the applicable basic conditions and dispositions of 1999/5/EG directive.
15 FAQ/Correction of errors If your GPS watch is not working properly, first check that the watch battery is charged and that the chest strap battery is replaced if needed. I’d like to start training, why doesn’t the GPS watch show speed? When acquiring the GPS signal BEFORE you start your workout or GPS Navigation, be sure that you are standing in one place and not on the move. Be sure that you are standing in an open space, with a clear view of the sky when you start the search for satellites.
The display on the screen reacts slowly, why? Is the temperature below freezing (32° F) When the temperature rises again over 32°C, the display will become normal. The saved data will not be lost. How long does the battery of the GPS watch last? A full batter charge will last approximately 16 hours, when using the GPS, or approximately 1 year when used solely as a watch in time mode. It doesn’t show my current speed, why? Check that you are receiving the GPS signal.
Why won't the battery of the GPS watch charge? If you are charging the watch by connecting it to a USB port on your computer, be sure that the USB port is a power carrier. Check the contact pins on the back of the watch. If these have become soiled with sweat deposits and skin scales, clean them with a sharp metallic object (e.g. tweezers) or a dab of alcohol on a cotton swab.
16 Warranty We provide a 24-month warranty against manufacturers defects. . The warranty period begins on the date of purchase (till receipt, purchase voucher). If the product fails during the warranty period, you will receive a new or repaired product free of charge. The warranty does not include batteries, improper handling, dropping, shock, or other damage. To make a claim: a) Contact the retailer where the product was purchased or b) Send an e-mail to: service@runtastic.