
Owner's Manual


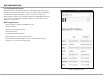
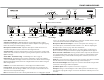


Table Of Contents

5XZone70V Installation Manual
XZone70V Streaming Audio Amplifier
Level
System VolumeMic Volume
Clip
FRONT AND BACK PANEL
Power Button Status LEDsSystem
Volume Control
Ethernet
Port
Factory
Reset
USB Port
AC Input
Power Button - Turns the XZone70V on/o.
Output Level Indicator - LEDs will illuminate sequentially from left to right to
indicate increasing output levels. Red indicates that the amplifier has begun clipping.
Reduce the volume level when clipping is reached.
Microphone Volume Control - Adjust the microphone volume level here to in-
crease the microphone volume in relation to the background audio.
System Volume - Use these volume buttons to increase/decrease the overall system
volume level. These buttons are similar to pressing volume up/down on the XTS or the
MyRussound app.
Status LEDs - Troubleshooting - See LED diagnostic chart on page 11
Ethernet Port - The Ethernet port is used for configuration as well as for enabling
control via the MyRussound App or the XTS Touchscreen. The default network setting is
DHCP-enabled, but the XZone70V can be configured with a static IP address using the
Web Config interface.
USB Port - For audio from flash drives or externally powered USB hard drives
Factory Reset - The factory reset button has two functions. A 3-second press and
hold will restore network settings to DHCP. A 10-second press and hold will reset the
XZone70V to its factory default settings.
Note: A unit that has been reset to factory default will have no configuration and will
need to be unlocked and reconfigured by a Russound Certified Installer. Network
connections will also default back to DHCP during a reset.
Microphone Gain Control/Input - Connect a microphone here. If using a con-
denser microphone, set the Phantom Power switch to "On". Refer to "Adjusting the
Microphone Gain" section on page 12 for more information.
Phantom Power Switch - Set this switch to "On" when using a condenser micro-
phone or when the microphone instructions specify using Phantom Power support.
Mode 70/100V or 4Ω Switch - Like any premium audio component, the XZone70V
uses a high pass filter when operating at 70/100v. If using as a low impedance ampli-
fier (minimum 4 ohm), set this switch to the 4Ω position. Otherwise, leave it at the
70/100V position.
Audio In - Connect any stereo audio source to this connection. This input is selectable
from the XTS touchscreen or the MyRussound app and has AUX input.
Pre-Out Left and Right - Balanced pre-out connections for both left and right audio
channels for connecting to additional amplifiers
Speaker Output - Refer to "Speaker Connections" on page 12.
AC input - Voltage is autoswitching for 100V to 240V operation 50-60 Hz. This recep-
tacle accepts a 3-prong IEC C13 type connector. A detachable 3-terminal power cord is
included.
Pre-Out
Left and Right
Speaker
Out
Audio In
Microphone
Gain Control/Input
Phantom
Power Switch
Mode 70/100V or 4 Ω Switch
Microphone
Volume Control
Output Level
Indicator