
Installation manual


28
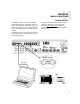
Before proceeding to the system programming section, it’s important to conduct an initial test to
determine that the hardware components are working properly.
1. Connect the speaker wires from Zone #1 to the CAA66 Zone #1 speaker output connectors.
2. Connect a keypad (KP6, KPL) to Keypad Port #1 on the rear of the CAA66.
3. Connect a source to the Source #1 Input on the CAA66 using RCA Audio patch cables.
4. Plug an 845.1 IR emitter into the Source #1 IR Output Jack and adhere the emitter end to the
source equipment’s IR window.
5. Plug in the main power cords for the CAA66 and the source.
6. Turn on the main power switch on the CAA66 and the source.
7. Manually command the source to provide audio or use the source remote control.
8. Press the power button on the KP6 or KPL keypad and select Source #1.
9. To be sure of proper placement of the IR emitter on the source component, aim the source
remote control at the keypad for Source #1 and try to control the source. Adjust the emitter over
the source’s IR receiver if necessary.
Congratulations – you should now hear the source through the speakers in Zone #1.
If there is no sound, follow these diagnostic steps:
1. Check the source to see that it is operating properly.
2. Check the RCA Audio cable connections from the source to the Source #1 Input on the CAA66.
3. Check the speaker connections and verify that they are correct and are connected to the
Zone #1 speaker outputs.
4. Check to see that the keypad is connected to the Zone #1 Keypad Port and verify the CAT-5 is
properly terminated at both ends.
If none of these steps produce successful results, call Russound Tech Support for further assistance.
INSTALLER
INITIAL HARDWARE INSTALL TEST