
Use and Care Manual


Russound Architectural Series of In-Ceiling and In-Wall Loudspeakers3
Additional Tips / Considerations
•
Try to run speaker wires after AC wiring is in so you can separate the wires,
avoiding induced noise caused by close parallel positioning of the two
wire types.
•
Secure speaker wires in place against a stud along vertical runs. Do not
pierce the wire insulation. Allow a bit of slack for expansion of building
materials.
•
Route horizontal wire runs through holes drilled in studs at roughly equal
heights.
•
Speakers should not be installed until the wallboard is in place. In the
meantime, leave several feet of wire coiled up and secured to the back
side of the mounting frame. Excess length can be removed during nal
assembly.
•
When installing the drywall, make sure the speaker cutout hole doesn’t
extend farther than 1/4” (0.6 cm) from the inside of the mounting frame.
•
Speakers installed in ceilings should have a safety wire tied between
the back of the speaker and the frame of the building. Use any strong
insulated wire, connect it to the speaker frame or bae so it doesn’t
interfere with the speaker’s operation. The other end should be rmly
attached to the joist or ooring above using a hook, nail, or other reliable
fastener.
•
Terminating the wires in an outlet box attached to a stud or retrot
junction box at the exit location. Use an outlet plate with speaker wire
terminations.
•
After the drywall is secured and nished, install the speakers as we’ve
described.
Painting the Speaker Grille
Russound Architectural Speaker Grilles have a designer white nish that can
be painted with ordinary latex paint. Remove the speaker grille from the
speaker before painting.
1. Remove the magnetic speaker grille and carefully remove the scrim cloth
from the grille and set aside.
2. Paint the grille. Russound recommends diluting the latex paint with water
4:1 or 5:1 proportionally. Due to the ne mesh openings, using several layers of
a thinner paint spray is recommended rather than using a single, thicker coat.
A thick coat is likely to clog the speaker grille openings.
3. While the paint is still wet on the grille, and the grille is not attached to the
frame, use a gentle burst of compressed air against the outside surface to clear
the ne holes in the mesh.
4. After the paint has thoroughly dried, re-attach the scrim cloth, and attach
the grille to the frame.
Pre-wire or Pre-construction
Locate all obstructions (AC wiring, plumbing, duct work, studs, and joists).
Route the speaker wire to the speaker location avoiding all obstacles. Watch
out for closeness to AC wiring.
Russound oers Speaker Rough-In Brackets that can be fastened to the
adjacent studs. Once the dry wall is installed, the opening is cut out. There are
holes molded into the bracket for speaker wire tie-o to keep the wire from
being lost during construction.
Make sure the speaker cutout (hole) doesn’t extend further than 1/4” (0.6 cm)
from the inside of the mounting bracket.
Retrot Installation
Locate existing pipes, duct work, and AC wiring before cutting any holes in
the ceiling.
1. Center the cardboard template between adjacent joists, avoiding all
wiring, pipes, duct work, and lightly mark the outline with a pencil.
Then use a keyhole/drywall saw or motorized spiral-cut tool to make
the opening.
2. Score the outline of the template with a utility knife to prevent
chipping. If dealing with lath and plaster or thick paneling, drill 1”
(2.5 cm) holes in several places around the pencil outline. Use a
ne-toothed keyhole saw or hacksaw blade with slow strokes to saw
through and remove the inner surface.
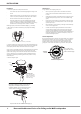
PREPARATION / SPEAKER PLACEMENT
Note:
Run two pair conductors for
single point speakers.
Rough-in Bracket
Magnetic square grille
ICG-6S (6” Models) and
ICG-8S (8” models)
(sold separately)
Speaker Cable
Screw
Stud / Joist
In-ceiling bracket Installation
In-wall bracket Installation
Retrot Installation
Score template outline Cut out opening
Speaker Assembly
Do not attach the grille until the
speaker has been connected and
secured in the ceiling.
Speaker
Grille
Scrim Cloth