
Use and Care Manual


Russound Architectural Series of In-Ceiling and In-Wall Loudspeakers4
Listening Test
It’s a good idea to test everything at this point.
1. Turn on your stereo system or music source. Make sure that the
volume control is turned down and that the balance control is set
to center.
2. Gently turn up the volume. You should hear music coming out of your
new Russound Speakers! (If you don’t, refer to the troubleshooting
guide.)
3. Now rotate the stereo’s balance control all the way to the left. Sound
should only come out of your left speaker. If it comes out of the right
speaker, skip to Step 5.
4. Rotate the balance control all the way to the right. Sound should only
come out of the right speaker.
5. If sound comes from the right speaker when the stereo’s balance
control is turned to the left, you’ll need to change the connections
on the back of the amplier/receiver. Note: Turn o the amplier.
Swap the wires attached to the left and right speaker terminals before
turning the amplier back on. Make sure to keep the (+) and (-) the
same for left and right speakers.
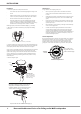
Tweeter Adjustment
The IC-630 and IC-830 feature a tweeter control that enables you to adjust the
high frequency performance up or down in 3 dB steps - to help compensate
for room acoustics. Also, in those models where the tweeters pivot, they
should be aimed toward the intended listener. Before installing the grille,
gently press on the outside of the tweeter ring as shown to aim as you wish.
Installation
1. Connect the speaker wire to the speaker terminals:
•
Leave about 2’ (60 cm) of wire extending through the ceiling or wall
cutout.
•
Pull the conductors apart so the last two inches are separated and
remove 1/2” (13 mm) of insulation from the end of each conductor.
•
Twist the strands in each conductor into tight spirals.
•
Attach the speaker wires to the red and black speaker terminals.
Connect the Positive (+) conductor to the Red terminal and the
Negative (-) conductor to the Black terminal. Make sure that no stray
strands of wire are touching the other conductor or terminal.
NOTE: Single point speakers have four terminals; Right(+), (-) and Left(+),
(-). Run an extra pair of wires and observe proper polarity when making
connections.
2. Center the speaker in the cutout. For the IC-610 and IC610T models: Rotate
the frame as needed before tightening the mounting dog screws. Tighten the
screws equally until the clamps secure the frame. Do not over-tighten.
IC-620, IC-820, IC-630 and IW-620 models - These models feature the patented
SwiftLock® by Swarm attachment design. For these models position the
speaker in the opening, rotate them to the desired position and hold them
in place - and then press each of the three SwiftLock® installation buttons.
You will hear a resounding “click” letting you know the speaker is securely
mounted in place.
3. Attach the magnetic grille.
INSTALLATION
Removing a SwiftLock
®
Speaker
Removing a SwiftLock
TM
speaker is quick and easy.
Simply insert a #2 Phillips Screwdriver into the
screwhead, push the screw in and turn the screw a
1/2-turn counter-clockwise to lock it into place.
Speaker
Press each of the three
SwiftLock
®
installation
buttons. (One for each
of the three dogs).
Cutout
Speaker
Cable
Install Speaker
Repeat for the other two SwiftLock
®
mounting dogs
Press on the outer
ring of the tweeter to
achieve desired angle.
Tweeter Adjustment
Tweeter
Dome
Insertion of speaker wire on back of speaker bae
+
+