UNO-TS2 Touchscreen Instruction Manual
IMPORTANT SAFEGUARDS Safety Instructions “WARNING” “ TO REDUCE THE RISK OF FIRE OR ELECTRIC SHOCK, DO NOT EXPOSE THIS APPLIANCE TO RAIN OR MOISTURE.” “CAUTION” “ TO REDUCE THE RISK OF ELECTRIC SHOCK, DO NOT REMOVE COVER. NO USER - SERVICEABLE PARTS INSIDE. REFER SERVICING TO QUALIFIED SERVICE PERSONNEL.
TABLE OF CONTENTS User Guide Introduction ........................................................................................................4 Front Panel and Home Screen ............................................................................5-6 Source Screens Common Features ......................................................................7 Source Screen Examples ......................................................................................8 Controlling the Russound ST2 Tuner .......
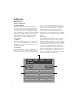
INTRODUCTION Stylish to look at, a joy to use. The UNO-TS2 Touchscreen is a full-featured color touchscreen that provides a powerful user interface for Russound multi-source, multi-zone A/V systems. The user can easily access, control and enjoy music and video from anywhere in the home. Housed in an attractive bezel, the UNO-TS2 features beautifully rendered screens and elegantly simple displays.
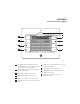
USER GUIDE Front Panel and Home Screen 1 2 10 3 9 4 8 5 7 6 1 IR RECEIVER - Receives IR signals from source and UNO-LRC1 remote controls, and passes them to the controller and source equipment 2 TOUCHSCREEN - Full color resistive touchscreen with multi-sound feedback 3 PLUS - Adjust setting for selected source 4 MINUS - Adjust setting for selected source 5 NEXT - Go to next selection for selected source 6 PREVIOUS - Go to previous selection for selected source 7 POWER - Turn room power
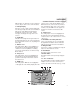
USER GUIDE Home Screen Home Screen Fields 1. Display Window At the top of the screen, the display window shows the active source name and peripheral info. A red bar reflects the volume level in the room the touchscreen is controlling. The small boxes with “master,” “party,” “shared” and “DND” reflect system status of shared source, party mode and master keypad, and do not disturb settings. These are accessed through the Options button. disc, etc.
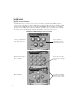
USER GUIDE Common Features of Source Screens Although there are different screens for different sources, they do share some common features. 1. Primary Display All source screens contain a primary display window which generally shows the same information that appears in the UNO-S2 keypad display, including the current source name, system messages and display messages from some sources. 2. Volume Bar This thin red rectangle runs along the bottom of the Primary Display.
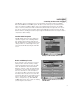
USER GUIDE Source Screen Examples The UNO-TS2 offers up a new screen for each source that is configured in the RNET system. A source can be a CD Player or Changer, DVD Player or Changer, VCR, Cable, Tuner, Satellite, Satellite Radio, Russound SMS3 Media Server or ST2 Tuner (AM/FM/XM). After the installer has configured the sources in the RNET system and in the UNO-TS2, you will be able to control the source through its custom screen and through the applicable hard buttons on the sides of the screen.
USER GUIDE Controlling the Russound ST2 Tuner The UNO-TS2 offers an expanded view of source information and selections when used with the Russound ST2-XM Tuner in an RNET system. The tuner screens allow you to see bank and preset names in a single view, with the ability to save a preset right from the touchscreen. For satellite radio, a screen is provided to show the channel name plus the artist and song in the same screen. You can also search for music by channel category.
USER GUIDE Controlling the Russound ST2 Tuner The ST2 tuner screens on the UNO-TS2 allow you to directly enter a station’s frequency or perform a station seek or scan function from the touchscreen. Bank and preset memory names show in a single screen view, and you can save a new preset right from the touchscreen. If the UNO-TS2 is powered on before the ST2 Tuner is turned on, existing preset names may not appear until after the tuner’s boot up procedure is complete (less than a minute).
USER GUIDE Controlling the Russound SMS3 Media Server The UNO-TS2 offers an expanded view of source information and selections when used with the Russound SMS3 Media Server in an RNET system. A single view shows the active theme, artist name, song title and album name. Linked screens show more detailed song information and lead to search fields to choose music by genre, artist, album and more.
USER GUIDE Controlling the Russound SMS3 Media Server Media Server Music Request Screen The Request Music screen for the media server lets you request music a variety of ways: by Artist, by Album, by Genre and more. Press the desired item to proceed to that category’s selections.
USER GUIDE Setting Room Preferences Options Screen Options The Options button on the home screen brings up a variety of room and screen setting options and touchscreen adjustments. CAV front A/V - This button selects as a source the component connected to the CAV6.6 front A/V connection. Features, Sound Control and Screen Setup These buttons bring up additional screens and are discussed below.
USER GUIDE Setting Room Preferences Sound Control Screen Treble:+2 The Sound Control button on the Options screen brings up a variety of room setting options. Bass - Adjust the bass level for the room Balance - Adjust the left-to-right speaker balance for the room Treble - Adjust the treble for the room Loudness - Turn loudness (more bass, fuller sound at “low” volumes) on or off for the room. A checkmark appears to indicate “Loudness” activation.
INSTALLER GUIDE UNO-TS2 Overview UNO-TS2 Overview for Installers Note: The following minimum firmware revisions are required for use with the UNO-TS2: CAV6.6 Rev. 3 CAV6.6 Rev. 4 CAM6.6 CAM Internal AM/FM Tuner CAM Internal XM Module ST2 Dual Tuner ST2-XM (ST2 Chassis) ST2-XM (XM Module) SMS3 Media Server 2.01.16 3.01.10 1.01.05 1.01.01 2.00.05 3.00.10 3.00.10 2.00.05 2.00.07 The UNO-TS2 is an RNET-system enabled touchscreen that functions similarly to the UNO-S2 keypad.
INSTALLER GUIDE UNO-TS2 Front Panel 1 2 UNO-TS2 without front cover plate 16 1 RESET BUTTON - Resets the UNO-TS2 after upgrades or programming (similar to cycling power) 2 OS UPDATE PORT - Port used for UNO touchscreen OS software updates.
INSTALLER GUIDE UNO-TS2 Back Panel RNET NEWMARKET, NH USA UNO-TS2 +12V BR +12V BR/W GND GR STATUS IN GR/W GND OR IR OUT OR/W COM A COM B BL BL/W RESET STATUS GND SIGNAL +12V EXTERNAL IR RECEIVER IN 1 2 DESIGNED IN USA MADE IN KOREA 3 1 110 PUNCHDOWN CONNECTOR - Termination for RNET CAT-5 connection between the UNO-TS2 Keypad and the CAV6.6/CAM6.
INSTALLER GUIDE UNO-TS2 Touchscreen Connections CAT-5 Connection The UNO-TS2 Touchscreen uses a 110-punchdown terminal to provide a simple installation and strong connection for CAT-5 cable’s eight conductors. Punchdown terminals require the use of a punchdown tool. Attach the CAT-5 cable to the 110-punchdown terminal on the UNO-TS2 touchscreen as shown, matching the conductor colors to the connection color guide.
INSTALLER GUIDE UNO-TS2 IR Receiver Connection The UNO-TS2 also has an External IR Receiver In terminal for connecting an external IR Receiver such as the Russound 858, SaphIR 862 Eye, or SaphIR 860 Phantom. receiver model’s manual for the specific wire needs. Use 2 twisted pair wire with one pair connecting GND (GROUND) and IR (SIGNAL) and the other pair connecting ST (STATUS) and V+ (+12VDC). Connect the shield or drain to ground at the UNO-TS2 only.
INSTALLER GUIDE UNO-TS2 Touchscreen Controller Connections For One UNO-TS2 per Controller An RNET controller (CAV6.6, CAM6.6) supports one UNO-TS2 and up to five UNO keypads per controller, connected to the UNO System Keypad Ports located on the rear panel. Caution: 12V Zone triggers on the RNET controller cannot be used with this keypad configuration due to 12V power supply capacity. Use an SA-ZX3 and power supply if triggers are used. 102.
INSTALLER GUIDE UNO-TS2 Touchscreen Installation Keypad Installation Size of UNO-TS2 bezel 6.0” W x 4.875” H To install a double-gang keypad, you will need a UL/CSA approved plastic 32ci double-gang electrical box. Note the minimal clearance around the box for the bezel. This is larger than a typical light switch cover, so additional space may be required. For best viewing and usage, the UNO-TS2 should be mounted at thermostat height, or about 59” from the floor. Size of standard 2-gang box 4.0” W x 3.
INSTALLER GUIDE Configuring Sources For proper operation, Russound components must be assigned the correct Source Type in the UNO-TS2 Source Setup process. The following chart references Russound components to UNOTS2 Source Types. Russound Component Source Type ST2 Tuner Russsound Tuner ST2-XM Satellite Radio SMS3 Media Server SMS3 Media Server After sources have been configured and given custom names (if applicable) in the CAV6.6 or CAM6.6 system, they must also be configured in the UNO-TS2.
INSTALLER GUIDE Other Installer Setup Functions Several installer-level functions are accessible from the Installers Setup screen. controlling and the ID number of the controller to which it is connected. About - This screen shows the current firmware and screen versions on this touchscreen.
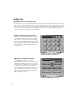
INSTALLER GUIDE Other Installer Setup Functions Diagnostics - This series of screens provides access to the diagnostics to provide some simple testing of the touchscreen’s performance. Diagnostics This screen is shown when “Diagnostics” is selected Touch Test - This screen is a tool for checking the touch sensitivity and calibration of the keypad. As each letter or number is pressed, the touchscreen “says” the letter/number.
INSTALLER GUIDE Other Installer Setup Functions Firmware Update There may be future updates to the UNO-TS2 firmware. Updates will be available online through the Document Center at www.russound.com, under Multi-zone. The Firmware Update page is reached from the Installers Setup screen. This screen is the first step in the firmware update process. The Russound Programming Cable (P/N 2500121036) must be connected to the OS update port on the front of the UNO-TS2.
TECHNICAL SPECIFICATIONS Technical Specifications Power Requirements: CAT-5 Connection: Dimensions: Weight: NOTES 26 12VDC @ 350mA 110 punchdown Inside J-Box 3.675"W x 1. 50"D x 2.850"H (9.3 x 2.9 x 7.2 cm) Front Panel 5.750”W x 1.0”D x 4.650”H (14.6 x 2.5 x 11.8 cm) Fits UL/CSA Approved Double-gang Junction Box 1 lb 2.5 oz.
WARRANTY Warranty Repair The Russound UNO-TS2 is fully guaranteed against all defects in materials and workmanship for two (2) years from the date of purchase. During this period, Russound will replace any defective parts and correct any defect in workmanship without charge for either parts or labor. For this warranty to apply, the unit must be installed and used according to its written instructions. If service is necessary, it must be performed by Russound.
UNO-TS2 Touchscreen Instruction Manual Russound 5 Forbes Road, Newmarket, NH 03857 tel 603.659.5170 • fax 603.659.5388 e-mail: tech@russound.com www.russound.com 28-1163 Rev.