
Use and Care Manual

FLOOR COATING
TECHNICAL DATA
RSP-01
ROCKSOLID
®
POLYCURAMINE
PROFESSIONAL FLOOR COATING
1
Form: TDS-1372
Rev.: 102422
DESCRIPTION AND USES
RockSolid
®
Polycuramine
Professional Floor Coating is an
industrial grade designed to provide excellent hardness,
adhesion and durability on properly prepared concrete floors.
It has excellent resistance to salt, oil, gasoline and other
harsh chemicals. This product combines the key attributes
from multiple chemistries to provide a self-leveling, flexible,
fast curing, high gloss system.
PRODUCT FEATURES
Low odor and can be applied indoors
Formulated without the addition of VOC containing
solvent
One coat system
Longer pot life than other 100% solids epoxies
Patented Burst Pouch Technology
96% solids formulation
Has excellent self-leveling properties
7 day recoat window without sanding
Excellent durability in a single coat
KIT CONTENTS
4 - 90 fl. oz. Polycuramine Burst Pouches
(U.S. Patent Number 8,381,903 B2)
Instructions
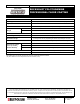
PRODUCTS
SKU
DESCRIPTION
322759
Gray
322760
Dark Gray
322761
Mocha
322762
High Gloss Clear
PRODUCT APPLICATION
SURFACE PREPARATION
Moisture Testing - New concrete should be allowed to cure
for 30 days before application of any coating. If there is any
doubt about the dryness of the concrete, conduct a test by
simply taping a piece of 4 mil plastic sheet 18x18” on the
bare concrete for 24 hours. Be sure to tape all four sides.
After 24 hours, check the concrete for signs of moisture.
The concrete substrate will be darker if damp. If moisture is
found, allow additional drying time (10-14 days) and repeat
the test.
Testing for Sealer - Check for curing compounds or other
types of sealers by pouring a small amount of water onto the
concrete. If water soaks in, the surface is suitable for
coating. If water beads up on the concrete, the surface is
not porous and a test application is warranted to ensure
proper adhesion will develop. Sanding or mechanical
abrading may be required if proper adhesion does not
develop.
PRODUCT APPLICATION (cont.)
SURFACE PREPARATION (cont.)
Previously Coated Floors -
Previously coated floors need
to be in good condition with proper adhesion to the concrete
substrate. Check the adhesion of the previous coating by
cutting a small X in the coating using a sharp razor knife.
Firmly apply a piece of 5” duct tape over the center of the X
cut, and then pull off with a fast snap. If more than 10% of
the taped area is removed, the original coating is not
bonded well and needs to be removed chemically or
mechanically with a grinder.
For best adhesion, scuff sand previously painted or coated
floor using 80 grit sandpaper and clean with solvent such as
acetone. Or use Rust-Oleum
®
Concrete & Garage Recoat
Primer (sold separately).
WARNING! If you scrape, sand or remove old paint from any
surface, you may release lead paint dust. LEAD IS TOXIC.
EXPOSURE TO LEAD DUST CAN CAUSE SERIOUS
ILLNESS, SUCH AS BRAIN DAMAGE; ESPECIALLY IN
CHILDREN. PREGNANT WOMEN SHOULD ALSO AVOID
EXPOSURE. Wear a NIOSH approved respirator to control lead
exposure. Clean up carefully with a HEPA vacuum and a wet
mop. Before you start, find out how to protect yourself and your
family by contacting the National Lead Information Hotline at 1-
800-424-LEAD or log on to www.epa.gov/lead.
The concrete surface must be free of all dirt, grease, oil,
fats, and other contamination. Remove surface
contamination by cleaning with RockSolid Heavy Duty
Degreaser
, detergent, or other suitable cleaner. Rinse
thoroughly with clean, fresh water and allowed to dry.
Use an appropriate concrete etching solution (do not use
muriatic acid) per the instructions to create the proper
surface condition to optimize coating adhesion. Rinse the
floor thoroughly and allow it to dry completely.
MIXING
MIX ONLY ONE POUCH AT A TIME.
Both components and
the environment should be pre-conditioned to a minimum of
40ºF (4ºC) prior to use. Be sure the air and surface
temperatures are at least 5º above the dew point.
Combine the two components by placing the pouch on the
ground and rolling it from the part A side towards the part B
side like a tube of toothpaste. This will create pressure in the
part A side and force the middle seal to burst, allowing the
two components to mix together. Thoroughly mix the
materials by shaking the pouch back and forth and squeezing
the edges and corners toward the center of the pouch. Mix
for 2-3 minutes. The product is now activated and must be
applied within 45 minutes to 1 hour.