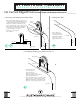
I N STALL AT ION I N STRUCTI ONS TOP MOUNT MODERN HANGER RH •••••••••••••••••••••••••••••••••••••••••
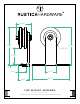
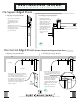
RH 2-3/16" 5-3/8" 5-3/8" Ø2-7/8" 2-5/16" 3/16" 5/8” 1-3/16" 1-1/2" 1-5/8" 5-1/4" TOP MOUNT MODERN SPEC I FI CATI O N S •••••••••••••••••••••••••••••••••••••••••
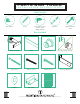
PA R T S A N D T O O L S IN S TA L L AT I ON INS TRU CTIONS Tools Needed Tape Measure Pencil Drill with 1/8” and 1/4” bits, and a Phillips drill bit Short Level Ratchet with 9/16” socket Parts Included Hanger Assembly Track Adjustable Spacers Track Stops or Lag Soft Stops Lag Screws Fastener Screws Grabber Screws Anti-jump Brackets 1” Washers Door Guide Instructions RH • • • • • • • • • • • • • • •••••••••••••••••••••••••••
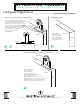
AT T A C H I N G H A N G E R I N S TA L L AT I O N I N S T RU C T I O N S On Square-Edged Doors 1. Measuring And Marking Your Hanger Holes • Place your Top Mount Hanger up against the top of your Door, making sure the Hanger front and the Door front are both facing the same direction. Measure 2” from the edge of your Door to the arm portion of the Hanger. (also, see below). • With a pencil, mark the center of both Hanger holes (these indicate where you should drill to attach your Hanger to your Door).
AT T A C H I N G H A N G E R IN S TA L L AT I ON INS TRU CTIONS On Curved-Edged Doors Modern Range and Bodyguard Style Doors 1. Measuring And Marking Your Hanger Holes • Place your Top Mount Hanger up against the top of your Door, making sure the Hanger front and the Door front are both facing the same direction. • Measure 2-3/4” from the outside edge of your Door to the Hanger base. (also, see below).
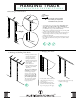
HANGING TRACK I N STAL L AT IO N IN S T RU C T IO N S 1. Measuring for Track Position 1-5/8” 1-5/8” + Door Height + 1/2” # of inches up from finished = floor where you will pencil a horizontal line for your track • To determine where to install your Track, add together 1-5/8” (space above door) plus 1/2” (floor gap) to the height of your Door. This measurement is how high up on your wall (from your finished floor up) you should install the Track.
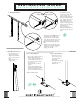
I N S TA L L I N G G U I D E IN STAL L ATI O N IN S T RU C T IO N S 1. Hole Installation Track Stop or Lag Soft Stop • The outside holes will be installed with a either a Track Stop or a Lag Soft Stop. • In this order: Adjustable Spacer, Flat Track, [Track or Lag Soft] Stop, 1” Washer, and Lag Screw. Using a ratchet with a 9/16” socket, tighten the Lag Screw most of the way, enough to hold the Track in place, but allowing the Track to move.
I N S TA L L I N G G U I D E IN STAL L ATI O N IN S T RU C T IO N S On Square-Edged Doors 2. Installing Anti-jump Bracket 1. Aligning Anti-jump Bracket • Holding the Anti-jump Bracket firmly in place, drill Grabber Screws into each of the two holes in the Bracket until screw heads are flush with your Bracket. Installing this Bracket will ensure your Door will not come off its Track. • Repeat Steps 1 and 2 on the opposite edge of the Door.
ENJOY IN S TA L L AT I ON INS TRU CTIONS Thank you for your purchase from Rustica Hardware. We hope that your purchasing and installation experience was exceptional. If you need installation assistance or have any feedback, we would love to hear from you. www.RusticaHardware.com 1.800.891.