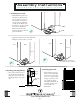
PA R T S A N D Door TOOLS Steampunk I N S TA L L AT IO N IN S T RUC T IO N S Assembly Instructions RH •••••••••••••••••••••••••••••••••••••••••
PA R T S A N D T O O L S I N S TA L L AT I O N I N S T RU C T I O N S Tools Needed Drill Tape Measure Pencil Short Level Ratchet Wrench Parts Included Short Grabber Screws Door Stops Long Grabber Screws Anti-Jump Blocks Lag Screws Door with Hangers and Wheels attached Adjustable Spacers 1” Washers Door Pull Flat Track length as ordered Adjustable Wall-Mount, U-Channel Door Guide Header (optional) RH ••••••••••••••••••••••••••••••••••••••••• www.rusticahardware.
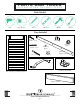
PsAsR A eT mSb l A y N I nD s t rTuO c tO i oLnSs I N S TA L L AT IO N IN S T RUC T IO N S 1. Measuring for Track Position 2-9/16” } Door Height } } 1/2” 2. Installing the Header • After you have marked for proper Track location, mark for drill holes for attaching the Header, making sure you are attaching the Header into your wall studs using Long Grabber Screws. This is important to ensure your wall can hold the weight of your Track System and Door. Use your level to ensure the track is level.
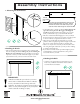
A mSb l A yN I nD s t rTuO c tO i oLnSs PsAsReT I N S TA L L AT I O N IN S T RUC T IO N S 4. Marking Drill Holes • Center the Flat Track over the line you have made to mark Track location. • Position the Door Stop over Edge of Door goes slightly the Flat Track and once past the Door you have determined opening how far from the Track end you want your Door Stop, pencil a mark Door in the center of Stop the hole on your Door Stop.
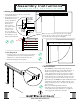
A eT mSb l A y N I nD s t rTuO c tOi oLnSs PsAsR I N S TA L L AT I O N I N S T RU C T I O N S 7. Installing Door Guide • Hold the Bracket against your wall with your hand, near the doorway edge, but not up to it. Slide your Door towards the doorway and into the Bracket to make sure the Bracket will hold the Door in place, and the Door will clear the Bracket. Make a pencil mark in the middle of the holes in the back plate of the Bracket.