INSTALL ATI ON I NSTRUCTI ONS INDUSTRIAL HANGER RH •••••••••••••••••••••••••••••••••••••••••
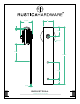
RH 2-7/16" 2" 1/4" 1-7/8" Ø2-7/8" 3-1/2" 11-1/4" 3-1/4" 1" 3/16" INDUSTRIAL SPE C I F I CAT I O N S •••••••••••••••••••••••••••••••••••••••••
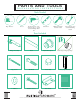
PA R T S A N D T O O L S I N S TA L L AT IO N IN S T RUC T IO N S Tools Needed Tape Measure Pencil Drill with 1/8”, 1/4” and 3/8” bits, 1” spade bit and Phillips drill bit Short Level Ratchet with 9/16” and 5/8” sockets 9/16” and 5/8” open end and ratcheting wrench Parts Included Hanger Assembly Track Adjustable Spacers Track Stops or Lag Soft Stops Lag Screws Hex Bolts Acorn Nuts Anti-jump Brackets 1” Washers Grabber Screws Door Guide Instructions RH •••••••••••••••••••••••••••••••••
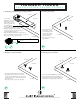
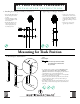
HANGER HOLES I N S TA L L AT I O N 1. Measuring and Marking Your Hanger Holes I N S T RU C T I O N S 2. Drilling Pilot Holes Door Top • Lay your Door facing UP on saw horses. • Pencil a line 2” parallel from the Door edge (this " marks the proper location 2 for the Hanger edge). • Using your Hanger as a guide, line up your Hanger with the line you just made. • Holding your Hanger in place, measure a 2-3/8” gap between the top of the Door and the bottom of the Wheel (see below).
AT T A C H I N G H A N G E R I N S TA L L AT ION 1. Installing Your Hanger Assembly To Your Door INS T RUC T IONS 2. Tightening Your Hanger Assembly • Thread the Hex Bolts with the Washers through the back of the Door. • Thread the Hanger assembly through the Hex Bolts on the front of the Door. • Holding Hex Bolts in place using a ratchet with a 5/8” socket, lightly tighten your Acorn Nuts by hand.
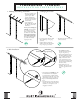
HANGING TRACK I N S TAL L ATION IN ST RUCT ION S 2. Hanging Your Track 1. Marking and Drilling Track Holes • Hold up your Track so that the marked line from the previous step is visible through the Track holes. • Mark an intersecting line in the center point of each of the Track holes. • Set the Track down. • Using a drill with 1/4” drill bit, drill out your marked Track holes.* *Be sure you are drilling into wall studs.
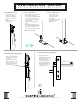
I N S TA L L I N G G U I D E I N S TAL L ATI ON 2. Door Guide Part 1 1. Installing Your Door • Lift your Door up to your Track at a slight angle. • Carefully rest both Wheel grooves onto the top of the track. • Guide the Door to the resting position. 3. Door Guide Part 2 • Use your level to plumb* your Door. • With the Door in the closed position, place the Door Guide half way into the Door mortise (the groove that runs along the bottom of a wood Door). • Double check that your Door is plumb.
ENJOY I N S TA L L AT I O N I N S T RU C T IO N S Thank you for your purchase from Rustica Hardware. We hope that your purchasing and installation experience was exceptional. If you need installation assistance or have any feedback, we would love to hear from you. www.RusticaHardware.com 1.800.891.