
Installation Guide


R H
•••••••••••••••••••••••••••••••••••••••••
INSTALLATION INSTRUCTIONS
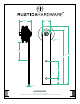
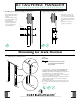
ATTACHING HANGER
1. Installing Your Hanger Assembly To Your Door 2. Tightening Your Hanger Assembly
5/8”
• read the Hex Bolts with the
Washers through the back of
the Door.
• Thread the Hanger assembly
through the Hex Bolts on the
front of the Door.
• Holding Hex Bolts in place
using a ratchet with a 5/8”
socket, lightly tighten your
Acorn Nuts by hand.
• Using a 9/16” wrench for the
Acorn Nut and a ratchet with a
5/8” socket and for the Hex Bolt,
gently tighten, being careful not
to damage your Hanger or Acorn
Nuts.
• Repeat Steps 1 and 2 on the
opposite edge of the Door.
5/8”
9/16”
Hex Bolt
1” Washer
Acorn Nut
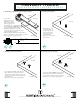
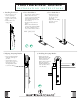
Measuring for Track Position
}
• To determine where to install your Track, add together 1-5/8”
(space above door) plus 1/2” (oor gap) to the height of
your Door. This measurement is how high up on your wall (from
your finished floor up) you should install the Track.
• This is where you will mark a horizontal line on your wall parallel
to the floor, the same length of your Track.
• Check to see if your floor is level. If your floor rises more than 1/2”
along the length of the Track, you risk your Door rubbing or
sticking at this high point.
• If your floor is not level, measure up from the highest point of your
floor to find your Track hole center position to attach the Track to
your wall.
1. Measuring for Track Position
}
Door Height
1/2”
1-5/8”
1-5/8”
Door Height
1/2”
# of inches up from oor where
you will pencil a horizontal line
for your track
+
+
=