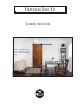
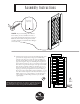
P l a n tat ion D oor Kit INSTAL L ATI ON I NSTRU CTI ONS Assemb ly I ns t ruc t ions This ecologically-friendly door is made using scraps from our Woodworking Shop RH •••••••••••••••••••••••••••••••••••••••••
P o rte plant at ion In struct ions de m ont age
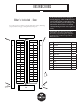
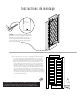
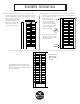
HANG ER HOLES INSTRUCTIONS I N S TA L L AT I O N I N S T RU C T I O N S If any of the slats have been damaged during shipping, call us at 800-891-8312 and we will expedite a replacement slat. Lay out your Door parts according to the illustration shown below to accurately identify which part needs to be replaced, if any. Wha t’s In c l u d e d - Door Lay out all your parts on the floor or another solid surface. Start by identifying your parts. Refer to this page to distinguish between the parts.
HIns A tN OnLtaEg eS rucGtiEo nR s d eHmo I N S TA L L AT I O N I N S T RU C T I O N S Outils requis Si l'une des lattes a été endommagée pendant le transport, appelez-nous au 800-891-8312 et nous enverrons les lattes ou pièces de remplacement selon les besoins. Disposez vos lattes de porte et composants selon l’illustration montrée à droite pour identifier ls pièces à remplacer le cas échéant .
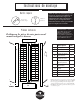
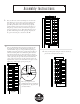
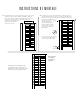
HA HO A sN s emGb E l y RI n stru ctiLo nEs S I N S TA L L AT I O N I N S T RU C T I O N S Door bottom with mortise NOTE: If you are installing a Floor Mount Door Guide, your door will have a mortise (a groove that runs along the bottom of your door). Make sure this mortise is facing down towards your floor and that you install the Door Hangers on the other end. 1.
Ins t ruc t i o n s d e mo n ta g e Bas de porte avec mortaise NOTE : Si vous installez un guide de porte sur le plancher, votre porte comportera une mortaise (une rainure qui longe le bas de votre porte). Assurez-vous que cette mortaise soit placée face vers le bas lorsque vous installez les supports de porte à l’autre extrémité. 1.
HA HO A sN s emGb E l y RI n stru ctiLo nEs S I N S TA L L AT I O N I N S T RU C T I O N S A1 C1 2. BR Next you will need to turn the assembled parts onto their sides where the holes are. Locate one C1 part, sixteen C3 Parts, and one C2 part. Next, apply a bead of glue running lengthwise up the BR part until you are about 5” from the top.
HIns A tN OnLtaEg eS rucGtiEo nRs d eHmo I N S TA L L AT I O N I N S T RU C T I O N S A1 C1 2. BR Il vous faudra ensuite retourner les pièces assemblées du côté où sont situés les trous. Localisez les pièces C1, seize pièces C3 et une pièce C2. Puis appliquez une goutte de colle le long de la pièce BR jusqu'à environ 5 po du haut de celle-ci.
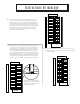
HA GE HO A sN s emb l y RI n stru ctiLo nEs S I N S TA L L AT I O N 5. Next you will identify the A1 part or top rail as we call it. This part is the capping piece on top and goes in similar to the bottom rail. Place a bead of glue in the groove of the BR part, should be about 5” left to glue. Then put glue in the groove of the A1 part A1 including the alignment hole for the dowel. This part will slide into place from the top working towards the bottom. I N S T RU C T I O N S 6.
IN ST RU CT IO N S D E M O N TAG E 5. Puis identifiez la pièce A1, ou rail supérieur. Cette pièce recouvre le haut du montage et s'insère de façon similaire au rail inférieur. Appliquer une goutte de colle dans la rainure de la pièce BR. Il devrait vous rester environ 5" de colle. Puis placez de la colle dans la rainure de A1, y compris le trou d'alignement de la A1 cheville. Cette pièce s'insérera depuis le haut vers le bas. 6. La dernière pièce est de mettre la pièce BC en place.