P l a nt at ion D oor INSTAL L ATI ON I NSTRU CTI ONS Assembly I ns t ruc t ions RH ••••••••••••••••••••••••••••••••••••••••• 9.22.
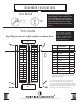
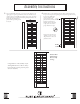
H AAs N HO s emGb E l y RI n stru ctiLo nEs S I N S TA L L AT I O N I N S T RU C T I O N S To o l s N e e d e d If any of the slats have been damaged during shipping, call us at 800-891-8312 and we will expedite a replacement slat. Lay out your Door parts according to the illustration shown below to accurately identify which part needs to be replaced, if any. Rubber Mallet Ratchet with 7/16” socket P a rts In c l u d ed PLEASE NOTE: These instructions are specific to a particular door size and type.
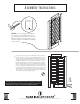
HA GE HO A sN s emb l y RI n stru ctiLo nEs S I N S TA L L AT I O N I N S T RU C T I O N S Door bottom with mortise NOTE: If you are installing a Floor Mount Door Guide, your door will have a mortise (a groove that runs along the bottom of your door). Make sure this mortise is facing down towards your floor and that you install the Door Hangers on the other end. 1.
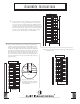
HA GE HO A sN s emb l y RI n stru ctiLo nEs S I N S TA L L AT I O N I N S T RU C T I O N S A1 C1 BR 2. Next you will need to turn the assembled parts onto their sides where the holes are. Locate one C1 part, sixteen C3 Parts, and one C2 part. Next, apply a bead of glue running lengthwise up the BR part until you are about 5” from the top.
H AAs N HO s emGb lEy R I n stru ctiLo nEs S I N S TA L L AT I O N 5. I N S T RU C T I O N S 6. The final item is to place the BL part into place. Place a bead of glue in either Next you will identify the A1 part or top rail as we call it. This part is the capping piece on top and goes in similar to the bottom rail. Place a bead of glue in the groove of the BR part, should be about 5” left to glue. Then put glue in the groove of the A1 part including the alignment hole for the dowel.