DIY Door System Assembly Instructions
DIY DOOR SYSTEM Recommended Tools Drill with 1/8”, 1/4”, and 3/8” Drill Bits, 1-1/8” Forstner Bit or 1-1/8” Spade Bit, and Phillips Bit 2 9/16” and 5/8” Combination Wrench 5.
DIY DOOR SYSTEM Parts A. B. E. C. F. I. G. J. H. K. L. PARTS A. Hanger Assembly B. Lag Screw C. Lag Bolt D. Phillips Head Screw E. 1” Washer F. Acorn Nut G. Door Guide H.Adjustable Hard Stop & Rubber Bumper I. Spacer J. Anti-Jump Block K. Track L. Left & Right Stiles M. Pull 3 D. M.
DIY DOOR SYSTEM Assembly Instructions FIRST THINGS FIRST THIS KIT IS AN ENABLER You have complete creative control over the kind of wood and finish you would like to use in your door. That being said, take into consideration wood thickness and length. The wood you choose should not be more than 3/4” in thickness to fit in the stiles. It is recommended that planks should be tongue and groove for greater strength, but it is not necessary.
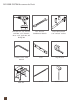
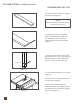
DIY DOOR SYSTEM Assembly Instructions PREPARING BOTTOM SLAT 1. Select the slat that will be the bottom slat of the door (Figure 1). NOTE: Ensure the bottom slat is tall enough to accept a 3/4” groove. Figure 1 2. Using a tape measure and pencil, draw a vertical line on the end of the slat, ensuring the line on the slat is in line with the slot in the metal stile (Figure 2). Figure 2 3. Draw two vertical lines, one on each side of the first line, 3/16” away from the first line (Figure 3).
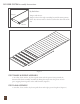
DIY DOOR SYSTEM Assembly Instructions By Definition: Tongue Tongue and Groove Tongue refers to the ridge extending beyond the main portion of the slat. Groove refers to the slot cut into the other side of the slat. Groove Figure 1 FOR TONUGE & GROOVE ASSEMBLY 1. On a flat, clean, surface, lay slats upside down with the groove facing toward the bottom of the door assembly. Assemble by fitting the tongue into the groove of each piece, tapping them together with a rubber mallet (Figure 1).
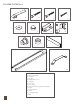
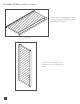
DIY DOOR SYSTEM Assembly Instructions 2. Attach stiles (L) with phillips screws (D) using a drill with a phillips bit to the back of the door (Figure 2). Figure 2 The door is now ready for a pull installation or to be hung with the hanger.
DIY DOOR SYSTEM Assembly Instructions PULL INSTALLATION NOTE 3’ (feet) or 36” (inches) The center point of the door pull should be three feet or 36” above the bottom edge of the door. Avoid placing the door pull too close to the edge of the door. Placing the pull too close to the edge can damage both door and pull. 1. Lay the door (A.) facing up on a clean, stable surface. Figure 1 2. Measure 3’ (feet) or 36” (inches) from the bottom of the door to where the center of the pull will be (see NOTE above).
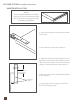
DIY DOOR SYSTEM Assembly Instructions HANGER INSTALLATION NOTE: Doors using Floor Mount Door Guides will need a groove on the bottom. Ensure this groove is on the opposite end of the Door Hanger Installation. 1. Lay the door with the front facing up on a flat, level surface. 2. Place the hanger on the door (Figure 1). 3. Adjust the placement of the hanger for a 2-3/8” gap between the top of the door and the bottom edge of the wheel.
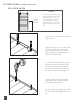
DIY DOOR SYSTEM Assembly Instructions 6. Drill two pilot holes all the way through the door for each hanger using a drill with an 1/8” drill bit (Figure 3). Door Front Figure 3 7. Turn the door over. Using a 1-1/8” Forstner bit*, drill a 7/16” deep hole into each pilot hole (Figure 4). *A 1-1/8” Spade bit may be used in pace of a Forstner bit. 8. Turn the door over, returning it to the face-up position. Drill all the way through the pilot holes using a drill with a 1/4” drill bit (Figure 5).
DIY DOOR SYSTEM Assembly Instructions FIRST THINGS FIRST Check to see if the floor below the track area is level. If the floor rises more than 1/2” the door may rub or not slide open completely. If the floor is not level, measure from the highest point of the floor surface to the recommended track placement and adjust track placement accordingly. Ensure the track will be installed onto wall studs.
DIY DOOR SYSTEM Assembly Instructions 6. Drill out the marked holes using a drill with a 1/4” drill bit (Figure 3). 7. Attach one end of the track to the wall with one adjustible hard stop (H.) (see NOTE), one lag screw (B.), and one washer (E.) using a socket wrench with 9/16” socket (Figure 4). Do not tighten. Figure 3 Alternate Adjustable Stop Installation NOTE: The adjustible hard stop can be placed wherever desired on the track.
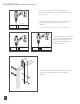
DIY DOOR SYSTEM Assembly Instructions ANTI-JUMP GUIDE INSTALLATION 12. Place the Anti-Jump block (J.) on the top of the door. 13. Install the block to the top of the door with phillips screw (provided) using a drill with a phillips bit (Figure 6). 14. Repeat steps 11 and 12 for the opposite end of the door. Figure 6 � Figure 7 13 15. Hang the door (Figure 7).
DIY DOOR SYSTEM Assembly Instructions DOOR GUIDE INSTALLATION 12. With the door in the closed position, ensure the door is hanging straight using a bubble level. 13. Position the Door Guide part way into the groove in the bottom of the door (Figure 7). SUGGESTION: Use double stick tape on the bottom of the door guide to hold the guide in place. Figure 8 14. Install the Door Guide using a 1” phillips screw (provided) and a drill with a phillips bit. 15.