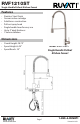
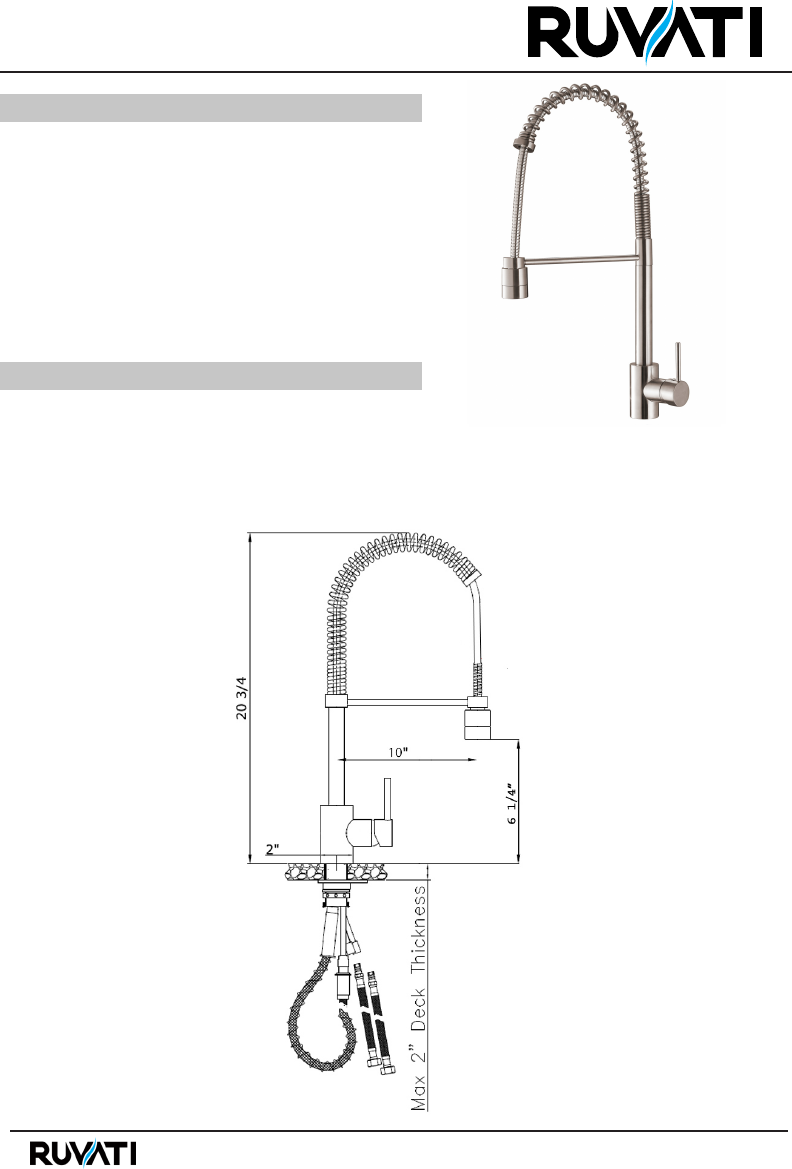
® RVF1210ST Single Handle Pullout Kitchen Faucet Features • • • • • • • Stainless Steel Finish Ceramic valve cartridge Solid brass construction Pull-out spray head Single handle lever for easy use Up to 2” deck thickness 1 hole installation Dimensions • Overal Height: 20.75” • Spout Height: 6.25” • Spout Reach: 10” ® www.ruvati.
® RVF1210ST Tools Needed Groove point pliers Safety Tips Adjustable wrench Phillips head screwdriver WARNING • Ruvati reccomends that this product only be installed by a licensed professional. • Always shut off the water supply befor removing the existing faucet and/ or installing a new one. Open the hot and cold knobs on the existing faucet in order to release built up pressure. • Always wear saftely glasses when cutting or soldering water supply lines • Keep the drain covered to avoid losing parts.
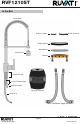
® RVF1210ST In the Box Faucet Body Rubber Gasket A Rubber Gasket B Rubber Washer Metal Washer Faucet Head Locknut Threaded Shank Hot & Cold Hose Pipes Spray Hose Pipe Spray Hose Weight Spray Hose Hot & Cold Water Supply Hoses ® www.ruvati.
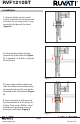
® RVF1210ST Installation 1. Remove rubber washer, metal washer, and locknut from the threaded shank. Do not remove the O-ring inserted in the base of the shank (Figure 1). Figure 1 2. Place the faucet body into the faucet hole of the deck/sink (Figure 2). A standard 1-3/8” hole is required for this faucet. Figure 2 3. From underneath the deck/sink, slide the rubber washer followed by the metal washer all the way up the threaded shank of the faucet (Figure 3). 4.
® RVF1210ST 5. Unscrew both screws of the hose weight until it is in two pieces. Place one half of the hose weight on the center sections of the spray hose. Then place the remaining half of the weight against the other half and reinsert the screws. Do not tighten the screws completely yet (Figure 4). Figure 4 6. Place rubber gasket A into the female end of the spray hose pipe (the longest copper pipe extending from the faucet’s base).
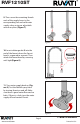
® RVF1210ST 9. Then screw the remaining female ends of the supply hoses to the corresponding hot and cold water supply valves using an adjustable wrench or pliers (Figure 7). Figure 7 10. Insert rubber gasket B into the end of the faucet where the faucet head is supposed to connect. Then attach the faucet head by screwing until tight(Figure 8). Figure 8 11. Turn water supply back on (Figure 9). Test the flexible spray hose by turning faucet on and off. Make sure there is good water flow and no leaks.
® RVF1210ST Trouble-Shooting Guide Issue Cause The water will not completely turn off. There is a dirty, worn out, or damaged washer in the cartridge. Check to see if the ceramic disc is dirty or damaged by removing the handle and the cartridge. Water is leaking from under the handle. The adjusting ring or cap has become loose. Tighten the adjusting ring or cap. The aerator is leaking or has an inconsistent water flow pattern. The aerator does not fit correctly or has become dirty.
® RVF1210ST RUVATI 1-Year WARRANTY At RUVATI, we stand behind our products with a 1 YEAR limited warranty on all faucets. We want every RUVATI customer to be a satisfied customer. REGISTER YOUR PRODUCT. By taking just a few minutes to register, you can improve your experience with Ruvati and enjoy more efficient Warranty Support. Visit www.ruvati.
RVF1210ST This warranty gives customer specific legal rights, and customer may also have other rights which vary from state to state. When requesting warranty service, you will need to provide: 1. an approved Return Merchandise Authorization number (RMA) issued by Customer Service 2. a dated, valid proof of purchase (payment receipt from an authorized Ruvati reseller) 3.
RVF1210ST REGISTER YOUR PRODUCT. By taking just a few minutes to register, you can improve your experience with Ruvati and enjoy more efficient Warranty Support. Visit www.ruvati.com ® ® www.ruvati.