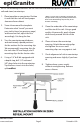
INSTALLATION GUIDE epiGranite series GRANITE COMPOSITE KITCHEN SINKS ®
epiGranite ® ATTENTION INSTALLER 1. Read these instructions carefully before installation. Inspect sink for damages. Do not install if the sink is damaged. 2. Ruvati recommends that installation of sinks be done by a professional installer. 3. Sink edges may be sharp and can cause accidental injury to installer if not careful. Wear cut-resistant protective gloves during installation 4. Templates are only provided as a guide.
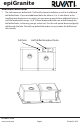
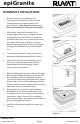
® epiGranite ® Additional Faucet holes 1. The sink comes pre-drilled with 1 full hole for faucet installation as well as 3 additional half-drilled holes. If you need additional holes for either a 2- or 3- hole faucet, or for installing soap dispenser or air switch, you can open up any of these additional holes as well. We recommend using a 1-3/8” (35mm) diamond bit hole saw to drill through the half-drilled holes. In that way you get a clean cut.
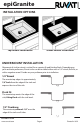
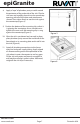
epiGranite INSTALLATION OPTIONS Top-mount Installation Under-mount Installation UNDERMOUNT INSTALLATION Alignment of sink to cutout is critical for a superior fit and finished look. Depending on your aesthetic preference, Ruvati sinks can be installed either with a 1/4” reveal, flush fit, or with a negative reveal. Decide on your prefence prior to installation. 1/4” Reveal The countertop edge sits approximately 1/4” back from the edge of the sink and exposes the rim of the sink.
® epiGranite NOTE: The following instructions are for solid stone countertop (granite, marble or cultured stone) countertops. 1. Place template on countertop. Position it such that the sink will have proper clearance from cabinet. 2. Trace a line around the template. Determine what “reveal” you want your sink to have (see previous page) and based on that, adjust the line accordingly. Cut along the line. 3.
epiGranite TOPMOUNT INSTALLATION 1. Place the sink cut-out template on the countertop, where the sink is to be installed. Trace around the outside perimeter with a pencil (Figure 1). Note: Make sure you are using the top-mount template, and not the undermount 2. After tracing, remove the template. Use a straight edge if necessary to straighten out the traced outline. Use a drill with a 7/8” spade bit to drill four pilot holes, one in each corner inside the outline.
® epiGranite 8. Apply a “rope” of plumbers putty or caulk around the perimeter of the underside of the sink. Flip the sink over and carefully place it into the countertop opening, with all of the drains and attachments secured. Press down firmly to seat the sink against the countertop (Figure 4). 9. Position the bottom of the mounting clip so that it is gripping the countertop. Use a screwdriver to tighten the screw until the mounting clip is snug against the countertop (Figure 5). Figure 5 10.
® epiGranite Care and Maintenance • Make a habit of drying your sink after use. This is not necessary, but a good practice, and will ensure that no build up of limescale occurs. Never pour gasoline, acid, alkali, bleach or any solvents in general into or onto the sink because they can interact with the material of the sink and damage it. • Food stains such as wine, coffee, tea, should be removed immediately using warm water and detergent.