
Installation Guide

RVH8001
RUVATI USA
www.ruvati.com
Printed in USA
Page 2
®
Attention Installer
1. Read these instructions carefully before installation. Inspect sink for damages. Do not
install if the sink is damaged.
2. Ruvati recommends that installation of undermount sinks be done by a professional
installer.
3. Sink edges may be sharp and can cause accidental injury to installer if not careful.
Wear cut-resistant protective gloves during installation.
4. Templates are only provided as a guide. Place template on sink to ensure the template
will give you the proper cutout for the sink. Ruvati is not responsible for improper sink or
countertop installation. Ruvati is not liable for any damages to sink or countertop or
personal injury during installation.
5. The instructions in this guide are for installation on a wood countertop. For installation
on granite, marble or cultured stone countertops ask your fabricator for proper
installation instructions. Remind your fabricator to install the sink in a way that it can be
removed in the future from the countertop if necessary.
6. Observe all local plumbing and building codes.
Materials and Tools Needed
• Plumber’s Putty
• Sink
• Sink Mounting Clips
• Silicon Caulk
• Philips Head Screwdriver
• Jigsaw or Keyhole Saw
• Pencil
• Sink Cut-Out Template
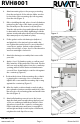
Installation
Figure 2
Figure 1
1. Place the sink cut-out template on the
countertop, where the sink is to be installed.
Trace around the outside perimeter with a pencil
(Figure 1).
2. After tracing, remove the template. Use a
straight edge if necessary to straighten out the
traced outline. Use a drill with a 7/8” spade bit
to drill four pilot holes, one in each corner inside
the outline. These holes will be your starting
points for sawing the hole, so they must be large
enough to t the blade of a jig saw or keyhole
saw.
3. Cut the hole for the sink, using a jig saw to cut
along the outline between each hole (Figure 2).