Installation Guide and User Manual 2019 Australian V4
Welcome Congratulations on your purchase of an RV Wi-Fi Router. This purchase will give you greater freedom to enjoy your travelling without sacrificing the lifestyle that the internet provides.
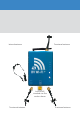
What makes up your RV Wi-Fi+? 1. RV Wi-Fi+ Router There are five components: 2. Internal Antennas (4 included) 3. Power Adapter 4. Telstra Starter SIM 5.
Installing your RV Wi-Fi+ In most cases, your manufacturer will install your RV WiFi for you. But if you are looking at installing yourself, please follow the steps below. There are two methods available: • With an external antenna fitted to the outside of the RV. • No external antenna.
Internal antenna To external antenna Insert a full/ standard size Sim card as shown To external antenna To external antenna
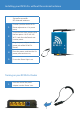
Installing your RV Wi-Fi+ without the external antenna Set up for use with NO external antenna 1 Choose a position for RV WI-FI+ Router adjacent to a 12v power point; 2 Screw the four black antenna into the four points - Wi-Fi/ 4G/ 3G/ Wi-Fi. Look for male/famale connection points. 3 Plug the power adaper into the power jack of the RV WI-FI+ Router; 4 Place the power cord into the 12v power point and turn on; 5 Ensure the ‘Power’ light is on.
Connection to the RV Wi-Fi+ Router 1 Turn on the device/s that you wish to connect to the Internet 2 Click on the ‘Settings’ or equivalent page on your device (phone/tablet/laptop). 3 Click on the ‘Wi-Fi’ heading and choose the wifi to work RV WIFI abc123 NOTE: “abc123” varies on each unique router.
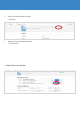
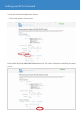
Setting your Wi-Fi+ Password. One of the great features of RV Wi-Fi is the security it provides whilst using the internet. This next section provides step by step instructions on setting your password. 1. Open the web/internet browser on your device and enter the address http://10.0.1.1 into the ‘search’ bar. http://10.0.1.1 2. The RV WI-FI home page will appear. Type ‘root’ 3. Type ‘admin’ You are about to enter the username and password.
4. Select/click on the following tab: 1. Network. 5. Select/click on the dropdown box: 1. WiFi/Wireless 6.
Setting your Wi-Fi+ Password. 7. Go to the ‘Interface Configuration’ Section. • Click on the ‘Wireless Security’ tab. 8. Next to the ‘Key’ drop down box, click on the astrix. This shows what the current WiFi password is set to.
• Delete the password, by backspacing or use the delete button. • In the Key box , type your new Wifi password - your choice! (Your password must be a minimum of 8 characters, and it is case sensitive). 9. Click on the ‘Save and Apply’ button. The screen will indicate that it is ‘waiting for configeration to apply’. • Wait for this to apply. Do not turn off your device during this time. 10. The next screen will give you two options.
How to Activate the Telstra Pre Paid SIM The Telstra satchel contains your Sim Card. You need to activate this and add credit to it to finish the set up stage of your RV Wi-Fi unit. We strongly advise to do this instore to make sure the activation has been confirmed. You MUST use a FULL/STANDARD SIZED SIM in your RV WI-FI+ Activate your Telstra Sim Card 1 Have your driver’s licence handy 2 Use the Service Number located on the rear bottom space of the Telstra Satchel.
Need help? For help with your RV Wi-Fi unit please go to: info@rvwifi.com.au and a service agent will be in touch. Factory Reset WARNING: This procedure will reset all of the settings applied to this router, back to original factory settings, and your passwords will be forgotten. Use this procedure if errors are occurring that may be related to unknown settings. Once you have followed the steps below, please follow the User Manual to set up a new password.
How to connect to RV Wi-Fi+ Media using VLC This guide is to help you watch your stored images and movies from your USB or portable hard drive and share amongst your digital devices. Go to the app store on your device and search for ‘VLC’. The icon looks like this VLC is a free multimedia player that plays most multimedia files. It’s Simple, fast and powerful. Once installed on your device, follow these simple steps to access your stored files. 1.
5. • Wait for the ‘Penguin’ image to appear.’ Select/Click 6. Choose from your files.
Frequently asked questions SIM CARDS What size SIM card should l use? Always use a FULL sized SIM card. What if l insert the wrong sized SIM card? You will know that the wrong sized SIM card has been inserted, if once it is inserted it can no longer be seen. If inserted correctly, approximately 3mm should be visible out of the end of your RV WIFI router. solid blue light, one solid red light, one flashing blue light.
5) There is a fault with the modem. To establish if it is a SIM card issue or a router issue, follow these steps 1) Turn on their RV WIFI router 2) On the device (phone/laptop/tablet), go to: settings 3) Go to: Wi-Fi 4) Wait for RVWIFI123abc (each router will 15) 2/3rds of the way down the page is a heading IPV4. To the right of this will have information that either says it is ‘3G connected’ or ‘not connected’.
er will automatically capitalize your first letter. Check that this is what you want. Can l change my SSID? Yes. The SSID is the routers ‘name’. This can be changed by: 1) going to the home page of http://10.0.1.1. 2) Scrolling 2/3rds of the page until you see the heading SSID, it will be highlighted. 3) Click on it. Then type in what you would like to call your router.
ing video, 1GB per hour as a rule of thumb, even more for High Definition. 5. Consider changing your plan or data provider. There are always new and improved deals being announced. What coverage can I expect to get? RV WIFI has been tested up to 1TB. How is RV WI-FI different to hot spotting my phone, or a ‘pocket device’? The RV WI-FI solution has been created with the specific needs of the RV community.