
Product Manual


Installing your RV Wi-Fi+
In most cases, your manufacturer will install your RV Wi-
Fi for you. But if you are looking at installing yourself,
please follow the steps below.
There are two methods available:
• With an external antenna fitted to the outside of the RV.
• No external antenna.
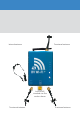
Set up for use with external antenna
1
Choose a position for RV WI-FI+ Router adjacent to
a 12v power point, remembering to leave access for
the SIM insertion;
2
Pre wire external antenna and mount on roof
using bracket provided;
3
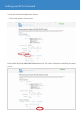
Screw into place on router: 4G antenna cable into
‘4G/External’ point:
4
Screw into place on router: 3G antenna cable into
‘3G/External’ point;
5
Screw into place on router: Wi-Fi antenna cable
into ‘Wi-Fi/External’ point;
6
Attach single antenna to router into ‘Wi-Fi’ point
- the remaining black antenna are now spares;
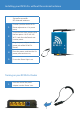
7
Plug the power adaper into the power jack of the RV
Wi-Fi+ Router;
8
Place the power cord into the 12v power point and
turn on;
9
Ensure the ‘Power’ light is on.
Installing your RV Wi-Fi+ using the
external antenna