inView 360 HD AVM Around Vehicle Monitoring System Automatic Calibration Guide © Rear View Safety | All rights reserved
Contents Introduction to Calibration �������������������������������������������������������������������������������������������������������������������������������������� 3 Calibration Kit Components ����������������������������������������������������������������������������������������������������������������������������������� 3 Placing Calibration Pads ����������������������������������������������������������������������������������������������������������������������������������������� 3 Conn
Introduction to Calibration The calibration process “stitches” together images from the front, back, left, and right camera views into a 360 top-level image of the space around the vehicle. After the physical installation of the cameras, ECU, antennas, push buttons, and optional monitor/recorder, the inView 360 HD AVM system will have to be calibrated to optimize this 360° view. The Automated Calibration process requires someone who is familiar with wizard-like, automated setup procedures.
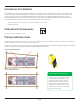
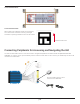
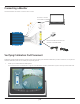
Correct Pad Placement { 6" 6" { Correct Pad Orientation When placing the calibration pads, ensure that they are in the correct orientation. The long rectangle should be at pointing towards the front of the vehicle. Towards vehicle front Connecting Peripherals for Accessing and Navigating the GUI You will use either USB mouse or a remote control to navigate the system's on-screen GUI to complete the automatic calibration. To use the mouse, you will directly connect it to the InView 360.
Connecting a Monitor Use the VGA Out connector to connect to a monitor. Connect a monitor to the VGA out cable Connect a USB mouse or an IR receiver to the USB cable Verifying Calibration Pad Placement Calibration pads provide reference points for the cameras during the software calibration process. Therefore, it is important that the calibration pads are accurately and optimally placed. 1. Power up the inView 360 HD AVM system.
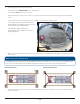
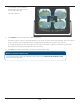
2. Cycle through every camera view by either: • Pressing the green DRIVER/VIEW button repeatedly, or • Pressing the Arrows on the remote control While reviewing the images on the monitor, ensure that the cameras have a direct line-of-sight with the calibration pads. The pads should not be obstructed by mirrors, ladders, or any other protruding objects. In this image, you can see that the calibration pad at the left is not placed correctly. It can not be clearly seen as it is behind a door.
Poor Pad Placement Pad is obstructed by the vehicle door and in shadows. Optimal Pad Placement Nothing obstructing either pad. No shadows. © Rear View Safety | All rights reserved p.
Logging In 1. Right-click anywhere on the screen or press Enter on the remote, then select Login. 2. Select Yes when asked if you want to proceed with stopping the recorder. 3. Double-click in the input field to open the virtual keyboard, and then enter the default password: 88888888 (8 number eights). 4. Click OK with the mouse or press Shift + OK on the remote. The Main Menu opens. Automatically Calibrating 1.
In this window, you can select the measurement units, and enter the vehicle width and length. This step is optional. 2. Click Calibrate to start the automatic calibration process. During the process, a series of messages appears on the screen to confirm when each calibration step is complete. If there is a problem with completing a step, a message appears to advise that a problem has occurred.
Refining the Calibration Sometimes the automatic calibration process requires some fine tuning after the process. You might notice that the overlay in the 360 image does not quite match your vehicle's dimensions. After the automatic calibration procedure is complete, you will have access to the Automatic Calibration configuration window, where you can refine the 360 image.
Verifying that Calibration was Successful The final mandatory step for calibrating your inView360 HD AVM system is to ensure that the calibration was successful. 1. Navigate to or back to the Live screen. If you are in any of the calibration windows, click the Back button and/or the ESC button until you see the Live screen. 2. Configure the vehicle to Full Screen Top view. • If the Green Driver/View button is installed, click the button to find the Full Screen Top view.
Rear View Safety 1797 Atlantic Avenue Brooklyn, NY 11233 www.rearviewsafety.com InView 360 HD Customer Support User documentation, training videos, and other technical resources for the InView 360 HD system can be found on our website’s dedicated 360 HD page. Contact Us Email: customerservice@rearviewsafety.