%73 XJ U I (14 PHHFS )XOO +' _ $BS 0RGHO 596 & 5HDU 9LHZ 6DIHW\ ,QF
Table Of Contents Product Picture & Function............................................................................................3 a) Device Introduction .....................................................................................................3 b) Button Function .......................................................................................................4-5 c) LED Light Status List ................................................................................................
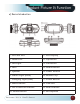
Product Picture & Function a) Device Introduction 1. SD Card Slot 11. LCD Display 3. LED Light 13. OK Button 2. HDMI Port 4. Lens 5. Speaker 6. Status Light (Blue) 7. Charging Light (Red) 8. Menu Button 9. File Protection Button 10. Mode Button Reverse With Confidence 12. Up Button 14. Down Button 15. Power Button 16. Mount Clip 17. Photo Button 18. USB Port 19. Reset Button 20.
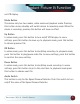
Product Picture & Function 22. Camera Mount 23. Power Input 24. Sticker for Mount b) Button Function Power Button Press this button for 2~3 sec to turn on/off the device. Photo Button In video mode, at any time, press this button to take picture. Reset Button If the device crashes, press this button to reset the device. Menu Button Press this button during standby or playback mode, to pull up a menu of camera modes.
on LCD display. Product Picture & Function Mode Button The device only has two modes, video mode and playback mode. Pressing this button during standby will switch device to recording mode. When the device is recording, pressing this button will have no effect. Up Button In video mode, press this button to turn on/off LCD display. In menu settings, press this button to move up. In playback mode, press this button to choose previous file. OK Button In video mode, press this button to start/stop recording.
Product Picture & Function c) LED Light Status List LED Light Status Light (Blue) Charging Light (Red) Status Flash On Off On Off Meaning Device is in Recording Device is in standby or Playback Mode Device is off Charging Battery Charging complete Basic Operation a) SD Card Installation Install the Micro SD into the Micro SD card slot as shown in the picture.
Product Picture & Function b) GPS Installation Insert GPS into camera mount as shown in the image below. Install the device on the windshield with adhesive pad or suction cup mount. When the power is on, the device will automatically start to catch GPS signal. If it doesn’t receive the GPS signal, GPS icon will be shown on LCD display. If it successfully catches the GPS signal, GPS icon will be shown on LCD display.
Product Picture & Function c) Power Supply Plug the camera charger into the cigarette lighter in vehicle and start engine. The device will automatically power on and start recording. Note: There are two Mini USB ports, one is on the device, another is on the camera mount. If you connect the car charger to the Mini USB port on the device, the power supply will be to device only.
Camera Dimensions e) Video Mode In video mode, in standby status, LCD display will be shown as below: In video mode, in recording status, LCD display will be shown as below: f) Taking Pictures In video mode, at any time, press photo button to take picture.
Camera Specifications g) Playback Mode Press the Mode Button to enter playback mode, then press Menu Button to choose preview video/picture file. Use the direction button to control playback operation.
Menu Setting The device has two mode, Video Mode and Playback Mode. a) In Video Mode: Setup Video Resolution Loop Setting Motion Detect Sensor Flip Flicker White Balance Contrast Sharpness Menu Item 2560x1080@30fps/ 2304x1296@30fps/ 1920x1080@45fps/ 1920x1080@30fps/ 1280x720@60fps Off/1min/3min/5min Off/On Off/On Auto/50Hz/60Hz Auto/sunny/cloudy/tungsten/flourescent Standard/High/Low Standard/High/Low EV Quality -2/-1.7/-1.3/-1/-0.7/0.3/0/0.3/0.7/1/1.3/1.
Menu Setting Language Default Setting Format Software Version b) In playback mode: Back to Previous Level File Protection Operation Auto Play Delete file Format 12 English/German/Czech/Polish/ Hungarian/Russian/Chinese/French No/Yes No/Yes TRCMA7_50_V1.9.
Connection a) Connect to TV The device can output the video to video equipment (TV or Monitor) to playback the data or adjust the settings. 1. Insert Micro SD card into device. 2. Connect HDMI cable to the video equipment (TV or Monitor) and to the device. 3. Power on the device. 4. Adjust the channel of the video equipment to HDMI input. 5. Installation complete. b) Connect to Computer 1. Insert SD card to device. 2.
DVR Player The camera software comes preloaded onto the microSD card. Simply inser SD card into computer to install software. The DVR player will be shown asbelow.
Product Specification Camera Video Resolution 1/3” 4.0 Mega CMOS Sensor, OV4689, good night vision performance Lens F/NO=2.0, 110° Horizon Angle in 1080P Standard Mov file, H.264 Compression Resolution 2560x1080@30fps/2304x1296@30fps/1920x10 80@45fps/ 1920x1080@30fps/1280x720@60fps WDR Function Wide Dynamic Range, Good Night Recording Audio Built-in Microphone, can be turned off in menu Still Image 2688x1512 (4M) LCD 2.
Product Specification Filter Lens (Optional) Other Function 16 CPL: Circular-Polarizing Filters, could reduce the reflection of inner car on the car window UV Lens: Protect the DVR lens Lit Keyboard for Night Operation Uniterrupted Recording: Over-writes first file if memory is full, no interruption between Video File File Protection Function: Once File is protected, it wont be deleted during cycle recording Automatically starts recording when car starts.
Warranty table of contents One Year Warranty Rear View Safety, Inc. warrants this product against material defects for a period of one year from date of purchase. We reserve the right to repair or replace any such defective unit at our sole discretion. Rear View Safety, Inc. is not responsible for a defect in the system as a result of misuse, improper installation, damage or mishandling of the electronic components. Rear View Safety, Inc. is not responsible for consequential damages of any kind.
table of contents Disclaimer Rear View Safety and/or its affiliates does not guarantee or promise that the user of our systems will not be in/part of an accident or otherwise not collide with an object and/or person. Our systems are not a substitute for careful and cautious driving or for the consistent adherence to all applicable traffic laws and motor vehicle safety regulations.
table of contents If you have any questions about this product, contact: Rear View Safety, Inc. 1797 Atlantic Avenue Brooklyn, NY 11233 800.764.1028 BETTER CAMERAS. BETTER SERVICE. IT’S OUR GUARANTEE.