
Installation Manual

1
GM TRUCK 07-13 BACKUP CAMERA INSTALLATION
Thank you for your purchase! These instructions are intended for the do-it-yourselfer who decides to install the
camera without professional assistance. Keep in mind you will be installing a device that uses electrical power
from your computer controlled truck. If you are not confident in your ability to attach this device without frying
your electrical system, new camera, or yourself please seek PROFESSIONAL INSTALLATION!
REQUIRED TOOLS
-Standard wire stripper/crimper
- 13mm socket wrench
-Black tape or shrink tube
-Razor knife or poking tool
-1/4” and 1” drill bit or step bit (if holes are not pre-drilled at the factory)
-Drill
-RTV or butyl sealant
Section 1: Setting up for the installation
BEFORE YOU BEGIN
Cables: The camera harness is 4 feet long and will get you through the bottom of your tailgate and
through the back of the bed. The chassis harness is 25’ long and is designed so that all electrical
connections can be made inside the cab as per the wiring instructions contained in this document. The
camera connector should be tied up in an accessible location by the spare tire area so it can be accessed
for tailgate removal.
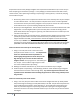
If you are using the factory NAV screen as your display: You must have the dealer re-flash your NAV
system for a backup camera. Any GM dealer can do it and it should cost around $100 or less. Just ask
them to apply part #2583-6479 to the navigation unit. In addition, you may need a video interface that
allows you to connect the camera to the factory wiring harness at the back of the radio. We stock the
GMX-550 NAV interface and the VSS pigtail adapter so check out our online catalog if you need an
interface for your navigation. You may also be able to connect directly to the navigation video input but
it would require you to splice your RCA cable to the factory harness– see Appendix A.
If you are using an aftermarket navigation display you should already have the proper video input and
reverse trigger wire required for this installation.