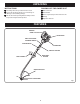
OPERATOR’S MANUAL Trimmer PLT3043A RY70101 Your new trimmer has been engineered and manufactured to Ryobi’s high standard for dependability, ease of operation and operator safety. Properly cared for, it will give you years of rugged, trouble-free performance. WARNING: To reduce the risk of injury, the user must read and understand the operator’s manual. Thank you for buying a Ryobi trimmer.
TABLE OF CONTENTS Q Safety ..................................................................................................................................................................... 2 - 3 Q Symbols ................................................................................................................................................................. 4 - 5 Q Technical Data ......................................................................................................................
SAFETY Q Secure long hair so it is above shoulder level to prevent entanglement in any moving parts. Q Keep all bystanders, children and pets at least 15 m (50 ft) away. Q Do not operate this unit when you are tired, ill or under the influence of alcohol, drugs or medication. Q Do not operate in poor lighting. Q Keep firm footing and balance. Do not overreach. Overreaching may result in loss of balance or exposure to hot surfaces. Q Keep all parts of your body away from any moving part.
SYMBOLS Important: Some of the following symbols may be used on your tool. Please study them and learn their meaning. Proper interpretation of these symbols will allow you to operate the tool better and more safely. SYMBOL NAME EXPLANATION Safety Alert Symbol Indicates danger, warning or caution. It means attention!!! Your safety is involved. Read Your Operator’s Manual Your manual contains special messages to bring attention to potential safety concerns as well as operating and servicing information.
SYMBOLS The purpose of safety symbols is to attract your attention to possible dangers. The safety symbols, and the explanations with them, deserve your careful attention and understanding. The safety warnings do not by themselves eliminate any danger. The instructions or warnings they give are not substitutes for proper accident prevention measures. SYMBOL MEANING DANGER: Indicates an imminently hazardous situation which, if not avoided, will result in death or serious injury.
UNPACKING INSTRUCTIONS PACKING LIST FOR OWNER’S KIT Q Carefully remove the product from the carton. Q Inspect the product to make sure no breakage or damage occurred during carriage. Q Do not discard the packing material until you have inspected and operated the product.
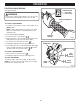
ASSEMBLY ASSEMBLY INSTRUCTIONS: GRASS DEFLECTOR See Figure 2. FRONT HANDLE 1. Remove wing nut, flat washer, lock washer and bolt from the Owner’s Kit. WING NUT 2. Place grass deflector over shaft and bracket. 3. Install bolt through the slots in the tabs on grass deflector and bracket on drive shaft housing. 4. Install flat washer, lock washer and wing nut. 5. Tighten securely. BOLT GRASS DEFLECTOR Fig. 3 SILENCER GUARD ASSEMBLY BOLT See Figure 4. 1.
OPERATION FUEL AND REFUELLING WARNING HANDLING THE FUEL SAFELY Q Always handle fuel with care; it is highly flammable. Q Always refuel outdoors where there are no sparks and flames. Do not inhale fuel vapour. Q Do not let petrol or oil come in contact with your skin. Q Keep petrol and oil away from the eyes. If petrol or oil comes in contact with the eyes, wash them immediately with clean water. If irritation is still present, see a doctor immediately. Q Clean up spilled fuel immediately.
OPERATION ADVANCING THE STRING ADVANCING STRING USING THE EZ LINE™ TAP ADVANCE SYSTEM String advance is controlled by tapping string head on grass while running engine at full throttle. 1. Run engine at full throttle. 2. Tap string head on ground to advance string. String advances each time the head is tapped. 3. Several taps may be required until string strikes the cut off blade. 4. Resume trimming.
OPERATION STARTING AND STOPPING See Figures 8 and 9. IGNITION SWITCH I = ON TO RUN O = OFF TO STOP WARNING Never start or run the engine inside a closed or poorly ventilated area; breathing exhaust fumes can kill. THROTTLE INTERLOCK TO START A COLD ENGINE: 1. Lay trimmer on a flat, bare surface. Move switch to “I” (RUN) position. NOTE: Unit is equipped with a positive on-off switch. Make sure switch is in the “I” (RUN) position before starting the unit. 2. Push primer bulb 8 to 10 times. 3.
MAINTENANCE WARNING: Use only original manufacturer’s replacement parts, accessories and attachments. Failure to do so can cause possible injury, poor performance and may void your warranty. 6. Make sure the string head and the spool retainer are installed on the drive shaft by turning the retainer anticlockwise to tighten. 7. Pull the strings again to rotate the spool into cutting position.
MAINTENANCE STRING REPLACEMENT See Figures 12, 13, 14 and 15. SPRING 1. Stop the engine, disconnect the sparking plug wire. Hold the string head and unscrew the spool retainer. Turn anticlockwise. SPOOL ARROWS ON SPOOL 2. Remove the spool from the string head. NOTE: Keep the spring attached to the spool. Remove any old string remaining on the spool. 3. Cut two pieces of string, each being approximately 2.7 m (9 ft) long. ANCHOR HOLE 4.
MAINTENANCE REPLACING AND CLEANING AIR FILTER See Figures 16 and 17. LATCH For proper performance and long life, keep air filter clean. 1. Remove the air filter cover by pushing down on the latch with your thumb while gently pulling on the cover. PULL COVER TO OPEN 2. Remove the filter and clean it in warm soapy water. Rinse and let dry completely. For best performance, replace annually. 3. Install the filter, align tabs, push in, and make sure the latches are locked into place. FUEL CAP Fig.
TROUBLESHOOTING IF THESE SOLUTIONS DO NOT SOLVE THE PROBLEM, CONTACT YOUR AUTHORISED SERVICE DEALER. PROBLEM POSSIBLE CAUSE SOLUTION Engine will not start: 1. No spark. 1. Check spark. Remove sparking plug. Reattach the sparking plug cap and lay sparking plug on metal cylinder. Pull the starter rope and watch for spark at sparking plug tip. If there is no spark, repeat test with a new sparking plug. 2. Push primer bulb until bulb is full of fuel.
TROUBLESHOOTING IF THESE SOLUTIONS DO NOT SOLVE THE PROBLEM, CONTACT YOUR AUTHORISED SERVICE DEALER. PROBLEM POSSIBLE CAUSE SOLUTION Grass wraps round drive shaft housing and string head: 1. Cutting tall grass at ground level. 2. Operating trimmer at part throttle. 1. Cut tall grass from the top down. 2. Operate trimmer at full throttle. Spool retainer hard to turn: Screw threads dirty or damaged. Clean threads and lubricate with grease - if no improvement, replace spool retainer.
WARRANTY GUARANTEE – STATEMENT (RTSA / RTUK / RTG) All Ryobi products are guaranteed from defects in material and workmanship for a period of twenty-four (24) months, effective and evidenced from date of original invoice or delivery note. Defects caused by normal wear and tear, unauthorised/improper maintenance/handling or overload are excluded from this guarantee, as are accessories such as battery packs, bulbs, blades and bits etc.
NOTES 17
OPERATOR’S MANUAL Trimmer PLT3043A RY70101 Ryobi Technologies GmbH Itterpark 7 D-40724 Hilden Germany Tel.: +49 (0)2103 / 29 58 0 Fax : +49 (0)2103 / 29 58 29 info@ryobi-rtg.