
User manual
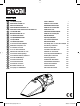


4
English
GB
FR DE ES IT NL PT DK SE FI NO RU PL CZ HU RO LV LT EE HR SI SK GR TR
OPERATION
WARNING:
Always wear safety goggles or safety glasses with
side shields when operating products. Failure to
do so could result in objects being thrown into
your eyes, resulting in possible serious injury.
WARNING:
Do not use any attachments or accessories
not recommended by the manufacturer of this
product. The use of attachments or accessories
not recommended can result in serious personal
injury.
APPLICATIONS
You may use this product for the purposes listed below:
■ Light-duty vacuuming of dry surfaces.
WARNING
Always remove battery pack from your tool when
you are assembling parts, making adjustments,
cleaning, or when not in use. Removing battery
pack will prevent accidental starting that could
cause serious personal injury.
BATTERY PROTECTION FEATURES
Ryobi 18 V lithium-ion batteries are designed with
features that protect the lithium-ion cells and maximize
battery life. Under some operating conditions, these
built-in features may cause the battery and the tool it is
powering to act differently from nickel-cadmium batteries.
During some applications, the battery electronics may
signal the battery to shut down, and cause the tool to
stop running. To reset the battery and tool, release the
trigger and resume normal operation.
NOTE: To prevent further shut down of the battery, avoid
forcing the tool.
If releasing the trigger does not reset the battery and
tool, the battery pack is depleted. If depleted, the battery
pack will begin charging when placed on the lithium-ion
charger.
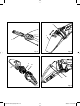
TO INSTALL BATTERY PACK
See Figure 1.
■ Make sure the slide switch is in the off position
■ Insert the battery pack into the product as shown.
■ Make sure the latches on each side of the battery
pack snap in place and that battery pack is secured in
the product before beginning operation.
TO REMOVE BATTERY PACK
■ Depress the latches on each side of the battery pack.
■ Remove the battery pack from the vacuum.
WARNING
Battery products are always in operating
condition. Therefore, the switch should always be
locked when not in use or carrying at your side.
STARTING/STOPPING THE VACUUM
See Figure 2,
■ To start the vacuum: slide the switch toward the
front of the vacuum.
■ To stop the vacuum: slide the switch toward the
back of the vacuum.
BRUSH/CREVICE ATTACHMENT
See Figures 3 - 5,.
The combination brush/crevice attachment is
conveniently stored on the underside of the dust bowl.
To detach the brush/crevice attachment, pull it forward
and remove it from the dust bowl.
The cover of the brush/crevice attachment slides forward
to cover the brush so the attachment can be used as a
crevice tool.
■ Turn off the vacuum.
■ Remove the battery pack.
■ Insert the attachment into the front end of the vacuum
dust bowl, making sure the attachment is firmly
pushed into place.
MAINTENANCE
WARNING:
When servicing, use only identical replacement
parts. Use of any other parts may create a hazard
or cause product damage.
WARNING:
Always wear safety goggles or safety glasses with
side shields during product operation or when
blowing dust. If operation is dusty, also wear a
dust mask.
GENERAL MAINTENANCE
Avoid using solvents when cleaning plastic parts. Most
plastics are susceptible to damage from various types of
commercial solvents and may be damaged by their use. Use
clean cloths to remove dirt, dust, oil, grease, etc.
CHV182 manual (EU).indd Sec1:4CHV182 manual (EU).indd Sec1:4 3/4/09 7:54:18 PM3/4/09 7:54:18 PM