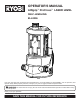
OPERATOR’S MANUAL AIRgrip™ ProCross™ LASER level self-leveling ELL0006 Your laser level has been engineered and manufactured to our high standard for dependability, ease of operation, and operator safety. When properly cared for, it will give you years of rugged, trouble-free performance. WARNING: To reduce the risk of injury, the user must read and understand the operator’s manual before using this product. Thank you for your purchase.
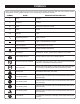
TABLE OF CONTENTS Introduction...................................................................................................................................................................... 2 General Safety Rules........................................................................................................................................................ 3 Symbols...........................................................................................................................
GENERAL SAFETY RULES Do not place the unit in a position that may cause anyone to stare into the laser beam intentionally or unintentionally. Serious eye injury could result. WARNING! READ AND UNDERSTAND ALL INSTRUCTIONS. Failure to follow all instructions listed below, may result in electric shock, fire and/or serious personal injury. Do not operate the laser level around children or allow children to operate the product. Serious eye injury could result.
SYMBOLS Some of the following symbols may be used on this product. Please study them and learn their meaning. Proper interpretation of these symbols will allow you to operate the product better and safer.
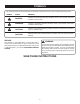
SYMBOLS The following signal words and meanings are intended to explain the levels of risk associated with this product. SYMBOL SIGNAL MEANING DANGER: Indicates an imminently hazardous situation, which, if not avoided, will result in death or serious injury. WARNING: Indicates a potentially hazardous situation, which, if not avoided, could result in death or serious injury. CAUTION: Indicates a potentially hazardous situation, which, if not avoided, may result in minor or moderate injury.
FEATURES PRODUCT SPECIFICATIONS Recommended Use.....................................................................................................................................................Indoors AIRgrip Power Supply........................................................................................................... 2 AA, 1.5 Volt Alkaline Batteries Laser Power Supply.............................................................................................................. 2 AA, 1.
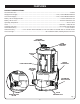
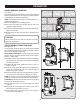
FEATURES TRIPOD ADAPTOR and adaptor storage PUSH PIN and pin storage ROUGH SURFACE ADAPTOR PUSH PIN HOLES HOOK-AND-LOOP STRAP STRAP LOOPS MULTI-FUNCTION BASE Fig. 2 KNOW YOUR CROSSHAIR LASER LEVEL LASER POWER/MODE SELECTOR See Figures 1 - 2. The safe use of this product requires an understanding of the information on the product and in this operator’s manual as well as a knowledge of the project you are attempting.
ASSEMBLY UNPACKING WARNING: This product has been shipped completely assembled. n Carefully remove the product and any accessories from the box. Make sure that all items listed in the packing list are included. n Inspect the product carefully to make sure no breakage or damage occurred during shipping. n Do not discard the packing material until you have carefully inspected and satisfactorily operated the product. n If any parts are damaged or missing, please call 1-800-525-2579 for assistance.
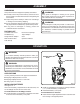
OPERATION Rotate the laser lens housing until the battery compartment comes into view. laser lens housing Remove battery cover plate. Install two AA batteries according to polarity indicators (+ or −) inside the battery compartment. ROTATIONAL ADJUSTMENT KNOB Reinstall the battery cover plate. NOTE: Remove the batteries from both the vacuum base and the laser if you will not be using the unit for an extended time. battery cover plate TURNING THE VACUUM BASE ON/OFF See Figure 5.
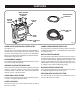
OPERATION ROUGH SURFACE ADAPTOR See Figure 7. By using the rough surface adaptor, you can use the AIRgrip feature to position the unit on many non-smooth surfaces, including brick and painted cinder block. NOTE: The AIRgrip feature cannot be used with stucco or unpainted cinder block. Place the adaptor over the AIRgrip base. Place the unit against the desired surface and press slightly to engage the seal. Continue to hold the unit against the surface while pressing the on/off button.
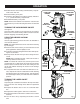
OPERATION using a TRIPOD See Figure 10. The laser level has a 5/8 in.-20 threaded fitting for attaching to a tripod base (not included). This method of mounting is ideal for leveling kitchen cabinets, countertops, window framing, and more. If a 1/4 in. tripod fitting is needed, thread the adaptor inside the 5/8 in. mounting hole and tighten with a flat blade screwdriver before attaching to tripod. CAUTION: Use caution when using laser level in base.
MAINTENANCE Store the unit indoors. WARNING: When not in use, the vacuum base and attachments should be kept in the protective case. To avoid serious personal injury, always remove the batteries from the product when cleaning or performing any maintenance. Keep the unit free of dust and liquids. Use a damp cloth and mild soap to clean the outside casing. Avoid using solvents when cleaning plastic parts.
troubleshooting Problem Vacuum not running. Possible Cause Solution Batteries are low. Replace batteries. Power is turned off. Press on/off button. Laser line projection is weak. Batteries are low. Replace batteries. Laser line is hard to see. Light in area is too bright. Dim light in the work area or use laser-enhancing glasses. Line is being projected beyond the specifications listed earlier in this manual.
OPERATOR’S MANUAL AIRgrip™ ProCross™ LASER level self-leveling ELL0006 • SERVICE This product has no serviceable parts. If unit fails due to normal wear and tear within two years of purchase, return with original receipt for a replacement unit at no charge. Please call 1-800-525-2579 for the nearest Authorized Service Center. You can also check our web site at www.ryobitools.com for a complete list of Authorized Service Centers. • MODEL NO. AND SERIAL NO.