OPERATOR'S MANUAL BELT SANDER BE318 DOUBLE INSULATED Your new sander has been engineered and manufactured to Ryobi's high standard for dependability, ease of operation, and operator safety. Properly cared for, it will give you years of rugged, trouble-free performance. WARNING: To reduce the risk of injury, the user must read and understand the operator’s manual. Thank you for buying a Ryobi belt sander.
TABLE OF CONTENTS Introduction ........................................................................................................................................................ 2 General Safety Rules ..................................................................................................................................... 3-4 Specific Safety Rules ......................................................................................................................................
GENERAL SAFETY RULES WARNING: Read and understand all instructions. Failure to follow all instructions listed below, may result in electric shock, fire and/or serious personal injury. SAVE THESE INSTRUCTIONS WORK AREA Keep your work area clean and well lit. Cluttered benches and dark areas invite accidents. Do not operate power tools in explosive atmospheres, such as in the presence of flammable liquids, gases, or dust. Power tools may create sparks which may ignite the dust or fumes.
GENERAL SAFETY RULES SERVICE Tool service must be performed only by qualified repair personnel. Service or maintenance performed by unqualified personnel could result in a risk of injury. When servicing a tool, use only identical replacement parts. Follow instructions in the Maintenance section of this manual. Use of unauthorized parts or failure to follow Maintenance Instructions may create a risk of electric shock or injury.
SYMBOLS Important: Some of the following symbols may be used on your tool. Please study them and learn their meaning. Proper interpretation of these symbols will allow you to operate the tool better and safer.
SPECIFICATIONS Belt Size 3 in. X 18 in. (7.6 cm X 45.7 cm) Sanding Surface 15 square in. (96.8 square cm) 700 surface ft./min.* No Load Speed Input 120 Volts, 60 Hz, AC only, 5 amps Net Weight 6.3 lbs. (2.8 kg) * Speed at which the belt moves UNPACKING INSTRUCTIONS PACKING LIST Your sander has been shipped completely assembled. Carefully remove the tool and accessories from the box. Make sure that all items listed in the packing list are included.
FEATURES DOUBLE INSULATION ELECTRIC MOTOR Double insulation is a concept in safety in electric power tools, which eliminates the need for the usual three-wire grounded power cord. All exposed metal parts are isolated from the internal metal motor components with protecting insulation. Double insulated tools do not need to be grounded. Your sander has a precision built electric motor. It should be connected to a power supply that is 120 volts, 60 Hz, AC only (normal household current).
FEATURES DUST COLLECTION BAG FRONT HANDLE REAR HANDLE TENSION RELEASE LEVER SANDING BELT Fig. 1 WARNING: Do not attempt to modify this tool or create accessories not recommended for use with this tool. Any such alteration or modification is misuse and could result in a hazardous condition leading to possible serious personal injury.
OPERATION WARNING: Always wear safety goggles or safety glasses with side shields when operating this tool. Failure to do so could result in dust, shavings, or loose particles being thrown into your eyes, resulting in possible serious injury. TURNING THE SANDER ON/OFF See Figure 2. Follow these directions to turn the sander on and off. To turn on the sander: Depress the switch trigger. To turn off the sander: Release the switch trigger. DEPRESS TO TURN ON SANDER Fig. 2 LOCKING ON See Figure 3.
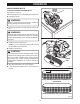
OPERATION USING SANDING BELTS TENSION RELEASE LEVER TO INSTALL/CHANGE SANDING BELTS See Figures 4, 5, and 6. Follow these directions to install/change sanding belts. Unplug the sander. WARNING: Failure to unplug the tool could result in accidental starting causing possible serious injury. Position the sander on its side with the cord on the left. WARNING: Keep hands and fingers clear of front idler roller and spring mechanism at all times.
OPERATION TO ADJUST SANDING BELT TRACKING See Figures 7 and 8. Belt life is greatly increased if you regularly adjust the sanding belt tracking. When correctly adjusted, the outer edge of the sanding belt should be even with the outer edge of the base of the sander. When you install a new sanding belt, you may need to adjust the sanding belt tracking several times until the belt becomes pliable. Follow these directions to adjust sanding belt tracking.
OPERATION USING THE DUST COLLECTION BAG The dust collection bag provides a dust collection system for the sander. BLOWER EXHAUST HOLE TO ATTACH THE DUST COLLECTION BAG See Figure 9. Follow these directions to attach the dust collection bag. Unplug the sander. WARNING: Failure to unplug the tool could result in accidental starting causing possible serious injury. Slide the dust bag retainer over the blower exhaust hole on the sander.
OPERATION OPERATING THE SANDER See Figure 10. Follow these steps to operate the sander. Secure the work to prevent it from moving under the sander. WARNING: Unsecured work could be thrown towards the operator causing injury. Turn the sander on and let the motor reach its maximum speed before placing the sander on the work surface. Lower the sander to the work surface with a slight forward motion.
OPERATION The front roller of the sander is not designed for contour sanding. Sanding on the front roller could cause irregularity in the sanding belt tracking. HELPFUL TIPS If the sanding belt slips or doesn’t track while sanding, you may be applying too much pressure. When this occurs, remove the sander from the workpiece. If you properly adjust the belt tracking, the sanding belt will return to its normal and correct position on the driver roller and front roller.
MAINTENANCE REPLACING THE TIMING BELT See Figures 12 and 13. Follow these directions to replace the timing belt. Unplug the sander. WARNING: Failure to unplug the tool could result in accidental starting causing possible serious injury. Remove the sanding belt from the sander. Refer to “TO INSTALL/CHANGE SANDING BELTS” earlier in this manual. Remove the belt cover screws and the belt cover. SMALL PULLEY TIMING BELT WARNING: LARGE PULLEY Fig.
OPERATOR'S MANUAL BELT SANDER BE318 DOUBLE INSULATED EXTENSION CORD CAUTION When using a power tool at a considerable distance from a power source, be sure to use an extension cord that has the capacity to handle the current the tool will draw. An undersized cord will cause a drop in line voltage, resulting in overheating and loss of power. Use the chart to determine the minimum wire size required in an extension cord. Only round jacketed cords should be used.