
Instructions / Assembly

26 - English
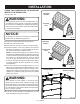
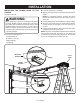
To mount the power head to finished ceilings:
Install center bracket or brackets (not supplied) to the
nearest joists or other structural supports in garage ceiling
using lag screws (not supplied).
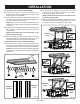
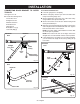
Using a hack saw, cut pieces of the mounting straps that
are a half inch longer than the measured length between
the header bracket and the ceiling.
NOTE: Mounting straps that will be attached diagonally
should be cut longer than the vertical measured distance
in figure 33.
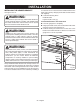
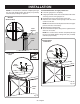
Connect straps to garage door opener and brackets using
bolts, washers, and nuts. Tighten bolts and nuts with a
10 mm socket.
NOTE: Install straps and nuts on the inside of the
brackets (facing the rail).
Remove the ladder and raise the door. If there isn’t enough
clearance between the rail assembly and the door, move
the header bracket up and repeat the steps above.
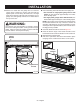
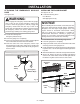
To mount the power head to unfinished ceilings:
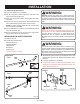
Using a hack saw, cut pieces of the mounting straps that
are a half inch longer than the measured lengths between
the header bracket and the nearest joists on either side.
NOTE: Mounting straps that will be attached diagonally
should be cut longer than the vertical measured distance
in figure 33.
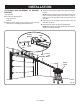
Fig. 34
Fig. 36
Fig. 37
Fig. 38
Connect straps to garage door opener and to the joists
using bolts, washers, and nuts (see figure 38). Tighten
bolts and nuts with a 10 mm socket.
NOTE: Install straps and nuts on the inside of the
brackets (facing the rail).
Remove the ladder and raise the door. If there isn’t enough
clearance between the rail assembly and the door, move
the header bracket up and repeat the steps above.
Fig. 35
Measured
Distance
Power
Head
Power
Head
Power
Head
Mounting
Strap
Mounting
Strap
Mounting
Strap
Mounting
Strap
Center
Bracket
Joists
INSTALLATION