
Instructions / Assembly


33 - English
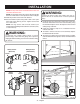
Screw
Pencil
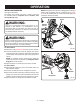
Insert a flat head screwdriver into the tabs on the indoor
keypad and remove the back cover.
Hold the back cover against the wall. Use a pencil and a
level to mark screw hole placement.
Mount the back cover to the wall using screws. Install
screws using Phillips screwdriver.
NOTE: Use screws and drywall anchors when installing
the keypad into drywall.
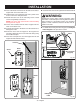
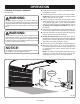
Fit the wires included with the indoor keypad into the
notch on the back cover.
Connect the keypad to the back cover. Be careful not to
damage the wires.
Route the wires from the keypad to the keypad wire
terminals. Attach the wires to the wall and ceiling using
the insulated staples.
Insert the red striped wire from the keypad into the left
keypad terminal marked with R.
Fig. 59
Fig. 60Fig. 58
Notch
Back
Cover
Insert the white wire into the right terminal marked with W.
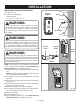
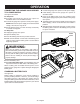
WARNING:
Entrapment warning label contains important safety
information. Install entrapment warning label next to the
indoor keypad in a prominent location. Use insulated
staples or other mechanical means if the label will not
adhere to the wall.
For details about using the indoor keypad, see Using the
Indoor Keypad in the Operations section.
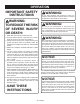
Child can become trapped or pinned under an automatic garage door resulting
in serious injury or death.
• Do not allow children to walk or run under a closing door.
• Do not allow children to operate door opener controls.
• Always keep a closing door within sight.
• In the event a person is trapped under the door, push the control button or
use the emergency release.
• This operator system is equipped with an unattended operation feature. The
door could move unexpectedly. Not intended for use with single panel garage
doors.
Test door opener monthly:
• Refer to Operator’s Manual.
• Use a 1 ½ inch thick object (or 2 X 4 laid flat) placed on the floor under the
closing door.
• In the event the door does reverse upon contact, adjust, repair, or replace the
opener.
Do not remove or paint over this label.
Mount this label next to the wall control.
Mount the wall control out of the reach of children at least 5 feet above the floor.
Fig. 57
Entrapment
Label
Screws
Wires
Wire Terminal
(Keypad)
Wires
INSTALLATION