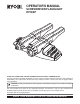
OPERATOR'S MANUAL SCREWDRIVER/FLASHLIGHT HP36KF 13 16 19 22 THANK YOU FOR BUYING A RYOBI SCREWDRIVER/FLASHLIGHT COMBINATION KIT. Your new screwdriver/flashlight combination has been engineered and manufactured to Ryobi's high standard for dependability, ease of operation, and operator safety. Properly cared for, it will give you years of rugged, troublefree performance. CAUTION: Carefully read through this entire operator's manual before using your new screwdriver/flashlight combination.
TABLE OF CONTENTS ■ Introduction ........................................................................................................................................................ 2 ■ General Safety Rules .....................................................................................................................................3-4 ■ Specific Safety Rules ......................................................................................................................................
GENERAL SAFETY RULES SAVE THESE INSTRUCTIONS ■ Remove adjusting keys or wrenches before turning the tool on. A wrench or a key that is left attached to a rotating part of the tool may result in personal injury. ■ Do not overreach. Keep proper footing and balance at all times. Proper footing and balance enables better control of the tool in unexpected situations. Do not use on a ladder or unstable support. ■ Use safety equipment. Always wear eye protection.
GENERAL SAFETY RULES ■ SERVICE ■ Tool service must be performed only by qualified repair personnel. Service or maintenance performed by unqualified personnel may result in a risk of injury. When servicing a tool, use only identical replacement parts. Follow instructions in the Maintenance section of this manual. Use of unauthorized parts or failure to follow Maintenance Instructions may create a risk of shock or injury.
SPECIFIC SAFETY RULES ■ CHARGER SAFETY INSTRUCTIONS ■ ■ ■ ■ ■ ■ ■ ■ ■ Save these instructions. This manual contains important safety and operating instructions for charger. Following this rule will reduce the risk of electric shock, fire, or serious personal injury. Before using battery charger, read all instructions and cautionary markings in this manual, on battery charger, and product using battery charger.
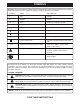
SYMBOLS Important: Some of the following symbols may be used on your tool. Please study them and learn their meaning. Proper interpretation of these symbols will allow you to operate the tool better and safer.
SPECIFICATIONS Motor (Screwdriver) 3.6 Volts DC Collet (Screwdriver) 1/4 in. (6.4 mm) No Load Speed (Screwdriver) 180 RPM Switch (Screwdriver) Reversible Maximum Torque (Screwdriver) 45 in. lbs. Charger Rating 120 Volts, 60 Hz, AC only Charge Time 10 hours UNPACKING INSTRUCTIONS PACKING LIST Your screwdriver/flashlight combination has been shipped completely assembled. ■ Carefully remove the screwdriver, flashlight, and accessories from the box.
FEATURES SWITCH TORQUE ADJUSTMENT Your flashlight has a conveniently located trigger switch. You can easily adjust the torque of the screwdriver. The maximum torque is 45 lbs./in. ANGLE ADJUSTMENT ERGONOMIC DESIGN Your screwdriver and flashlight are both equipped with an angle adjustment feature that allows you to adjust the angle of the tools. The design of your screwdriver and flashlight provides easy handling.
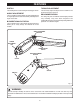
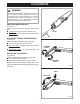
ADJUSTMENTS WARNING: Your screwdriver/flashlight combination should never be connected to power supply when you are assembling parts, making adjustments, cleaning, performing maintenance, or when not in use. Disconnecting your tools will prevent accidental starting that could cause serious injury. 22 16 19 INSERTING/REMOVING BITS 13 See Figure 2. Follow these directions when inserting and removing bits. ■ To insert bit: Insert shank end of bit into collet.
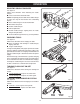
OPERATION MOUNTING CRADLE/CHARGER See Figure 5. Follow these directions when mounting the cradle/ charger. ■ Locate a convenient electrical outlet. NOTE: Temporarily place the tools in the cradle/charger to make sure they will not interfere with surrounding objects. ■ Place cradle/charger in the desired location. ■ Mark holes with pencil. ■ Remove cradle/charger. ■ Drill four pilot holes. ■ Position cradle/charger, aligning holes in cradle/ charger with pilot holes. Fig.
MAINTENANCE WARNING: When servicing use only identical Ryobi replacement parts. Use of any other parts may create a hazard or cause product damage. GENERAL REPLACING BULB Avoid using solvents when cleaning plastic parts. Most plastics are susceptible to damage from various types of commercial solvents and may be damaged by their use. Use clean cloths to remove dirt, carbon dust, etc. See Figure 9. When purchasing a replacement bulb, request part number 7803001.
OPERATOR'S MANUAL SCREWDRIVER/FLASHLIGHT HP36KF • SERVICE Now that you have purchased your tool, should a need ever exist for repair parts or service, simply contact your nearest Ryobi Authorized Service Center. Be sure to provide all pertinent facts when you call or visit. Please call 1-800-525-2579 for your nearest Ryobi Authorized Service Center. You can also check our Web site at www.ryobitools.com for a complete list of Authorized Service Centers. • MODEL NO. AND SERIAL NO.