
Use and Care Manual


11 — English
OPERATION
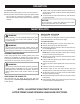
To install an auger tip:
Remove the battery pack or power cord from the tool.
Hold the cable and pull the collar back.
Slide the auger tip into into the cable’s t-slot.
Push the collar forward so that the tip is secured properly.
Check to see that the tip is secure.
To remove an auger tip:
Remove the battery pack or power cord from the tool.
Hold the cable and pull the collar back.
Remove the auger tip by sliding it out of the t-slot in the
collar.
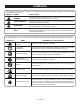
AUGER TIP SELECTION GUIDE
Standard Bulb Tip
Grab and remove small obstructions;
general purpose cleaning in drains up to
2 in. wide
Large Bulb Tip
Grab and remove large obstructions;
general purpose cleaning in drains up to
2 in. wide
Grease Tip
Cut through grease blockages in drains
up to 2 in. wide
USING THE DRAIN AUGER
See Figures 8 - 9, page 14.
The drain auger can be used to clear obstructions from a
variety of drains including sinks and bathtubs.
NOTE: This product can be used to clear drain pipes with
minimum diameters of 0.75 in. and maximum diameters of 2 in.
To clear obstructions:
When removing an obstruction from a sink or a bathtub,
it may be neccesary to remove the stopper or overflow
cover to gain access to the drain pipe.
Install the appropriate auger tip.
Connect the product to an AC or DC power supply.
Hold the drain auger within four inches of the drain or
overflow and manually feed the cable into the drain pipe.
NOTE: Advance the cable slowly at first. Advancing it too
rapidly can result in twisting or binding.
After feeding about six inches of cable into the drain, you
may begin advancing the cable using the switch trigger
or continue advancing it manually.
The cable should advance freely through the drain pipe
until it contacts the obstruction or is caught in a P-trap.
If the cable is caught in a P-trap, additional force or
increased trigger pressure should be enough to advance
it past the bend in the pipe.
If the cable has contacted an obstruction, there are two
ways to remove it:
• Leave the direction of rotation selector in the F/R
(forward/retract) position and continue squeezing
the switch trigger. Hold the trigger for several
seconds, allowing the tip of the cable to bore into
the obstruction. If the cable stops rotating, release
the switch trigger to avoid kinking or damaging
the cable. Place the feed direction selector collar
in the neutral (N) position, push the collar in, then
push or pull the cable manually until the obstruction
is dislodged. When finished, slowly retract the cable
and pull the obstruction through the drain.
• Put the direction of rotation selector in the N (neutral)
position. Place the feed direction selector collar in
the neutral (N) position, then pull it out away from
the tool. Squeeze the switch trigger. The cable will
rotate, but it will not advance. Hold the trigger for
several seconds, allowing the obstruction to wrap
around the cable. If the cable stops rotating,
release the switch trigger to avoid kinking or
damaging the cable. When finished, slowly retract
the cable and pull the obstruction through the drain.
NOTE: When removing the cable from a drain, remove it
slowly to avoid “splash back”.
NOTE: If the tip of the cable is entangled and difficult to
remove, change the direction of rotation to N (neutral) and
run the tool in neutral to unwind and disengage from the
obstruction.
Once the obstruction is cleared, run water through your
drain to confirm that the water is flowing freely.
After the cable has been properly cleaned, as described
in the next section, store the unit for later use.
CLEANING THE DRAIN AUGER
See Figure 10, page 14.
The drain auger should be cleaned after each use to prevent
contamination and residue build up.
To drain the drum:
Remove the battery pack or power cord from the tool.
Hold the tool at an angle and lift the drain tab located on
the back of the tool.
Allow any liquids inside the drum to pour down a drain
or into a container approved for liquid waste.