
Use and Care Manual

10 - English
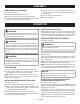
OPERATION
NOTICE:
To prevent damage, always allow the wheel to come to a
complete stop before changing the direction of rotation.
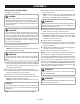
WARNING:
Battery tools are always in operating condition. Lock the
switch when not in use or carrying at your side, when
installing or removing the battery pack, and when install-
ing or removing wheels.
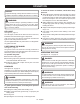
LED LIGHT
See Figure 6, page 14.
The LED lights, located at the base and front of the tool,
illuminate when the switch trigger is depressed.
If the tool is not in use, the time-out feature will cause the
lights to start fading and then shut off.
The LED lights illuminate only when there is a charged bat-
tery pack in the tool.
POSITIONING THE GUARD
See Figure 7, page 14.
The guard on the tool should be correctly positioned to
provide maximum control and protection. Never use the tool
without the guard correctly in place.
To reposition the guard:
Remove the battery pack.
Get a firm grasp of the guard with one hand and hold the
overmolded handle with the other.
Rotate the guard until it snaps securely into one of the
four fixed positions.
KICKBACK
See Figures 8 - 9, page 14.
Kickback occurs when the wheel stalls rapidly and the tool
is driven back towards you. Wheel stalling is caused by any
action which pinches the wheel in the material.
DANGER:
Release switch immediately if wheel binds or tool stalls.
Kickback could cause you to lose control of the tool. Loss
of control can lead to serious personal injury.
To guard against kickback, avoid dangerous practices
such as the following:
Twisting the cutting wheel while making a cut.
Making a cut with a dull, gummed up, or improperly set
cutting wheel.
Forcing a cut.
Operating the tool incorrectly or misusing the tool.
To lessen the chance of kickback, follow these safety
practices:
When appropriate, adjust the shoe assembly up or down
to set the depth of cut. The shoe assembly should be
positioned so that very little of the cutting wheel is visible
below the workpiece. The more wheel is exposed, the
more likely the tool is to bind and kickback.
Make straight cuts. Always use the shoe assembly or a
straight edge guide when rip cutting. This helps prevent
twisting the wheel.
Support and clamp the workpiece properly before begin-
ning a cut.
Use steady, even pressure when making a cut. Never
force a cut.
Always let the cutting wheel reach full speed before begin-
ning a cut.
Hold the tool firmly and keep your body in a balanced
position so as to resist the forces if kickback should occur.
WARNING:
When using the tool, always stay alert and exercise con-
trol. Do not remove the tool from the workpiece while the
cutting wheel is moving.
OPERATING THE TOOL
See Figures 10 - 12, page 14.
DANGER:
Never use the tool with the guard removed. It has been
designed for use only with the guard installed. Attempt-
ing to use tool with guard removed will result in loose
particles being thrown against the operator resulting in
serious personal injury.
WARNING:
To make cutting easier and safer, always maintain proper
control of the tool. Loss of control could cause an acci-
dent resulting in possible serious injury.
WARNING:
When lifting the tool from the workpiece, the wheel is
exposed on the underside of the tool.