
Use and Care Manual

15 — English
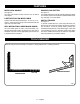
31.6
22.5
22.5
31.6
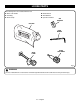
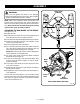
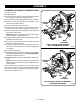
INSTALLING BATTERIES FOR LASER
See Figure 11.
Remove screw from battery compartment cover using
the Phillips end of the supplied blade wrench. Remove
cover and set aside.
Install two AAA batteries according to polarity indicators
inside the battery compartment.
Replace the battery compartment cover. Reinstall screw
and tighten securely.
DANGER:
Laser radiation. Avoid direct eye contact with light source.
WARNING:
Use of controls, adjustments, or performance of pro-
cedures other than those specified here can result in
hazardous radiation exposure.
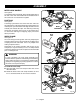
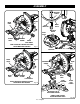
ALIGNING THE LASER GUIDE LINE
See Figure 12.
Unplug the saw. Draw a line on the workpiece. When the
laser guide switch is turned on it will generate a red line on
the work surface. This line will let you see your mark and the
laser guide line at the same time, and will assist you in lining
up the mark for more accurate cutting of the workpiece.
Align the laser line and the mark with the blade at the up-
permost position. Once both lines are in alignment, do not
move the workpiece.
Plug the saw into the power source. Make several practice
cuts on different styles and thickness of material. Repeat
the steps above as necessary.
Removing Your Mark:
Position the laser line near the left edge of your mark on the
work surface in order to remove the mark.
To Cut Your Mark:
Position the laser line near or over your mark on the work
surface in order to cut the mark.
To Leave Your Mark:
Position the laser line near the right edge of your mark on
the work surface in order to leave the mark.
After you have become familiar with using the laser guide,
you will be able to remove, cut, or leave your mark on the
work surface. Practice will teach you the correct position for
aligning the laser line with your mark.
Fig. 12
LASER
LINE
ASSEMBLY
BATTERIES
COMPARTMENT
COVER
LASER GUIDE
SWITCH
SCREW
Fig. 11