OPERATOR’S MANUAL 16 GAUGE STRAIGHT FINISH NAILER YN250FS Your straight finish nailer has been engineered and manufactured to our high standard for dependability, ease of operation, and operator safety. When properly cared for, it will give you years of rugged, trouble-free performance. WARNING: To reduce the risk of injury, the user must read and understand the operator’s manual before using this product. Thank you for your purchase.
TABLE OF CONTENTS Introduction......................................................................................................................................................................2 Warranty...........................................................................................................................................................................2 General Safety Rules...........................................................................................................
GENERAL SAFETY RULES Do not overreach. Keep proper footing and balance at all times. Proper footing and balance enables better control of the tool in unexpected situations. DANGER: READ AND UNDERSTAND TOOL LABELS AND MANUAL. Failure to follow warnings could result in DEATH or SERIOUS INJURY. Use safety equipment. Always wear eye protection. Dust mask, nonskid safety shoes, hard hat, or hearing protection must be used for appropriate conditions. Do not use on a ladder or unstable support.
SPECIFIC SAFETY RULES operation Know your pneumatic tool. Read operator’s manual carefully. Learn its applications and limitations, as well as the specific potential hazards related to this tool. Following this rule will reduce the risk of electric shock, fire, or serious injury. Always assume that the tool contains fasteners. Do not carry the tool from place to place holding the trigger. Accidental discharge could result.
SPECIFIC SAFETY RULES Always disconnect air supply: During normal use the tool will recoil immediately after driving a fastener. This is a normal function of the tool. Do not attempt to prevent the recoil by holding the nailer against the work. Restriction to the recoil can result in a second fastener being driven from the nailer. Grip the handle firmly and let the tool do the work. Failure to heed this warning can result in serious personal injury.
SYMBOLS Some of the following symbols may be used on this tool. Please study them and learn their meaning. Proper interpretation of these symbols will allow you to operate the tool better and safer. SYMBOL NAME DESIGNATION/EXPLANATION Read The Operator’s Manual To reduce the risk of injury, user must read and understand operator’s manual before using this product.
GLOSSARY OF TERMS Activate (operating controls) To move an operating control so that it is in a position that allows the tool to be actuated or that satisifes one requirement for the tool to be actuated. Actuate (tool) To cause movement of the tool component(s) intended to drive a fastener. Air inlet port In an air tool, the opening to which the compressed air supply is connected, usually by means of a threaded fitting.
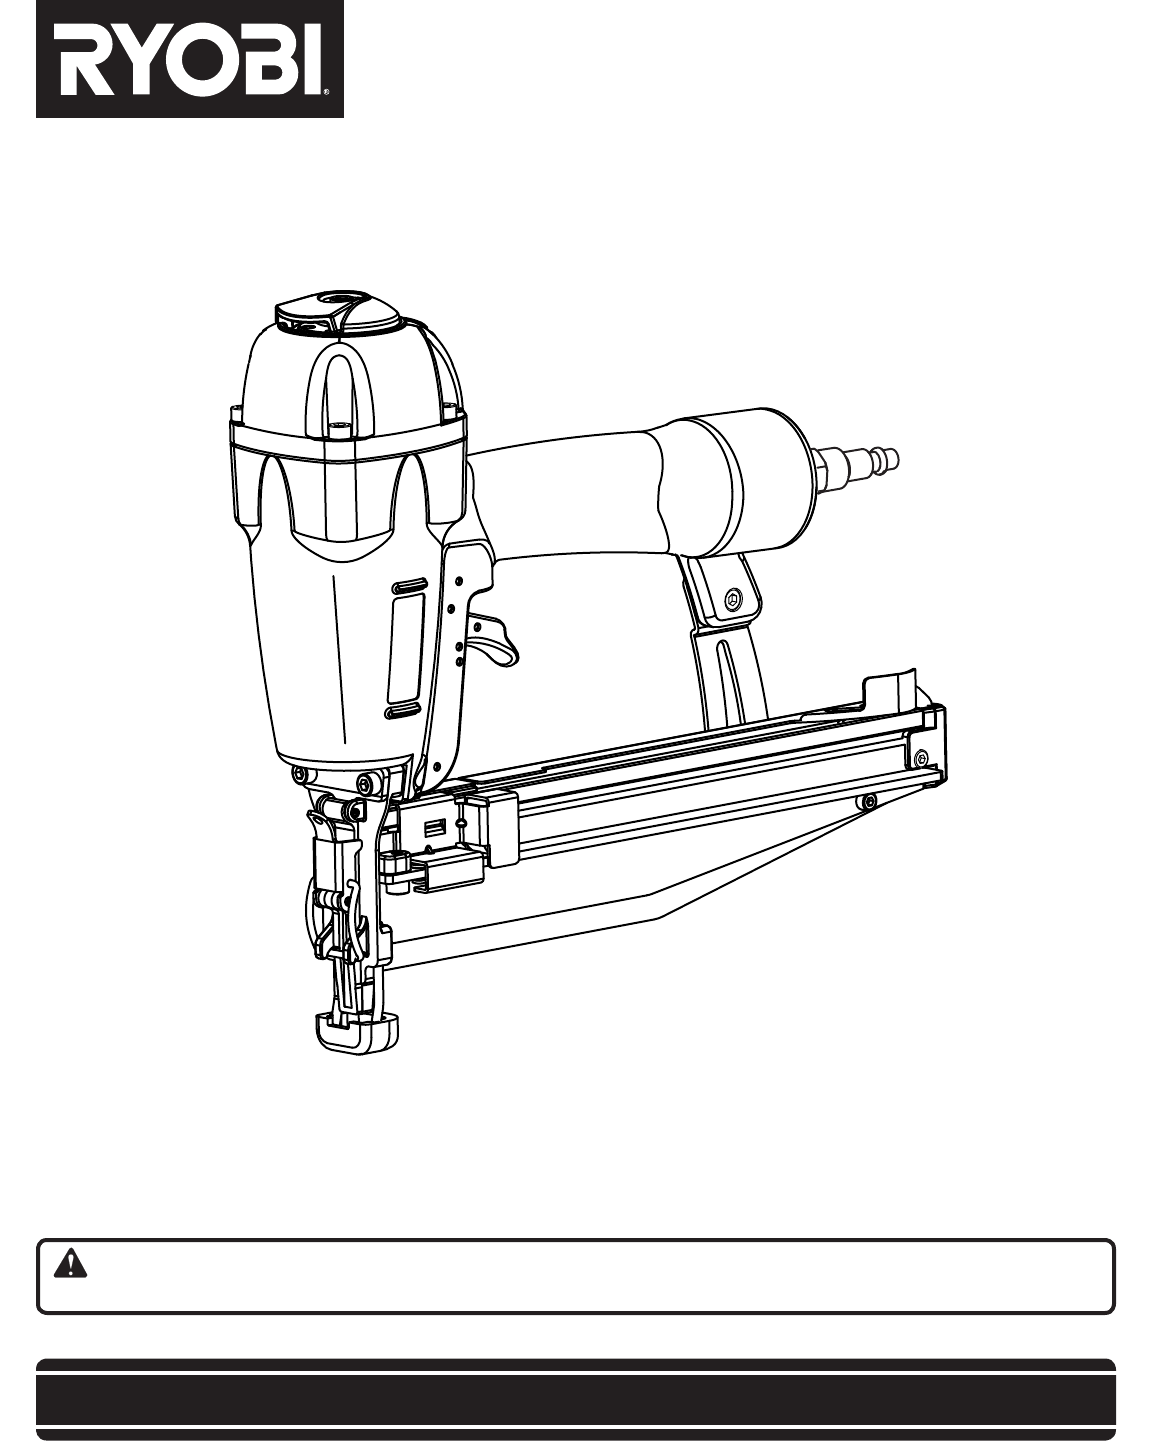
FEATURES PRODUCT SPECIFICATIONS Air Consumption............................ 0.05 ft3/cycle at 100 psi Air Inlet............................................................... 1/4 in. NPT Weight......................................................................... 4 lbs. Operating Pressure............................................. 70-120 psi Fastener Type...................................... 16 gauge finish nails Fastener Range...........................................1 in. to 2-1/2 in.
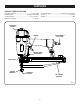
FEATURES KNOW YOUR straight finish nailer jam release See Figure 1. The safe use of this product requires an understanding of the information on the product and in this operator’s manual as well as a knowledge of the project you are attempting. Before use of this product, familiarize yourself with all operating features and safety rules. A tool-free jam release is provided for ease in clearing infrequent jams.
OPERATION APPLICATIONS DANGER: You may use this tool for the purpose listed below: Finish and Trim (Interior and exterior) Do not use oxygen, combustible gases or bottled gases as a power source for this tool. The tool will explode and cause death or serious injury. Door & Window Casing Door Jambs Baseboard WARNING: Crown Molding Cabinetry Do not allow familiarity with tools to make you careless. Remember that a careless fraction of a second is sufficient to inflict severe injury.
OPERATION WARNING: QUICK-CONNECT air fitting Always wear eye protection. Eye protection does not fit all operators in the same way. Make sure the eye protection chosen has side shields or provides protection from flying debris both from the front and sides. PREPARING the tool for use See Figure 2. Under normal use conditions, the tool should be lubricated before connecting the tool to an air supply.
OPERATION WARNING: QUICK-CONNECT AIR FITTING Disconnect the tool from the air supply before leaving the work area, moving the tool to another location, or handing the tool to another person. Failure to do so could result in serious personal injury. CONNECTING THE TOOL TO AN AIR SUPPLY See Figure 5. AIR HOSE CONNECTOR DANGER: Do not use oxygen, combustible gases or bottled gases as a power source for this tool. The tool will explode and cause death or serious injury.
OPERATION loading the tool with NAILS See Figures 6 - 7. Connect the tool to the air supply. WARNING: NAILS The tool’s driving mechanism may cycle when the tool is first connected to the air supply. Always connect the tool to the air supply before loading nails to prevent injury from unintended cycling. Always make sure the tool’s magazine is empty at the beginning of each work session, before connecting to an air supply.
OPERATION DRIVING A FASTENER See Figure 8. WARNING: Never wedge or hold back the workpiece contact mechanism during operation of the tool. Doing so could result in possible serious injury. SINGLE SEQUENTIAL ACTUATION TRIGGER Single sequential actuation provides accurate fastener placement. Connect the tool to the air supply. Grip the tool firmly to maintain control. Position the nose of the tool onto the work surface. Push the tool against the work surface to depress the workpiece contact.
OPERATION setting the AIR pressure The amount of air pressure required will depend on the size of the nail and the workpiece material. Begin testing the depth of drive by driving a test nail into the same type of workpiece material used for the actual job. Drive a test nail with the air pressure set at 90-95 psi. Raise or lower the air pressure to find the lowest setting that will perform the job with consistent results. It may be possible to achieve the desired depth with air pressure adjustments alone.
OPERATION WARNING: Disconnect the tool from the air supply before clearing a jammed fastener. Failure to do so could result in serious personal injury. CLEARING A JAMMED FASTENER See Figure 11. If a nail or fastener becomes jammed in the tool, disconnect the air hose and keep the tool pointed away from you while clearing the jam. Disconnect the tool from the air supply. Remove fasteners from the tool. Pull up on the latch and open the jam release.
MAINTENANCE LUBRICATION WARNING: Frequent, but not excessive, lubrication is required for best performance. Oil for pneumatic fastening tools added through the air line connection will lubricate the internal parts. Do not use detergent oil or additives as these lubricants will cause accelerated wear to the seals and bumpers in the tool, resulting in poor tool performance and frequent tool maintenance. When servicing use only identical replacement parts.
MAINTENANCE REQUIRED DAILY CHECKLIST With the workpiece contact not engaged on the workpiece, point the tool down and away and pull the trigger several times. Hold the trigger in this position for a minimum of 5 seconds. The tool must not operate. Disconnect the air supply from the tool and remove all fasteners. Check all screws, nuts, bolts, and pins on the tool. If any of these are loose, they must be tightened with the appropriate size wrench.
TROUBLESHOOTING PROBLEM POSSIBLE CAUSE SOLUTION Air leak near the top of the tool or in the trigger area Loose screws Worn or damaged O-rings or seals Tighten screws Install Overhaul Kit Air leak near the bottom of the tool Worn or damaged O-rings or bumper Install Overhaul Kit Tool does nothing or operates sluggishly Inadequate air supply Inadequate lubrication Worn or damaged O-rings or bumper Verify adequate air supply Lubricate tool Install Overhaul Kit Tool jams frequently Incorrect fasten
OPERATOR’S MANUAL 16 GAUGE STRAIGHT FINISH NAILER YN250FS • Parts and Service Prior to requesting service or purchasing replacement parts, please obtain your model and serial number from the product data plate. • MODEL NUMBER • SERIAL NUMBER YN250FS • How to obtain Replacement Parts: Replacement parts can be purchased online at www.ryobitools.com or by calling 1-800-525-2579. Replacement parts can also be obtained at one of our Authorized Service Centers.